You might have come across this error while dealing with the openssl module.
Inorder to solve this issue follow the following steps
Step 1: Install openssl using brew
brew install openssl
Step 2: Copy copy libssl.1.0.0.dylib and libcrypto.1.0.0.dylib
cd /usr/local/Cellar/openssl/1.0.1f/lib
sudo cp libssl.1.0.0.dylib libcrypto.1.0.0.dylib /usr/lib/
Note the bold folder name. There will be change in that depending on your openssl version
Edit (2019 July) If you are getting permission denied error even after sudo. Try copying to `/usr/local/lib ` instead. Thanks to George Hotz from comments to pointing it out.
Warning: Refusing to link: openssl
Linking keg-only openssl means you may end up linking against the insecure,
deprecated system OpenSSL while using the headers from Homebrew’s openssl.
Instead, pass the full include/library paths to your compiler e.g.:
 -I/usr/local/opt/openssl/include -L/usr/local/opt/openssl/lib
And yes we’re doom! But no worry we can manually link it with steps below.
The biggest advantage of python is the ease of use and the abundance of libraries for just about anything. With a few lines of code, there is nothing you couldn’t do. As long as your python scripts are for personal use or your target audience is technical enough, you would never even have to think about a User Interface (UI).
Sometimes, however, your target audience is not technical enough. They’d love to use your python scripts but only as long as they didn’t have to look at a single line of code. In those cases, providing command line scripts will simply not cut it. You would ideally need to provide them with a UI. Although I wouldn’t be surprised if you have your typical desktop client versus web-based UI debate, in this blog posts, the aim is to use Python exclusively.
Python Libraries Available for UI usage
There are essentially 3 big Python UI libraries; Tkinter, wxPython and PyQT. While reviewing all three, I realised that everything that I liked about Python was nowhere to be found in using these libraries. Python libraries, in general, make a very good job of abstracting away the super technical. If I needed to work with Object Oriented Programming, I might as well have loaded up Java or .Net.
Much to my delight, however, I came across a fourth option that seemed to be catering to my kind of liking. The library I begun reviewing and ultimately choosing to create Python UIs from is called PySimpleGUI. Funnily enough, this library is using all the 3 popular libraries, but abstracts away the super technical.
Without any further ado, let’s dive in and explore this library by solving a real problem at the same time.
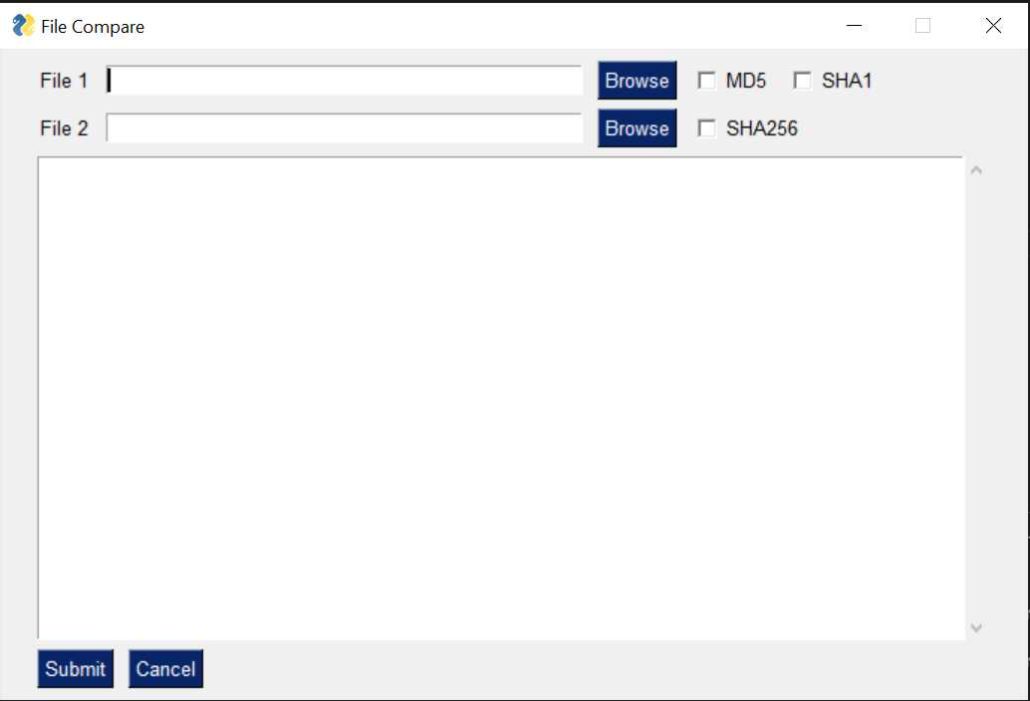
With the UI in place, it’s simple for one to see how to plug in the rest of the code. We simply need to monitor for what the user inputs and then act accordingly. We can very easily do that, with the following code.
import PySimpleGUI as sg
import re
import hashlibdef hash(fname, algo):
    if algo == 'MD5':
        hash = hashlib.md5()
    elif algo == 'SHA1':
        hash = hashlib.sha1()
    elif algo == 'SHA256':
        hash = hashlib.sha256()
    with open(fname) as handle: #opening the file one line at a time for memory considerations
        for line in handle:
            hash.update(line.encode(encoding = 'utf-8'))
    return(hash.hexdigest())layout = [
    [sg.Text('File 1'), sg.InputText(), sg.FileBrowse(),
     sg.Checkbox('MD5'), sg.Checkbox('SHA1')
     ],
    [sg.Text('File 2'), sg.InputText(), sg.FileBrowse(),
     sg.Checkbox('SHA256')
     ],
    [sg.Output(size=(88, 20))],
    [sg.Submit(), sg.Cancel()]
]window = sg.Window('File Compare', layout)while True:                             # The Event Loop
    event, values = window.read()
    # print(event, values) #debug
    if event in (None, 'Exit', 'Cancel'):
        break
    if event == 'Submit':
        file1 = file2 = isitago = None
        # print(values[0],values[3])
        if values[0] and values[3]:
            file1 = re.findall('.+:\/.+\.+.', values[0])
            file2 = re.findall('.+:\/.+\.+.', values[3])
            isitago = 1
            if not file1 and file1 is not None:
                print('Error: File 1 path not valid.')
                isitago = 0
            elif not file2 and file2 is not None:
                print('Error: File 2 path not valid.')
                isitago = 0
            elif values[1] is not True and values[2] is not True and values[4] is not True:
                print('Error: Choose at least one type of Encryption Algorithm')
            elif isitago == 1:
                print('Info: Filepaths correctly defined.')
                algos = [] #algos to compare
                if values[1] == True: algos.append('MD5')
                if values[2] == True: algos.append('SHA1')
                if values[4] == True: algos.append('SHA256')
                filepaths = [] #files
                filepaths.append(values[0])
                filepaths.append(values[3])
                print('Info: File Comparison using:', algos)
                for algo in algos:
                    print(algo, ':')
                    print(filepaths[0], ':', hash(filepaths[0], algo))
                    print(filepaths[1], ':', hash(filepaths[1], algo))
                    if hash(filepaths[0],algo) == hash(filepaths[1],algo):
                        print('Files match for ', algo)
                    else:
                        print('Files do NOT match for ', algo)
        else:
            print('Please choose 2 files.')window.close()
Running the above code will give you the following outcome:
Closing Thoughts
Although not the prettiest of UIs, this library allows you to quickly spin up simple python UIs and share them with whoever you may need to. More importantly, the code that you require to do so, is simple and very readable. You will still have the problem of having to run the code to get the UI, which may make sharing a bit difficult, but you can consider using something like PyInstaller which will turn your python script into a .exe that people can simply double click.
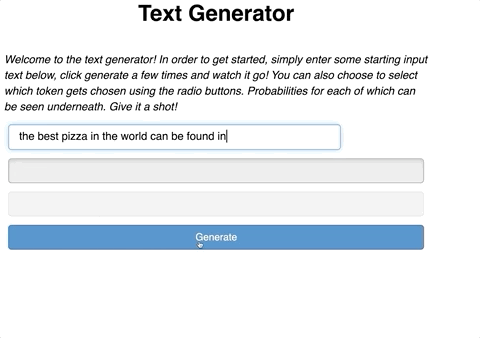
We will be using OpenAI’s GPT-2 as the model and Panel as the web dashboard framework. This guide will be split into two parts. In the first part, we will load our model and write a predictions function. In the second, we will build the web application.
Example text generation application. We will be building a simpler variation of this web app.
What you will need
This tutorial assumes you already have Python 3.7+ installed and have some understanding of Language Models. Although the steps involved can be done outside of Jupyter, using a jupyter notebook is highly highly recommended.
We will be using PyTorch as our Deep Learning library of choice. Within PyTorch, we will use the transformers library to import the pre-trained OpenGPT-2 model. You can install these libraries by individually entering the following commands in your bash:
pip install torchpip install transformers
For our web application, we will be utilizing Panel, a great tool for easily creating servable dashboards from either jupyter notebooks or a regular python script. Use the following command to install panel:
pip install panel
Part 1: Setting up the Model
OpenAI’s GPT is a type of transformer model which has received a lot of buzz about its capabilities to produce human-like text. If you have not experimented with it before, you are likely to come away with the same opinion at the end of this read.
Loading the Model
First, we need to import the required packages.
import numpy as np
import torch
import torch.nn.functional as F
from transformers import GPT2Tokenizer, GPT2LMHeadModel
from random import choice
Next, we will load the OpenGPT2 Tokenizer and the Language Model: (it may take a few minutes to download the pre-trained model if run for the first time)
tok = GPT2Tokenizer.from_pretrained("gpt2")
model = GPT2LMHeadModel.from_pretrained("gpt2")
Predictions Function
At this stage, most of the work in already done. Since our model is pre-trained, we don’t need to train it or make any modifications. We simply need to write a function which can input text to the model and generate a prediction.
There is a lot happening in this function. So, let’s break it down. First, we are tokenizing and encoding the input text from input_ids. Then, we ask our model to generate a logits vector for the next word/token. After applying softmax and sorting these probabilities in descending order, we have a vector, idxs, which lists the indices of each token in our vocab in order by their respective probabilities.
At this stage, we could just pick the token which has the highest probability. However, we want to be able to mix up our results so the same input text can generate a variety of text. To do this, we will add an element of randomness where we choose a random token from a list of the most probable next tokens. This way, we are not selecting the same predicted token each time. To do this, we utilize Nucleus (Top-p) Sampling.
We perform this by looping through each probability until the sum of all the probabilities we have looped over is greater than p, an arbitrary number between 0 and 1. All the tokens iterated through until p is exceeded are stored in a list, res. Once, p is exceeded, we choose a token at random from this list. Remember that the list of probabilities that we are looping through contains indices ordered by their probability. Note that if p is higher, more tokens will be included in our list. Vice versa. Therefore, if you want the same result each time, you can set p to 0.
Now, let’s test out our pred function a few times:
Each time, there is a different result which is exactly what we expect. Our prediction function is now ready. Let’s build our web app!
Part 2: Building the Web Application
Panel Overview
If you are not familiar with Panel, it facilitates the process of creating web dashboards and apps. At a first glance, what you need to know is that it has three primary components:
Panels: containers which can contain one or more of panes (objects) such as text, image, graphs, widgets etc. (they can contain other panels as well)
Panes: any single object such as text, image, dataframe, etc.
Widgets: user adjustable items such as text input, sliders, buttons, checkboxes which can alter the behavior of panes
The next and final thing you need to know for our purpose is that there are multiple ways for us to define how different panes and widgets interact with each other. These are called “callbacks.” For example, if a certain button is pressed, how should the other panes be updated? We will be defining a callback function later on which does exactly this.
High Level Application Overview
Our text generator app will have an input for a user to enter their desired text. Next, the user should be able to generate a new token with a press of a button. After which, new text will be generated with a predicted token from the function we defined in Part 1. Lastly, the user should be able to continue to generate new text on top of the already predicted tokens.
Implementation
Let’s first import panel and create the text input widget:
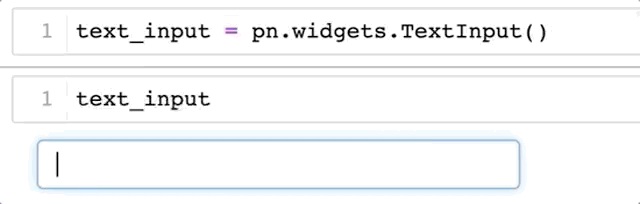
import panel as pn
pn.extension() # loading panel's extension for jupyter compatibility text_input = pn.widgets.TextInput()
Now, if we execute text_input in jupyter, we get the following:
Next, we want a pane which will store the whole text as we generate more and more tokens:
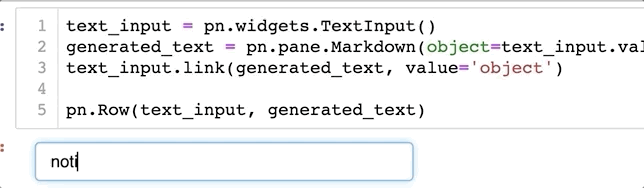
Notice that we set the object of text to the value of text_input. We want the value of the generated_text to have the same value as the text_input since we will be predicting new text on top of the generated_text. As more tokens get added to our sequence, we will keep predicting over the generated_text until the user changes the text_input. In which case, the process will restart.
However, we are not quite done yet. Although generated_text will take the value of text_input at its initiation, it will not update itself if the text_input value changes. For this, we need to link these two objects together as so:
text_input.link(generated_text, value='object')
Here, we have formed a unidirectional link between text_input to generated_text. So whenever the value of the text_input changes, the value of generated_text is changed to the new value as well. See:
observing linked behavior between text_input and generated_text in a panel. Note: pn.Row as a component is a panel i.e. container of panes and widgets
Now that we have both our text objects, let’s create our button widget:
Great, now that we have a button, we just have to link it to our desired behavior. For this we will be writing a callback function which will run every time the button is clicked:
def click_cb(event):
    pred = get_pred(generated_text.object, model, tok)
    generated_text.object += pred
Two things happen here. First, we pass generated_text as the input to the prediction function we wrote earlier which gives a new token. Second, this token is added to the generated_text. This process repeats each time there is a new click of the button.
Speaking of, we still have to tie the button click with the callback function. We can do that with:
button.on_click(click_cb)
We are now through creating all our widgets, panes and functions. We just need to put these objects in a panel and voila:
Note: pn.Column, similar to pn.Row is another type of panel i.e. container of widgets, panes and even other panels.
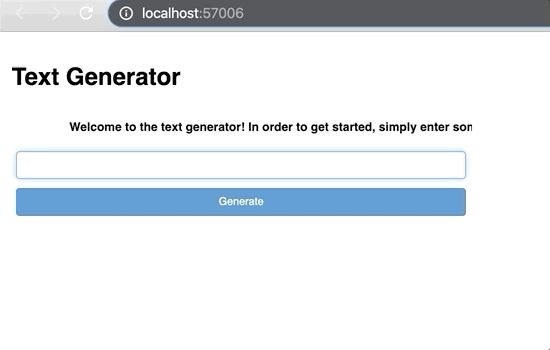
Let’s add a title and a brief description and we are through!
title = pn.pane.Markdown("# **Text Generator**")
desc = pn.pane.HTML("<marquee scrollamount='10'><b>Welcome to the text generator! In order to get started, simply enter some starting input text below, click generate a few times and watch it go!</b></marquee>")final_app = pn.Column(title, desc ,app)
Serve the Application
Panel makes it very easy to serve the app. There are two methods which can be used to do this. The first one is the “.show()” command. This is used for debugging usually and it is used as below. This will launch a new window with our final_app panel running as a web application.
final_app.show()
In order to put it in a production environment, you need to use the “.servable()” method. However, if you run this similarly to the show method, nothing different will happen in your current notebook. Instead, you have to serve the notebook through your machine’s bash like this:
panel serve --show text_generation_app.ipynb
This will launch your app on a local port as long as you have the following code in your notebook:
final_app.servable()
Done.
By now, you have the capabilities to build your own text generation app. You can further build upon it by adding more panel components. You can even embed this app in your other projects. As always, you can find my code base on github. Note: the app in the title image is the advanced variation found in my tutorial notebook: text_generation_app.ipynb.
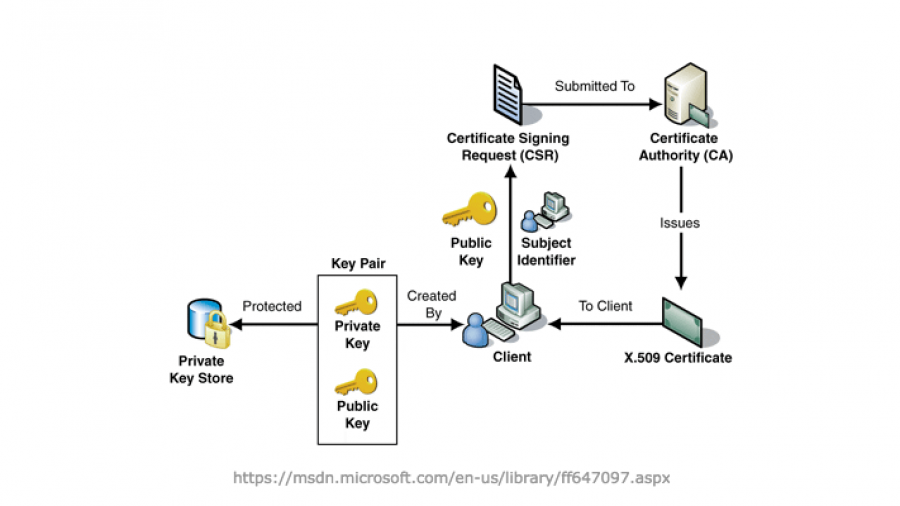
After struggling for a few weeks, finally, on my mobile, I could launch my page, that running on my home Kubernetes cluster and hosting on my public domain, with the Chrome browser. I even don’t have to tolerate that dazzling “not secure” icon and that little red text remind me that my site is not trusted, because I protected with a TLS certificate issued by Let’s Encrypt. The whole setup was free, besides the monthly bill from my ISP and the cost for turning on my 10-years old PC, and I will tell you how to do it.
Open your home Kubernetes cluster to the internet could be significant. Imagine that you are a freelancer and want to run a demo site for your client for a few days. It can be hosted on your PC, at least they won’t complain that your page has a bug because they saw a little red warning text next to the address bar. It also could be your last frontier in freezone before you move them to cloud, until now I still hide my credit card no from Google, AWS and Azure.
Anyway, if you plan to do what I done, you will need to run you own Kubernetes cluster locally. You can find my previous post for how to configure your home Kubernetes cluster with the Rancher server.
The header pic illustrated my home network setup, and how the incoming requests from internet forward into my Kubernetes cluster, you can jump to next section about the TLS certificate setup if you found that pic was instructive enough.
Like an ordinary home network, I has a wireless router connecting to my ISP, behind it is my first-tier private LAN using network address 192.168.1.0/24. My wireless router is also a DHCP server, that assigned an IP address 192.168.1.128/24 to my desktop PC.
My desktop PC running on Windows 10, it installed with VMWare as the hypervisor. The NAT network managed by the VMWare is my second-tier private LAN using different network address 192.168.24.0/24. The Ubuntu virtual machines were spun up in the second-tier network formed my local Kubernetes cluster, one of the worker nodes was assigned with an IP address 192.168.24.149/24.
To open my Kubernetes cluster to the internet (explicitly is to open the Nginx ingress controller running on worker nodes), I configured the port forwarding rules on both wireless router and VMWare hypvisor, it allows incoming requests from internet forwarding to the Nginx ingress controller.
Another critical setting to make the requests through is to add inbound rule into my Windows 10 firewall. The default rule set blocked incoming requests to both Http (80) and Https (443) ports, therefore an allowed-rule is necessary for establishing the connection.
Meanwhile, I registered for a free public domain “hung-from-konghong.asuscomm.com” with the DDNS service come with my ASUS wireless router. I believe those well-known DDNS providers such as Google domain, DynDNS or no-IP are supported by most of the wireless routers in the market.
Finally, to verify the above settings, I tested the Nginx ingress controller by making request from internet. I tested with my mobile, even no ingress rules had been defined, Nginx can return a 404 page. I also used the canyouseeme.org, the utility page can capture my public IP address and checked whether my both Http and Https ports were opened or not.
Let’s Encrypt, DNS-01 and HTTP-01 challenge
Congratulations! If you followed to this point, your Kubernetes cluster should also be accessible from internet too. Now I had my public domain, I can request an TLS certificate for it from Let’s Encrypt.
Let’s Encrypt is a CA (Certificate Authority) who offers a free TLS certificate, it verifies certificate and delivers certificate using the ACME protocol.
First, it requires to deploy an agent on my Kubernetes cluster. The agent responds to raise certificate request to the Let’s Encrypt service, completes either the DNS-01 or the HTTP-01 challenge, and installs the certificate delivered by CA. The challenge is part of the ACME protocol, it lets the CA validates whether the public domain in the cert request is managed by the requester.
With the DNS-01 challenge, the agent will be asked to update the text (TXT) record (a type of DNS record) of their domain. Since I relied on ASUS’s DDNS service to register my public domain, and it does not provide the feature to update my text record, therefore I could only take the HTTP-01 challenge option.
With the HTTP-01 challenge, the agent has to publish a given token into a pre-agreed URL, after Let’s Encrypt servers verified that content, it will deliver a new SSL certificate to the agent.
Cert-Manager and Helm
I found Cert-Manager as the ACME agent implmentation for Kubernetes environment, if you search both “Kubernetes” and “Let’s Encrypt” in Google, it should be listed within top 10. The tool integrates with Nginx ingress controller to do the HTTP-01 challenge automatically.
Helm comes with a backend service, the Tiller which to deploy different Kubernetes resources in a Helm chart package. To run Tiller on a Kubernetes cluster which has Role Base Access Control (RBAC) enabled (cluster created by Rancher is RBAC enabled by default). Tiller needs to run with a service account granted with the cluster-admin role. I captured the script to install Helm as below:
# Install Helm with snap
sudo snap install helm --classic# Create a service account for triller with following manifest
cat <<EOF | kubectl apply -f -
apiVersion: v1
kind: ServiceAccount
metadata:
  name: tiller
  namespace: kube-system
---
apiVersion: rbac.authorization.k8s.io/v1
kind: ClusterRoleBinding
metadata:
  name: tiller
roleRef:
  apiGroup: rbac.authorization.k8s.io
  kind: ClusterRole
  name: cluster-admin
subjects:
  - kind: ServiceAccount
    name: tiller
    namespace: kube-system
EOF# Install Tiller - the backend service for Helm
helm init --service-account tiller# Verify Helm client and Tiller server installation
helm version
Install Cert-Manager
Cert-Manager’s document recommands to install it into a separated namespace and I captured only thenecessary steps to install Cert-Manager.
# Update your local Helm chart repository cache helm repo update
# Install the cert-manager Helm chart helm install \ --name cert-manager \ --namespace cert-manager \ --version v0.11.0 \ jetstack/cert-manager# Verify the cert-manager installation kubectl get pods --namespace cert-manager
Create Issuer for Let’s Encrypt production service
Now I came to the ACME agent part, Issuer and Cluster Issuer are types of Kubernete resource comes with Cert-Manager, Issuer can only work with resources in its namespace, and Cluster Issuer do not has such restiction.
An issuer responses to deal with differnt types of CA and issuing TLS certificate for ingress rules. Following manifest defined a Cluster Issuer that works as agent for Let’s Encrypt production service, the spec.acme.solvers property defined to use HTTP-01 challenge for verification and integrated for Nginx ingress controller.
Other than production service, Let’s Encrypt also provides the staging service, to switch to it, you just need to change the spec.acme.server property to a proper URL.
# Create the cluster issuer with following manifest
cat <<EOF | kubectl apply -f -
apiVersion: cert-manager.io/v1alpha2
kind: ClusterIssuer
metadata:
  name: letsencrypt-prod
spec:
  acme:
    # The URL for Let's Encrypt production service
    server: https://acme-v02.api.letsencrypt.org/directory
    # My Email address used for ACME registration
    email: kwonghung.yip@gmail.com
    # Name of a secret used to store the ACME account private key
    privateKeySecretRef:
      name: letsencrypt-prod
    # Enable the HTTP-01 challenge provider
    solvers:
      - http01:
          ingress:
            class: nginx
EOF# Verify the resource
kubectl describe clusterissuer letsencrypt-prod
Request a TLS certificate and save it into Secert
Next step is to request a TLS certificate. The Certificate resource introduced by Cert-Manager actually is for making certificate request (a little bit confuse, Ha!), the received TLS certificate eventally is stored as a Kubernetes Secret object.
That is what you can find in Kubernete offical reference, the spec.tls.secretName property for Ingress rule defines which Secret contains the TLS key pair, it means you can apply TLS certificate without using the Cert-Manager, but it does give a convenience way to handling the certificate.
Following manifest defined a Certificate Resource that refer to the Cluster Issuer created before, the TLS certificate was stored into Secret named tls-public-domain.
After the TLS certificate Secret has been created, I deployed a Tomcat service for verification, a sample service was necessary because it needed a Ingress rule that get used the TLS certificate Secret. I used Tomcat because I am a Java developer and it does provide a default welcome page for verification.
I packed the Tomcat service as a Helm chart package and hosting it on GitHub Page, you can refer to my other post for details. Following script show how to deploy the Tomcat with Helm, and the Ingress rule came with the package.
# Add my Helm repository running on GitHub Page
helm repo add hung-repo https://kwonghung-yip.github.io/helm-charts-repo/# Update local Helm charts repository cac
helm repo update# Install the tomcat service
helm install hung-repo/tomcat-prod --name tomcat# Verify the ingress rule manifest after installed the tomcat, sample output as below:
helm get manifest tomcat
...
...
---
# Source: tomcat-prod/templates/ingress.yaml
apiVersion: extensions/v1beta1
kind: Ingress
metadata:
  name: tomcat-tomcat-prod
  labels:
    app.kubernetes.io/name: tomcat-prod
    helm.sh/chart: tomcat-prod-0.1.0
    app.kubernetes.io/instance: tomcat
    app.kubernetes.io/version: "9.0.27"
    app.kubernetes.io/managed-by: Tiller
spec:
  tls:
  - hosts:
    - hung-from-hongkong.asuscomm.com
    secretName: tomcat-acme-prod
  rules:
  - host: hung-from-hongkong.asuscomm.com
    http:
      paths:
      - backend:
          serviceName: tomcat-tomcat-prod
          servicePort: 8080
After going through all the steps, the welcome page was exposed and secured.
Conclusion and further work
In this post, I shared my findings and the steps that how I opened my home Kubernetes cluster to the Internet and secrued it with the Let’s Encrypt TLS certificate.
Other than ACME agent, Cert- Manager Issuer also supports self-signed certificate as the Certificate Authority, it allows to issue a certificate to a wildcard domain within your private LAN, with a wildcard domain, different services can have their customized domain and they all under a single self signed root certificate.
Other further works can be:
To bridge Github or other public repo and your home Kubernetes cluster with webhook to automate the deployment process for your home Kubernetes cluster.
Instead of forwarding request to only one of my worker nodes, the requests should be forward to a HA proxy that will be a load balancer of all worker nodes.
In the next post, I will look into service mesh, Istio and their implementations.
Below sections supplement the technical details for your reference, please feel free to leave comment or messaging me, my contact info can be found at the end of this post.