Unique ways to showcase your skills in portfolio

Unique ways to showcase your skills in portfolio

Work smarter, not harder. Make your development easier with these extensions
This tutorial would be the last part of our laravel-news application. We have already completed the migrations and models, relationships among models, and creating and consuming RESTful API. To create the user interface for admin users I have planned to use Jetstream, Livewire, Sanctum, and Tailwind.
The admin dashboard needs to be secure. Laravel comes with Laravel Jetstream which provides login, registration, email verification, two-factor authentication, session management, API support via Laravel Sanctum, and optional team management. Jetstream is designed using Tailwind CSS and offers your choice of Livewire or Inertia scaffolding.
We have already used Laravel Sanctum to secure RESTful API in the previous tutorial.
If you like Vue.js as a templating language then choose the Inertia.js stack provided by Jetstream.
I am sticking to Blade as the templating language so I will use Livewire provided by Jetstream.
Laravel Livewire is a library that makes it simple to build modern, reactive, dynamic interfaces. When using Livewire, you may pick and choose which portions of your application will be a Livewire component, while the remainder of your application can be rendered as the traditional Blade templates you are used to.
Now let’s dive into code. There is make:livewire command which creates two files, one in app\Http\Livewire directory and another in resources\views\livewire directory.
Different versions of this command are as follows:
php artisan make:livewire foo
# Creates Foo.php & foo.blade.php
php artisan make:livewire foo-bar
# Creates FooBar.php & foo-bar.blade.php
php artisan make:livewire Foo\\Bar
php artisan make:livewire Foo/Bar
php artisan make:livewire foo.bar
# Creates Foo/Bar.php & foo/bar.blade.php
php artisan make:livewire foo --inline
# Creates only Foo.php
Before we start with our planned application, let us make few required edits in registration and profile update files provided by Laravel as there are first_name and last_name in our users table instead of the default name.
If you have not changed the default migration for users table then you may skip this step.
Open resources\views\auth\register.blade.php
<div>
<x-jet-label for="name" value="{{ __('Name') }}" />
<x-jet-input id="name" class="block mt-1 w-full" type="text" name="name" :value="old('name')" required autofocus autocomplete="name" />
</div>
and replace the above code with the following code
<div>
<x-jet-label for="first_name" value="{{ __('First Name') }}" />
<x-jet-input id="first_name" class="block mt-1 w-full" type="text" name="first_name" :value="old('first_name')" required autofocus autocomplete="first_name" />
</div><div>
<x-jet-label for="last_name" value="{{ __('Last Name') }}" />
<x-jet-input id="last_name" class="block mt-1 w-full" type="text" name="last_name" :value="old('last_name')" required autocomplete="last_name" />
</div>
Open resources\views\profile\update-profile-information-form.blade.php
<!-- Name -->
<div class="col-span-6 sm:col-span-4">
<x-jet-label for="name" value="{{ __('Name') }}" />
<x-jet-input id="name" type="text" class="mt-1 block w-full" wire:model.defer="state.name" autocomplete="name" />
<x-jet-input-error for="name" class="mt-2" />
</div>
and replace the above code with the following code
<!-- First Name -->
<div class="col-span-6 sm:col-span-4">
<x-jet-label for="first_name" value="{{ __('First Name') }}" />
<x-jet-input id="first_name" type="text" class="mt-1 block w-full" wire:model.defer="state.first_name" autocomplete="first_name" />
<x-jet-input-error for="first_name" class="mt-2" />
</div><!-- Last Name -->
<div class="col-span-6 sm:col-span-4">
<x-jet-label for="last_name" value="{{ __('Last Name') }}" />
<x-jet-input id="last_name" type="text" class="mt-1 block w-full" wire:model.defer="state.last_name" autocomplete="last_name" />
<x-jet-input-error for="last_name" class="mt-2" />
</div>
Then open app\Actions\Fortify\CreateNewUser.php and replace the create() with the following code:
public function create(array $input)
{
Validator::make($input, [
'first_name' => ['required', 'string', 'max:255'],
'last_name' => ['required', 'string', 'max:255'],
'email' => ['required', 'string', 'email', 'max:255', 'unique:users'],
'password' => $this->passwordRules(),
])->validate();return User::create([
'first_name' => ['required', 'string', 'max:255'],
'last_name' => ['required', 'string', 'max:255'],
'email' => $input['email'],
'password' => Hash::make($input['password']),
]);
}
After that open app\Actions\Fortify\UpdateUserProfileInformation.php and replace update() and updateVerifiedUser() functions with the following code:
public function update($user, array $input)
{
Validator::make($input, [
'first_name' => ['required', 'string', 'max:255'],
'last_name' => ['required', 'string', 'max:255'],
'email' => ['required', 'email', 'max:255', Rule::unique('users')->ignore($user->id)],
'photo' => ['nullable', 'image', 'max:1024'],
])->validateWithBag('updateProfileInformation');if (isset($input['photo'])) {
$user->updateProfilePhoto($input['photo']);
}if ($input['email'] !== $user->email && $user instanceof MustVerifyEmail) {
$this->updateVerifiedUser($user, $input);
} else {
$user->forceFill([
'first_name' => $input['first_name'],
'last_name' => $input['last_name'],
'email' => $input['email'],
])->save();
}
}protected function updateVerifiedUser($user, array $input)
{
$user->forceFill([
'first_name' => $input['first_name'],
'last_name' => $input['last_name'],
'email' => $input['email'],
'email_verified_at' => null,
])->save();
$user->sendEmailVerificationNotification();
}
At this point, we are ready to go with Laravel’s default registration and profile update functionality.
Now move on to create pages to manage Categories, Tags, and Posts of our News Application.
Our Category page will look like the following and have the functionality to list all categories, edit a category, show all posts of a category, delete a category, and create a new category.
To create this page follow the below-mentioned steps:
php artisan make:livewire Categories\\categories
It will create Component and View files as discussed before.
Open app\Http\Livewire\Categories\Categories.php and write the following code
<?php
namespace App\Http\Livewire\Categories;use App\Models\Category;
use Livewire\Component;class Categories extends Component
{
public $categories, $title, $color, $category_id;
public $isOpen = 0;public function render()
{
$this->categories = Category::all();
return view('livewire.categories.categories');
}public function store()
{
$this->validate([
'title' => 'required',
'color' => 'required',
]);Category::updateOrCreate(['id' => $this->category_id], [
'title' => $this->title,
'color' => $this->color
]);session()->flash('message', $this->category_id ? 'Category Updated Successfully.' : 'Category Created Successfully.');$this->closeModal();$this->resetInputFields();
}public function delete($id)
{
Category::find($id)->delete();
session()->flash('message', 'Category Deleted Successfully.');
}public function edit($id)
{
$category = Category::findOrFail($id);
$this->category_id = $id;
$this->title = $category->title;
$this->color = $category->color;
$this->openModal();
}public function create()
{
$this->resetInputFields();
$this->openModal();
}public function openModal()
{
$this->isOpen = true;
}public function closeModal()
{
$this->isOpen = false;
}private function resetInputFields()
{
$this->title = '';
$this->color = '';
$this->category_id = '';
}
}
In the above code all the public properties are available to the view returned by render() method. List of all categories are passed to categories view by $categories variable.
To create or update a category the store() method is wired in the view. In this method after validation a category is added or updated in the database and accordingly message is flushed.
To delete a category delete() method is wired to delete button of view. The id of category to be deleted is passed to delete method from view and the same is deleted and message is flushed.
The edit() method is wired to edit button of the view. It passes id of the category. Then the category data is fetched by this id and all the public variables are populted with that data which will now be available to model form.
Then open resources\views\livewire\categories\categories.blade.php and write the following code
<x-slot name="header">
<h2 class="font-semibold text-xl text-gray-800 leading-tight">
Categories
</h2>
</x-slot><div class="py-12">
<div class="max-w-7xl mx-auto sm:px-6 lg:px-8">
<div class="bg-white overflow-hidden shadow-xl sm:rounded-lg px-4 py-4">
@if (session()->has('message'))
<div class="bg-teal-100 border-t-4 border-teal-500 rounded-b text-teal-900 px-4 py-3 shadow-md my-3" role="alert">
<div class="flex">
<div>
<p class="text-sm">{{ session('message') }}</p>
</div>
</div>
</div>
@endif<button
wire:click="create()"
class="inline-flex items-center px-4 py-2 my-3 bg-gray-800 border border-transparent rounded-md font-semibold text-xs text-white uppercase tracking-widest hover:bg-gray-700 active:bg-gray-900 focus:outline-none focus:border-gray-900 focus:shadow-outline-gray disabled:opacity-25 transition ease-in-out duration-150">
Create New Category
</button>@if($isOpen)
@include('livewire.categories.create')
@endif<table class="table-fixed w-full">
<thead>
<tr class="bg-gray-100">
<th class="px-4 py-2 w-20">No.</th>
<th class="px-4 py-2">Title</th>
<th class="px-4 py-2">Color</th>
<th class="px-4 py-2">Action</th>
</tr>
</thead>
<tbody>
<?php $count = 1; ?>
@foreach($categories as $category)
<tr>
<td class="border px-4 py-2"><?php echo $count++; ?></td>
<td class="border px-4 py-2">{{ $category->title }}</td>
<td class="border px-4 py-2"><span style="background-color: {{ $category->color }};"> </span> {{ $category->color }}</td>
<td class="border px-4 py-2">
<button
wire:click="edit({{ $category->id }})"
class="inline-flex items-center px-4 py-2 bg-gray-800 border border-transparent rounded-md font-semibold text-xs text-white uppercase tracking-widest hover:bg-gray-700 active:bg-gray-900 focus:outline-none focus:border-gray-900 focus:shadow-outline-gray disabled:opacity-25 transition ease-in-out duration-150">
Edit
</button>
<a href="{{ url('dashboard/categories/'. $category->id .'/posts') }}" class="inline-flex items-center px-4 py-2 bg-gray-800 border border-transparent rounded-md font-semibold text-xs text-white uppercase tracking-widest hover:bg-gray-700 active:bg-gray-900 focus:outline-none focus:border-gray-900 focus:shadow-outline-gray disabled:opacity-25 transition ease-in-out duration-150">
Show All Posts
</a>
<button
wire:click="delete({{ $category->id }})"
class="inline-flex items-center justify-center px-4 py-2 bg-red-600 border border-transparent rounded-md font-semibold text-xs text-white uppercase tracking-widest hover:bg-red-500 focus:outline-none focus:border-red-700 focus:shadow-outline-red active:bg-red-600 transition ease-in-out duration-150">
Delete
</button>
</td>
</tr>
@endforeach
</tbody>
</table>
</div>
</div>
</div>
Create one more view resources\views\livewire\categories\create.blade.php which will act as model to create and edit the category
<div class="fixed z-10 inset-0 overflow-y-auto ease-out duration-400">
<div class="flex items-end justify-center min-h-screen pt-4 px-4 pb-20 text-center sm:block sm:p-0">
<div class="fixed inset-0 transition-opacity">
<div class="absolute inset-0 bg-gray-500 opacity-75"></div>
</div><!-- This element is to trick the browser into centering the modal contents. --><span class="hidden sm:inline-block sm:align-middle sm:h-screen"></span><div
class="inline-block align-bottom bg-white rounded-lg text-left overflow-hidden shadow-xl transform transition-all sm:my-8 sm:align-middle sm:max-w-lg sm:w-full"
role="dialog" aria-modal="true" aria-labelledby="modal-headline"><form>
<div class="bg-white px-4 pt-5 pb-4 sm:p-6 sm:pb-4">
<div class="">
<div class="mb-4">
<label for="exampleFormControlInput1" class="block text-gray-700 text-sm font-bold mb-2">Title:</label>
<input type="text" class="shadow appearance-none border rounded w-full py-2 px-3 text-gray-700 leading-tight focus:outline-none focus:shadow-outline" id="exampleFormControlInput1" placeholder="Enter Title" wire:model="title">
@error('title') <span class="text-red-500">{{ $message }}</span>@enderror
</div>
<div class="mb-4">
<label for="exampleFormControlInput2"
class="block text-gray-700 text-sm font-bold mb-2">Color:</label><textarea
class="shadow appearance-none border rounded w-full py-2 px-3 text-gray-700 leading-tight focus:outline-none focus:shadow-outline" id="exampleFormControlInput2" wire:model="color" placeholder="Enter Color"></textarea>
@error('color') <span class="text-red-500">{{ $message }}</span>@enderror
</div>
</div>
</div>
<div class="bg-gray-50 px-4 py-3 sm:px-6 sm:flex sm:flex-row-reverse">
<span class="flex w-full rounded-md shadow-sm sm:ml-3 sm:w-auto">
button wire:click.prevent="store()" type="button" class="inline-flex items-center px-4 py-2 my-3 bg-gray-800 border border-transparent rounded-md font-semibold text-xs text-white uppercase tracking-widest hover:bg-gray-700 active:bg-gray-900 focus:outline-none focus:border-gray-900 focus:shadow-outline-gray disabled:opacity-25 transition ease-in-out duration-150">
Save
</button>
</span>
<span class="mt-3 flex w-full rounded-md shadow-sm sm:mt-0 sm:w-auto">
<button wire:click="closeModal()" type="button" class="inline-flex items-center px-4 py-2 my-3 bg-white border border-gray-300 rounded-md font-semibold text-xs text-gray-700 uppercase tracking-widest shadow-sm hover:text-gray-500 focus:outline-none focus:border-blue-300 focus:shadow-outline-blue active:text-gray-800 active:bg-gray-50 transition ease-in-out duration-150">
Cancel
</button>
</span>
</form>
</div>
</div>
</div>
</div>
To show all the posts belonging to a category create app\Http\Livewire\Categories\Categoryposts.php file and write the following code
<?php
namespace App\Http\Livewire\Categories;use App\Models\Category;
use App\Models\Post;
use App\Models\Tag;
use Illuminate\Support\Facades\Auth;
use Illuminate\Support\Facades\DB;
use Livewire\Component;
use Livewire\WithPagination;class Categoryposts extends Component
{
use WithPagination;
public $title, $content, $category, $post_id;
public $tagids = array();
public $isOpen = 0;
public $cid;public function mount($id)
{
$this->cid = $id;
}public function render()
{
return view('livewire.posts.posts', [
'posts' => Post::where('category_id', $this->cid)->orderBy('id', 'desc')->paginate(),
'categories' => Category::all(),
'tags' => Tag::all(),
]);
}public function store()
{
$this->validate([
'title' => 'required',
'content' => 'required',
'category' => 'required',
]);$post = Post::updateOrCreate(['id' => $this->post_id], [
'title' => $this->title,
'content' => $this->content,
'category_id' => intVal($this->category),
'author_id' => Auth::user()->id,
]);if (count($this->tagids) > 0) {
DB::table('post_tag')->where('post_id', $post->id)->delete();
foreach ($this->tagids as $tagid) {
DB::table('post_tag')->insert([
'post_id' => $post->id,
'tag_id' => intVal($tagid),
'created_at' => now(),
'updated_at' => now(),
]);
}
}
session()->flash('message', $this->post_id ? 'Post Updated Successfully.' : 'Post Created Successfully.');$this->closeModal();$this->resetInputFields();
}public function delete($id)
{
Post::find($id)->delete();
session()->flash('message', 'Post Deleted Successfully.');
}public function edit($id)
{
$post = Post::with('tags')->findOrFail($id);
$this->post_id = $id;
$this->title = $post->title;
$this->content = $post->content;
$this->category = $post->category_id;
$this->tagids = $post->tags->pluck('id');
$this->openModal();
}public function create()
{
$this->resetInputFields();
$this->openModal();
}public function openModal()
{
$this->isOpen = true;
}public function closeModal()
{
$this->isOpen = false;
}private function resetInputFields()
{
$this->title = '';
$this->content = '';
$this->category = null;
$this->tagids = null;
$this->post_id = '';
}
}
In the above code we are doing pagination as there might be many posts belonging to a category. To do so use Livewire\WithPagination then use paginate() method to get paginated records.
In the above code block we have used mount() method, we use mount() method to intercept parameters. To get the id of category from URL we will use this method.
This time we are passing posts, categories, and tags to view so we will pass these as an array in the second parameter while returning view.
Rest of the code is mostly repetative. So I am ignoring for now.
Now lets work on Posts. Posts page will look like this:
Once again run make:livewire as follows:
php artisan make:livewire Posts\\posts
Open app\Http\Livewire\Posts\Posts.php file and paste the following code:
<?php
namespace App\Http\Livewire\Posts;
use App\Models\Category;
use App\Models\Image;
use App\Models\Post;
use App\Models\Tag;
use Illuminate\Support\Facades\Auth;
use Illuminate\Support\Facades\DB;
use Illuminate\Support\Str;
use Livewire\Component;
use Livewire\WithFileUploads;
use Livewire\WithPagination;class Posts extends Component
{
use WithPagination;
use WithFileUploads;
public $title, $content, $category, $post_id;
public $tagids = array();
public $photos = [];
public $isOpen = 0;public function render()
{
return view('livewire.posts.posts', [
'posts' => Post::orderBy('id', 'desc')->paginate(),
'categories' => Category::all(),
'tags' => Tag::all(),
]);
}public function store()
{
$this->validate([
'title' => 'required',
'content' => 'required',
'category' => 'required',
'photos.*' => 'image|max:1024',
]);// Update or Insert Post
$post = Post::updateOrCreate(['id' => $this->post_id], [
'title' => $this->title,
'content' => $this->content,
'category_id' => intVal($this->category),
'author_id' => Auth::user()->id,
]);// Image upload and store name in db
if (count($this->photos) > 0) {
Image::where('post_id', $post->id)->delete();
$counter = 0;
foreach ($this->photos as $photo) {
$storedImage = $photo->store('public/photos');
$featured = false;
if($counter == 0 ){
$featured = true;
}Image::create([
'url' => url('storage'. Str::substr($storedImage, 6)),
'title' => '-',
'post_id' => $post->id,
'featured' => $featured
]);
$counter++;
}
}// Post Tag mapping
if (count($this->tagids) > 0) {
DB::table('post_tag')->where('post_id', $post->id)->delete();
foreach ($this->tagids as $tagid) {
DB::table('post_tag')->insert([
'post_id' => $post->id,
'tag_id' => intVal($tagid),
'created_at' => now(),
'updated_at' => now(),
]);
}
}session()->flash('message', $this->post_id ? 'Post Updated Successfully.' : 'Post Created Successfully.');$this->closeModal();$this->resetInputFields();
}public function delete($id)
{
Post::find($id)->delete();
DB::table('post_tag')->where('post_id', $id)->delete();session()->flash('message', 'Post Deleted Successfully.');
}public function edit($id)
{
$post = Post::with('tags')->findOrFail($id);
$this->post_id = $id;
$this->title = $post->title;
$this->content = $post->content;
$this->category = $post->category_id;
$this->tagids = $post->tags->pluck('id');
$this->openModal();
}public function create()
{
$this->resetInputFields();
$this->openModal();
}public function openModal()
{
$this->isOpen = true;
}public function closeModal()
{
$this->isOpen = false;
}private function resetInputFields()
{
$this->title = null;
$this->content = null;
$this->category = null;
$this->tagids = null;
$this->photos = null;
$this->post_id = null;
}
}
The above code follows the same pattern as previous codes. Here I am uploading multiple files. To upload file use Livewire\WithFileUploads. Read more here about Livewire file upload.
Open resources\views\livewire\posts\posts.blade.php and paste the following code:
<x-slot name="header">
<h2 class="font-semibold text-xl text-gray-800 leading-tight">
Posts
</h2>
</x-slot><div class="py-12">
<div class="max-w-7xl mx-auto sm:px-6 lg:px-8">
<div class="bg-white overflow-hidden shadow-xl sm:rounded-lg px-4 py-4">
@if (session()->has('message'))
<div class="bg-teal-100 border-t-4 border-teal-500 rounded-b text-teal-900 px-4 py-3 shadow-md my-3"
role="alert">
<div class="flex">
<div>
<p class="text-sm">{{ session('message') }}</p>
</div>
</div>
</div>
@endif
@if (Request::getPathInfo() == '/dashboard/posts')
<button wire:click="create()" class="inline-flex items-center px-4 py-2 my-3 bg-gray-800 border border-transparent rounded-md font-semibold text-xs text-white uppercase tracking-widest hover:bg-gray-700 active:bg-gray-900 focus:outline-none focus:border-gray-900 focus:shadow-outline-gray disabled:opacity-25 transition ease-in-out duration-150">
Create New Post
</button>
@endif@if ($isOpen)
@include('livewire.posts.create')
@endif<div class="grid grid-flow-row grid-cols-3  gap-4">
@foreach ($posts as $post)
<div class="max-w-sm rounded overflow-hidden shadow-lg">
<div class="px-6 py-4">
<div class="font-bold text-xl mb-2">{{ $post->title }}</div>
<p class="text-gray-700 text-base">
{{ Str::words($post->content, 20, '...') }}
</p>
</div>
<div class="px-6 pt-4 pb-2">
<a href="{{ url('dashboard/posts', $post->id) }}"
class="inline-flex items-center px-4 py-2 bg-gray-800 border border-transparent rounded-md font-semibold text-xs text-white uppercase tracking-widest hover:bg-gray-700 active:bg-gray-900 focus:outline-none focus:border-gray-900 focus:shadow-outline-gray disabled:opacity-25 transition ease-in-out duration-150">
Read post
</a><button wire:click="edit({{ $post->id }})"
class="inline-flex items-center px-4 py-2 bg-gray-800 border border-transparent rounded-md font-semibold text-xs text-white uppercase tracking-widest hover:bg-gray-700 active:bg-gray-900 focus:outline-none focus:border-gray-900 focus:shadow-outline-gray disabled:opacity-25 transition ease-in-out duration-150">
Edit
</button><button wire:click="delete({{ $post->id }})"
class="inline-flex items-center justify-center px-4 py-2 bg-red-600 border border-transparent rounded-md font-semibold text-xs text-white uppercase tracking-widest hover:bg-red-500 focus:outline-none focus:border-red-700 focus:shadow-outline-red active:bg-red-600 transition ease-in-out duration-150">
Delete
</button>
</div>
</div>
@endforeach
</div>
</div>
<div class="py-4">
{{ $posts->links() }}
</div>
</div>
</div>
Then create file resources\views\livewire\posts\create.blade.php to be used as model for post create and edit and paste the following code:
<div class="fixed z-10 inset-0 overflow-y-auto ease-out duration-400">
<div class="flex items-end justify-center min-h-screen pt-4 px-4 pb-20 text-center sm:block sm:p-0">
<div class="fixed inset-0 transition-opacity">
<div class="absolute inset-0 bg-gray-500 opacity-75"></div>
</div><!-- This element is to trick the browser into centering the modal contents. -->
<span class="hidden sm:inline-block sm:align-middle sm:h-screen"></span><div class="inline-block align-bottom bg-white rounded-lg text-left overflow-hidden shadow-xl transform transition-all sm:my-8 sm:align-middle sm:max-w-lg sm:w-full" role="dialog" aria-modal="true" aria-labelledby="modal-headline">
<form>
<div class="bg-white px-4 pt-5 pb-4 sm:p-6 sm:pb-4">
<div class="">
<div class="mb-4">
<label for="title" class="block text-gray-700 text-sm font-bold mb-2">Title:</label>
<input type="text" class="shadow appearance-none border rounded w-full py-2 px-3 text-gray-700 leading-tight focus:outline-none focus:shadow-outline" id="title" placeholder="Enter Title" wire:model="title">
@error('title') <span class="text-red-500">{{ $message }}</span>@enderror
</div><div class="mb-4">
<label for="content" class="block text-gray-700 text-sm font-bold mb-2">Content:</label>
<textarea rows="10" class="shadow appearance-none border rounded w-full py-2 px-3 text-gray-700 leading-tight focus:outline-none focus:shadow-outline" id="content" wire:model="content" placeholder="Enter Content"></textarea>
@error('content') <span class="text-red-500">{{ $message }}</span>@enderror
</div><div class="mb-4">
<label for="category" class="block text-gray-700 text-sm font-bold mb-2">Category:</label>
<select name="category" id="category" wire:model="category" class="shadow appearance-none w-full border text-gray-700 py-3 px-4 pr-8 rounded leading-tight focus:outline-none focus:shadow-outline"><option value="" selected>Select Category</option>
@foreach ($categories as $category)
<option value="{{ $category->id }}">{{ $category->title }}</option>
@endforeach
</select>
@error('category') <span class="text-red-500">{{ $message }}</span>@enderror
</div><div class="mb-4">
<div x-data="{ isUploading: false, progress: 0 }"
x-on:livewire-upload-start="isUploading = true"
x-on:livewire-upload-finish="isUploading = false"
x-on:livewire-upload-error="isUploading = false"
x-on:livewire-upload-progress="progress = $event.detail.progress"><div class="flex">
<label for="photos" class="block text-gray-700 text-sm font-bold mb-2">Images:</label>
{{-- <div class="px-2" wire:loading
wire:target="photos">Uploading</div> --}}
<div x-show="isUploading" class="px-2">
<progress max="100" x-bind:value="progress"></progress>
</div>
</div>
<input type="file" multiple name="photos" id="photos" class="shadow appearance-none border rounded w-full py-2 px-3 text-gray-700 leading-tight focus:outline-none focus:shadow-outline" wire:model="photos">
@error('photos') <span class="text-red-500">{{ $message }}</span>@enderror
</div>
</div><div class="mb-4">
<label for="tagids" class="block text-gray-700 text-sm font-bold mb-2">Tags:</label>
<select multiple name="tagids[]" id="tagids[]" wire:model="tagids" class="shadow appearance-none w-full border text-gray-700 py-3 px-4 pr-8 rounded leading-tight focus:outline-none focus:shadow-outline">
@foreach ($tags as $tag)
<option value="{{ $tag->id }}">{{ $tag->title }}</option>
@endforeach
</select>
</div>
</div>
</div><div class="bg-gray-50 px-4 py-3 sm:px-6 sm:flex sm:flex-row-reverse">
<span class="flex w-full rounded-md shadow-sm sm:ml-3 sm:w-auto"><button wire:click.prevent="store()" type="button" class="inline-flex items-center px-4 py-2 my-3 bg-gray-800 border border-transparent rounded-md font-semibold text-xs text-white uppercase tracking-widest hover:bg-gray-700 active:bg-gray-900 focus:outline-none focus:border-gray-900 focus:shadow-outline-gray disabled:opacity-25 transition ease-in-out duration-150">
Save
</button>
</span>
<span class="mt-3 flex w-full rounded-md shadow-sm sm:mt-0 sm:w-auto">
<button wire:click="closeModal()" type="button" class="inline-flex items-center px-4 py-2 my-3 bg-white border border-gray-300 rounded-md font-semibold text-xs text-gray-700 uppercase tracking-widest shadow-sm hover:text-gray-500 focus:outline-none focus:border-blue-300 focus:shadow-outline-blue active:text-gray-800 active:bg-gray-50 transition ease-in-out duration-150">
Cancel
</button>
</span>
</form>
</div>
</div>
</div>
</div>
To show single post create file app\Http\Livewire\Posts\Post.php and paste the following code:
<?php
namespace App\Http\Livewire\Posts;
use App\Models\Post as PostModel;
use Livewire\Component;class Post extends Component
{
public $post;
public function mount($id)
{
$this->post = PostModel::with(['author', 'comments', 'category', 'images', 'videos', 'tags'])->find($id);
}public function render()
{
return view('livewire.posts.post');
}
}
Now create view for the single post resources\views\livewire\posts\post.blade.php and paste the following code:
<x-slot name="header">
<h2 class="font-semibold text-xl text-gray-800 leading-tight">
Post
</h2>
</x-slot><div class="py-12">
<div class="max-w-7xl mx-auto sm:px-6 lg:px-8">
<div class="bg-white overflow-hidden shadow-xl sm:rounded-lg px-4 py-4">
<div class="grid gap-4">
<div class="font-bold text-xl mb-2">{{ $post->title }}</div>
<div class="flex">
by <span class="italic">{{ $post->author->first_name . ' ' . $post->author->last_name }}</span>
in <a href="{{ url('dashboard/category/' . $post->category->id . '/posts') }}" class="underline">{{ $post->category->title }}</a> on {{ $post->updated_at->format('F, d Y') }}</div><div class="grid grid-flow-col">
@foreach ($post->images as $image)
<div class="px-6 py-4">
<img src="{{ $image->url }}" alt="{{ $image->description }}" width="300" height="200">
</div>
@endforeach
</div><div class="grid grid-flow-col">
@foreach ($post->videos as $video)
<div class="px-6 py-4">
<img src="{{ $video->url }}" alt="{{ $video->title }}" width="300" height="200">
</div>
@endforeach
</div><div class="text-gray-700 text-base">
{!! $post->content !!}
</div><div class="flex">
@php
$tags=$post->tags->pluck('id', 'title');
@endphp
@if (count($tags) > 0)
Tags:
@foreach ($tags as $key => $tag)
<a href="{{ url('dashboard/tags/' . $tag . '/posts') }}" class="underline px-1">{{ $key }}</a>
@endforeach
@endif
</div>@if ($post->comments->count())
<div class="text-base">
<p class="text-gray-900 pt-2 pb-4">{{ $post->comments->count() }}
@if ($post->comments->count() > 1) Responses @else Response
@endif
</p><div class="bg-gray-100 overflow-hidden shadow-xl px-6 pt-4">
@foreach ($post->comments as $comment)
<div>
<p class="text-gray-500 font-bold">
{{ $comment->author->first_name . ' ' . $comment->author->last_name }}</p>
<p class="text-gray-400 text-xs">{{ $comment->created_at->format('F, d Y g:i a') }}
</p>
<p class="text-gray-500 pb-4">{{ $comment->content }}</p>
</div>
@endforeach
</div>
</div>
@endif
</div>
</div>
</div>
</div>
{{-- https://www.php.net/manual/en/datetime.format.php --}}
This completes Categories and Posts. Now Tags and navigation menus are remaining. I will update that here very soon.
The source code is available at Github for you to refer to.
Read the previous part, Creating and consuming RESTful API in Laravel of this tutorial.
Twitter: kotagin
GitHub: mdutt247
E-mail: m.dutt@mditech.net
Nice Tutorial to get started with APIs in Laravel.
Madhavendra DuttDec 1·6 min read
An API — Application Programming Interface, is a computing interface that defines interactions between multiple software intermediaries. It is a way to programmatically interact with a separate software component or resource.
REST is an acronym for REpresentational State Transfer. This term was coined by Roy Fielding in 2000. It is an architecture style for designing loosely coupled applications over HTTP, that is often used in the development of web services.
REST defines 6 architectural constraints that make any web service a true RESTful API.
Now let’s jump into creating and consuming RESTful API in Laravel. I would recommend to read and implement Migration and data seeding & Creating Relationships before you dive into this tutorial.
Consumers of our API will be able to perform a few limited tasks. There would be the following endpoints:
Related to category:
GET /categoriesGET /categories/{id}/postsRelated to the post:
GET /postsGET /posts/{id}GET /posts/{id}/commentsRelated to the author:
GET /authors/{id}GET /authors/postsGET /authors/{id}/commentsRelated to the tag:
GET /tags/{id}/postsRelated to comment:
POST /comments/posts/{id}You have to create API Resources, Controllers, and API Routes for the above-mentioned API endpoints.
Step 1: Let’s first create API Resources. To do so follow the below-mentioned steps (don’t forget to implement the Migration and Relationship part):
When building an API, you may need a transformation layer that sits between your Eloquent models and the JSON responses that are actually returned to your application’s users. Laravel’s resource classes allow you to expressively and easily transform your models and model collections into JSON.
Run the command php artisan make:resource CategoryResource. It will create CategoryResource in app\Http\Resources directory.
Open this file and return the desired data, eg. category_id in place of id. You can do a lot more than just masking the field names or number of fields to be returned like- we can return additional information with API, etc.
public function toArray($request)
{
 return [
  'category_id' => $this->id,
  'category_title' => $this->title,
  'category_color' => $this->color,
 ];
}// (Optional) Additional code is attached to the response
public function with($request){
 return [
  'version' => "1.0.0",
  'author_url' => "https://mditech.net"
 ];
}
The same way you have to create other required resources — CommentResource, PostResource, TagResource, UserResource, ImageResource, and VideoResource. Create these resources or check them out from the repository.
Step 2: The next activity is to create the required controllers. To do so follow the below steps:
Run the command php artisan make:controller Api\\CategoryApiController. It will create CategoryApiController in theapp\Http\Controllers\Api directory. Open that file and write the methods to perform actions.
public function index()
{
 $categories = Category::all();
 return CategoryResource::collection($categories);
}public function posts($id)
{
 $posts = Post::where('category_id', $id)->orderBy('id', 'desc')->paginate();
 return PostResource::collection($posts);
}
Here you created two methods index and posts inside CategoryApiController.
The index method will return all the categories wrapped inside CategoryResource.
The posts method will return all the posts belonging to a specific category wrapped inside PostResource.
The same way create the desired methods in CommentApiController, PostApiController, TagApiController, and UserApiController or checkout repository.
Step 3: The last step is to create routes for the API. Proceed to the routes directory and open the api.php file and create the API endpoints that will reference the methods created in CategoryApiController, CommentApiController, PostApiController, TagApiController, and UserApiController.
<?php
use App\Http\Controllers\Api\CategoryApiController;
use App\Http\Controllers\Api\CommentApiController;
use App\Http\Controllers\Api\PostApiController;
use App\Http\Controllers\Api\TagApiController;
use App\Http\Controllers\Api\UserApiController;
use Illuminate\Support\Facades\Route;Route::get('authors/{id}', [UserApiController::class, 'show']);
Route::get('authors/{id}/posts', [UserApiController::class, 'posts']);
Route::get('authors/{id}/comments', [UserApiController::class, 'comments']);
Route::get('categories', [CategoryApiController::class, 'index']);
Route::get('categories/{id}/posts', [CategoryApiController::class, 'posts']);
Route::get('posts', [PostApiController::class, 'index']);
Route::get('posts/{id}', [PostApiController::class, 'show']);
Route::get('posts/{id}/comments', [PostApiController::class, 'comments']);
Route::get('tags/{id}/posts', [TagApiController::class, 'posts']);
Route::middleware('auth:sanctum')->group(function () {
Route::post('comments/posts', [CommentApiController::class, 'store']);
});
Start the database and run php artisan serve command. Laravel development server will start on http://127.0.0.1:8000
Open Postman and test all routes defined in api.php, but make sure to append your route with /api/
To get all categories you should send a GET request to http://127.0.0.1:8000/api/categories
Now lets test authenticated route as well. There is only one authenticated route for storing comment of logged in user on a post.
We are using Laravel Sanctum for authentication and authorization. We will issue an API token and use that in Postman to authenticate the request.
Laravel Sanctum provides a featherweight authentication system for SPAs (single page applications), mobile applications, and simple, token based APIs. Sanctum allows each user of your application to generate multiple API tokens for their account. These tokens may be granted abilities / scopes which specify which actions the tokens are allowed to perform.
To issuse an API token we will run tinker command
php artisan tinker
It will now allow us to interact with the Laravel application from the command line. Here you need to create an API token for a user using createToken() method.
Copy plainTextToken, to be used in Postman.
Now open Postman and do the following:
POST request to http://127.0.0.1:8000/api/comments/postsAuthorization tab select Type as Bearer Token and paste the plainTextToken in Token text box.Headers tab Key as Accept and Value as application/json.Body tab select form-data radio button and in Key, Value write id — 159, comment — Testing some comment on post 159send button and you will get back the newly created comment.In this article, we have been able to build and consume (Consumer was Postman)RESTful API using Laravel. We covered the API Resource creation, API Controller creation, and tested Authenticated and Non-Authenticated API Routes.
The source code is available at Github for you to refer to.
Read the previous part, Creating Relationships of this tutorial.
Read the next part, Creating the Front End for Admin user.
Twitter: kotagin
GitHub: mdutt247
E-mail: m.dutt@mditech.net
WHAT WE’LL BE BUILDING
In this tutorial, you’ll learn how to use Laravel Lumen (version 8) to create REST APIs.
We’ll be creating a Lumen microservice that implements all the types of HTTP requests. Our microservice will help us manage users. So, from any frontend application we connect to our microservice, we should be able to:
– Create a new user (POST Request)
– Edit the details of a user (PUT Request)
– Request for the details of users (GET Request)
– Delete a user (DELETE Request)
Here’s a link to the GitHub repo of this project: Repo
Tools Required:
· You need to have PHP installed. The minimum PHP version that is compatible with Lumen 8 is PHP 7.3. If you have the latest XAMPP, WAMP, or LAMP installed, you should be good to go.
· You also need to have Composer installed. If you don’t have it, click here to get it.
Knowledge Required:
Install lumen on your system by running the command below via a CLI:
composer global require “laravel/lumen-installer”
Next, in your CLI, navigate to the directory that you want your project to be located in and create a lumen project using the command:
composer create-project — prefer-dist laravel/lumen projectName
NB: Replace “projectName” with whatever you want to name your project.
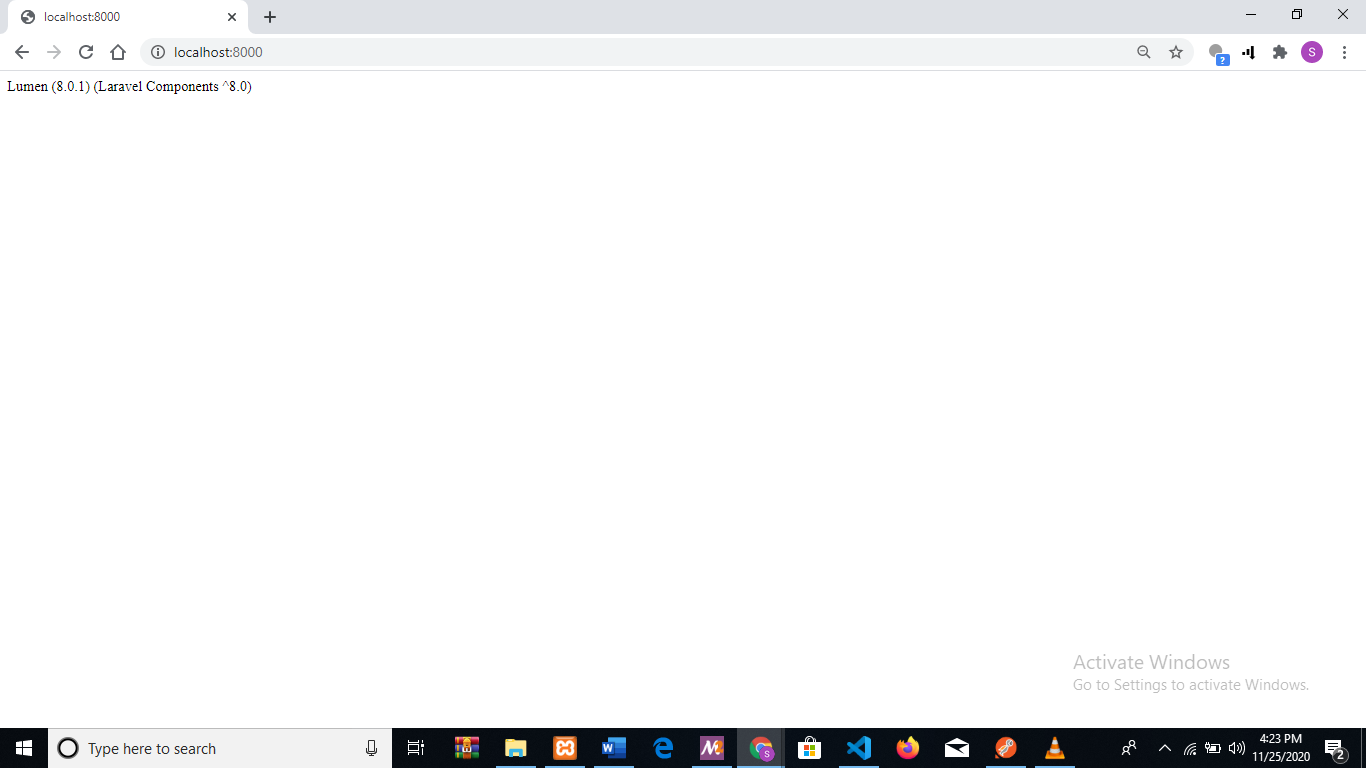
Lumen comes with some boilerplate code; a simple template that we can build upon. If you want to take a quick look at it, run php -S localhost:8000 -t public via your CLI and run localhost:8000 in your browser. You should see something like this:
Now, let’s continue with creating our microservice.
The next thing we want to do is create a database for our microservice. This is where all the details of our users will be stored. There are a number of ways to do this. I’m going to stick with MySQL, and I’ll make use of PHPmyAdmin. Feel free to use whatever option you deem best.
Make sure your server is running(XAMPP, WAMP, or LAMP). Go to your browser and enter localhost/phpmyadmin. Create a new database and take note of the name you used.
Next, let’s add our database details to our lumen project, so as to connect both together.
Open the newly created lumen project with any code editor of your choice, navigate to the .env file, and update the name of the database, the username, and the password.
By default, the username should be “root” and there should be no password.
Now that our database is set, we can start working on the actual project. In this project, we’ll be making use of Laravel’s Eloquent and Facades classes. In Lumen, these classes come disabled, so we have to enable them ourselves. To do this, navigate to boostrap/app.php and uncomment the lines below:
//$app->withFacades();
//$app->withEloquent();
Now, your bootstrap/app.php file should look like this:https://omojolasamsonade.medium.com/media/68dd19d605319f97a4cb061e715cd5b4
We’ll be making use of Eloquent and Facades in our routes and controller files.
Now that we have that set up, let’s create our users table in the database we just created. Run the following command in your CLI:
php artisan make:migration create_users_table
Navigate to the migrations folder and open the newly created users migration file. This is where we decide what columns the users table should have.
Each user should have a first name, a last name, and an email address. So let’s go ahead and create columns for them.
$table->string(‘first_name’);
$table->text(‘last_name’);
$table->integer(‘email_address’);
Now, your users migration file should look like this:https://omojolasamsonade.medium.com/media/0caf4f7320a9f21e3159fbc2f5741ebf
To create the table, run the following command in your CLI:
php artisan migrate
Now that we’ve successfully created our users table, the next step is to create our User model. In Lumen, there’s no CLI command for creating models, so navigate to your app/Models folder, create a file and name it User.php. If you find a User.php file already created in that folder, just use that instead. Now, let’s map it to our database:
protected $fillable =[‘first_name’, ‘last_name’, ‘email_address’,];
It should look like this now:https://omojolasamsonade.medium.com/media/05657cd2cae8ab19b8e53a881583d282
Now we need to create the appropriate routes for our microservice. The code that will process API calls will be in a controller file named UserController. UserController will contain different methods for handling all the different HTTP requests, and each method will need a route pointing to it. The routes will serve as triggers for these methods. Every time they are called, the methods will be executed. We’ll be giving all the routes a common prefix “api/v1” (think of it as them all belonging to the same family).
Navigate to routes/web.php and add the needed routes:
$router->group([‘prefix’ => ‘api/v1’], function () use ($router) {
$router->post(‘users/add’, ‘UserController@createUser’);
$router->get(‘users/view/{id}’, ‘UserController@viewUser’);
$router->put(‘users/edit/{id}’, ‘UserController@updateUser’);
$router->delete(‘users/delete/{id}’, ‘UserController@deleteUser’);
$router->get(‘users/index’, ‘UserController@index’);
});
Your web.php should look like this:https://omojolasamsonade.medium.com/media/8ae6347853eb6a9604c797d0068e5403
(The comment above each route explains what the route does).
Now that our routes are set, we need to actually create that controller file with the methods we are referencing above. These methods will be in charge of handling our API calls and processing our requests.
Go to app/Http/Controllers and create a file named UserController.php
These are the methods we need:
Create New User
public function createUser(Request $request){
$user = User::create($request->all());
return response()->json($user);
}
update user details
public function updateUser(Request $request, $id){
$user = User::find($id);
$user->first_name = $request->input(‘first_name’);
$user->last_name = $request->input(‘last_name’);
$user->email_address = $request->input(‘email_address’);
$user->save();
return response()->json($user);
}
view user
public function viewUser($id){
$user = User::find($id);
return response()->json($user);
}
delete user
public function deleteUser($id){
$user = User::find($id);
$user->delete();
return response()->json(‘Removed successfully’);
}
list users
public function index(){
$user =User::all();
return response()->json($user);
}
Your User Controller should look like this:https://omojolasamsonade.medium.com/media/2d970a97395fe287e49e3d980da9c2e3
The first method createUser() allows you to create a new user.
The second method updateUser() allows you to update the details of an already existing user.
The third method viewUser() allows you to view the details of a user you created.
The fourth method deleteUser() allows you to delete a user from your database.
The fifth method index() allows you to list all the users you created.
Now, if a call is made to any of the routes in web.php, the corresponding method in UserController is triggered.
You can use Postman to make the http request. To do that, make sure your lumen server is running. Use this command to get it started: php -S localhost:8000 -t public
Next, fire up postman.
Let’s test createUser() first. Send this HTTP request via Postman: http://localhost:8000/api/v1/users/add

Create the required fields and supply them with values.
(Use the POST option)
You should get the details of the user you just created as a JSON response.
Next, let’s test updateUser(). We can edit the details of the user we just created. Send this HTTP request via Postman: http://localhost:8000/api/v1/users/edit/1
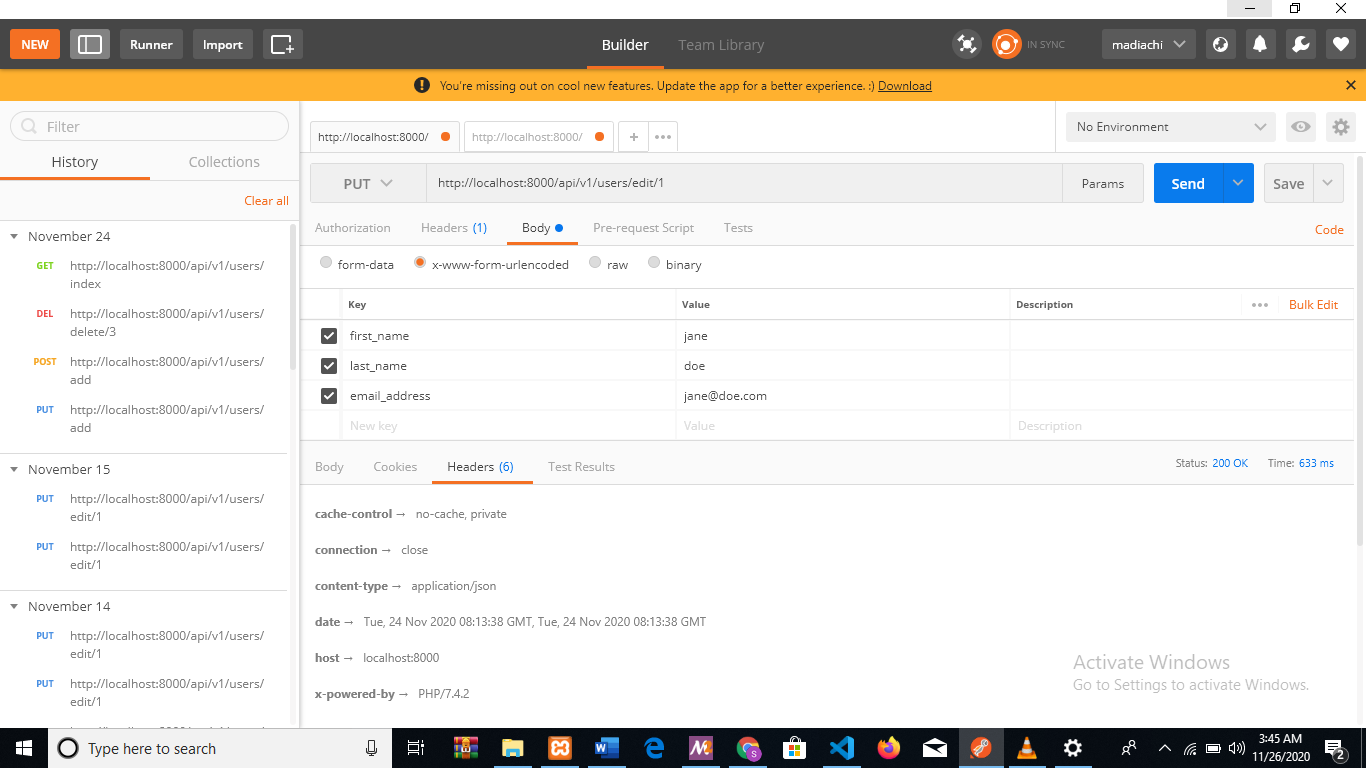
Supply the previously created fields with new values.
(Use the PUT option)
You should get the details you just entered back as a JSON response.
Next, let’s test viewUser(). We can view the details of the user we just created. Send this HTTP request via Postman: http://localhost:8000/api/v1/users/view/1
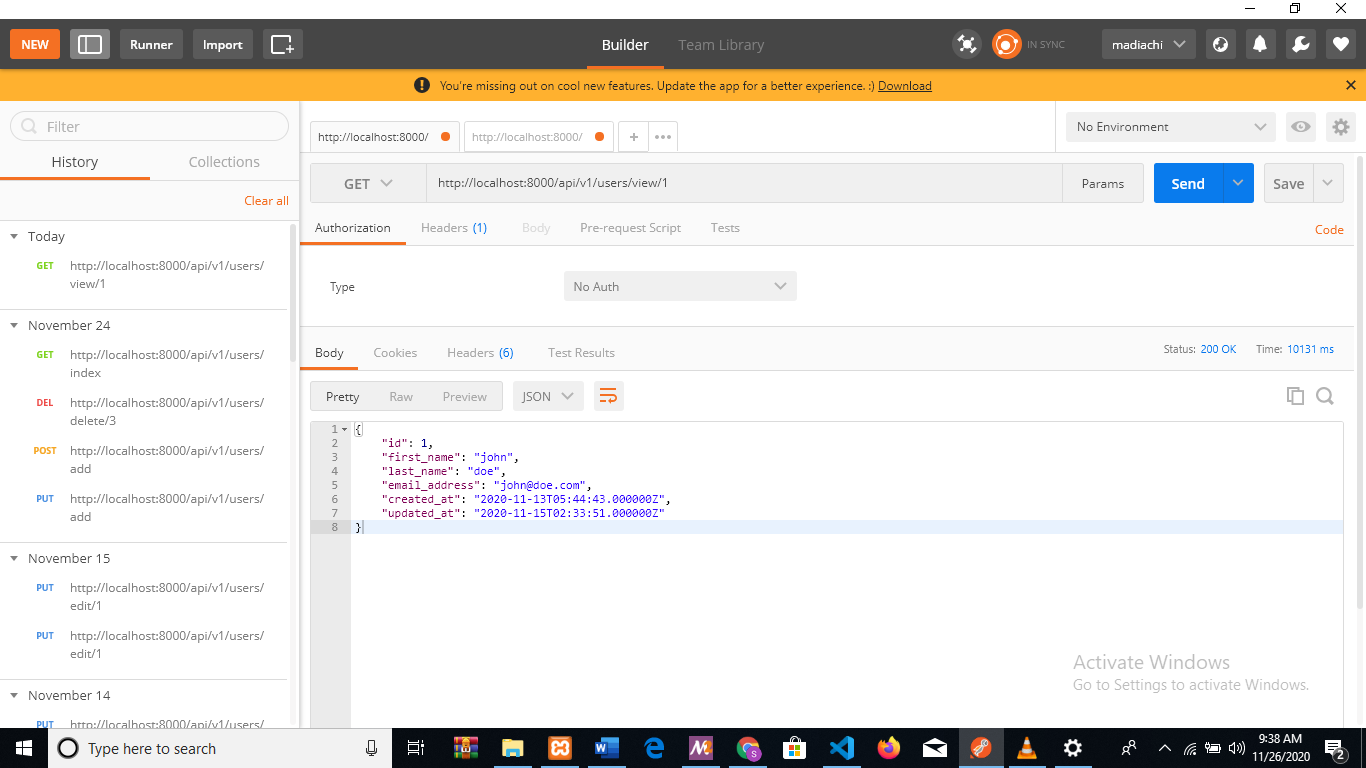
(Use the GET option)
You should get the details of the user you created back as a JSON response.
Next, let’s test deleteUser(). We can delete the user we just created. Send this HTTP request via Postman: http://localhost:8000/api/v1/users/delete/1
(Use the DELETE option)
You should get a success message back.
Lastly, let’s test index(). This will list out all the users we have in our database. Send this HTTP request via Postman: http://localhost:8000/api/v1/users/index
(Use the GET option)
Let’s create a very simple frontend application to consume the API we just created. A simple PHP application will suffice. Navigate to xampp/htdocs and create a folder for your frontend app. I’ll name mine “userfrontend”. Next, create a file in the folder and name it “index.php”.
Make sure your lumen microservice and your XAMPP are running.
We can use php’s curl function to make the API request, like this:
$url = ‘http://localhost:8000/api/v1/users/index’;
curl_setopt($curl, CURLOPT_URL, $url);
$data = curl_exec($curl);
Next, you convert the data to JSON format:
$decodeUsers = json_decode($data, true);
And lastly, loop through the data with a foreach loop and display each user’s data.
Now, if you go to your browser and run http://localhost/userfrontend, you should see the details of the users in your database.
Here’s a link to the GitHub repo of this project: Repo

Create unique and interesting apps using these APIs
Laravel provides us with an amazing feature called Must Verify Email which makes email verification a breeze by just writing 2–3 lines of code really. But unfortunately there is no provision for applying the same feature in API, especially if you are using same auth user table to register in API . This threw me off for a while and there wasn’t many resource online , when i finally got around it , turned out to be very simple. So here i am going to share with you how to apply the same feature in your API registration as one stop solution. We will basically recreate the must verify email feature for API. Follow along ….
Let’s install a fresh installation of Laravel, in my case I named my project as “email”, runn the following command to install laravel
composer create-project --prefer-dist laravel/laravel emailLaravel comes ship with users table migration which looks like this
class CreateUsersTable extends Migration
{
   /**
    * Run the migrations.
    *
    * @return void
    */
    public function up()
    {
        Schema::create('users', function (Blueprint $table) {
            $table->increments('id');
            $table->string('name');
            $table->string('email')->unique();
            $table->timestamp('email_verified_at')->nullable();
            $table->string('password');
            $table->rememberToken();
            $table->timestamps();
        });
    }
}
As you can see that laravel includes ‘email_verified_at’ in it’s schema which when we use Must Verify Email changes from null to the current timestamp , you can check the docs for more info.
Before we implement the email verification feature we need to run the artisan command to make the authorisation scaffoldings type in the following command to enable auth:
php artisan make:auth
Once the auth is generated you can simply include the following in your User Model as mentionad in the docs
<?php

namespace App;

use Illuminate\Notifications\Notifiable;
use Illuminate\Contracts\Auth\MustVerifyEmail;
use Illuminate\Foundation\Auth\User as Authenticatable;

class User extends Authenticatable implements MustVerifyEmail
{
    use Notifiable;
    // ...
}
And you can simply include the following in your web route
Auth::routes(['verify' => true]);
Add the middleware in the route to protect it like so
Route::get('profile', function () {
    // Only verified users may enter...
})->middleware('verified');
So far we have only talked about how we can implement the email verification in the web route now coming to the topic i will guide you how we can replicate the same for API
Let’s start with recreating the VerificationController that you can find under app/http/controllers/auth/VerificationController only for an API let’s name it “VerificationApiController” run the following command to make the controller
php artisan make:controller VerificationApiController
And just add the follwoing code inside the controller
<?php

namespace App\Http\Controllers;

use App\User;
use Illuminate\Foundation\Auth\VerifiesEmails;
use Illuminate\Http\Request;
use Illuminate\Auth\Events\Verified;

class VerificationApiController extends Controller
{
    use VerifiesEmails;

    /**
    * Show the email verification notice.
    *
    */
    public function show()
    {
        //
    }

    /**
    * Mark the authenticated user’s email address as verified.
    *
    * @param \Illuminate\Http\Request $request
    * @return \Illuminate\Http\Response
    */
    public function verify(Request $request)
    {
        $userID = $request[‘id’];
        $user = User::findOrFail($userID);
        $date = date(“Y-m-d g:i:s”);
        $user->email_verified_at = $date; // to enable the “email_verified_at field of that user be a current time stamp by mimicing the must verify email feature
        $user->save();
        return response()->json(‘Email verified!’);
    }

    /**
    * Resend the email verification notification.
    *
    * @param \Illuminate\Http\Request $request
    * @return \Illuminate\Http\Response
    */
    public function resend(Request $request)
    {
        if ($request->user()->hasVerifiedEmail()) {
        return response()->json(‘User already have verified email!’, 422);
        // return redirect($this->redirectPath());
    }

    $request->user()->sendEmailVerificationNotification();
    return response()->json(‘The notification has been resubmitted’);
    // return back()->with(‘resent’, true);
    }
}
Now let’s create our own notification which will mimic the Must Verify Email notification , just create a folder under the app folder called “Notifications” and create a file named “VerifyApiEmail.php” and paste in the following code:
<?php

namespace App\Notifications;

use Illuminate\Support\Carbon;
use Illuminate\Support\Facades\URL;
use Illuminate\Auth\Notifications\VerifyEmail as VerifyEmailBase;

class VerifyApiEmail extends VerifyEmailBase
{
    /**
    * Get the verification URL for the given notifiable.
    *
    * @param mixed $notifiable
    * @return string
    */
    protected function verificationUrl($notifiable)
    {
        return URL::temporarySignedRoute(
        ‘verificationapi.verify’, Carbon::now()->addMinutes(60), [‘id’ => $notifiable->getKey()]
        ); // this will basically mimic the email endpoint with get request
    }
}
Now all you have to do for it to work is bring in the notification that you created into your User Model like so use App\Notifications\VerifyApiEmail;
and add the following method inside your user Model
public function sendApiEmailVerificationNotification()
{
    $this->notify(new VerifyApiEmail); // my notification
}
You are almost done now all you have to do is specify the route “‘verificationapi.verify” in your api route , it’s important to note that you need to add the following routes inside your api route for it to work
Route::get(‘email/verify/{id}’, ‘VerificationApiController@verify’)->name(‘verificationapi.verify’);
Route::get(‘email/resend’, ‘VerificationApiController@resend’)->name(‘verificationapi.resend’);
The above code will take care of email verification and getting the proper response as “Email Verified”. But we still need to be able to send the email notification to the email of the user trying to register via api , for that let’s make a controller to handle the api registration request by the user. Let’s call it UsersApiController , run the following command to make the controller
php artisan make:controller UsersApiController
and paste in the following code in it
<?php

namespace App\Http\Controllers;

use Illuminate\Http\Request;
use App\User;
use Illuminate\Support\Facades\Hash;
use Auth;
use Validator;
use Illuminate\Foundation\Auth\VerifiesEmails;
use Illuminate\Auth\Events\Verified;

class UsersApiController extends Controller
{
    use VerifiesEmails;

    public $successStatus = 200;

    /**
    * login api
    *
    * @return \Illuminate\Http\Response
    */
    public function login()
    {
        if (Auth::attempt([‘email’ => request(‘email’), ‘password’ => request(‘password’)])) {
            $user = Auth::user();
                if ($user->email_verified_at !== NULL) {
                    $success[‘message’] = “Login successfull”;
                    return response()->json([‘success’ => $success], $this-> successStatus);
                } else {
                    return response()->json([‘error’=>’Please Verify Email’], 401);
                }
            } else {
            return response()->json([‘error’=>’Unauthorised’], 401);
        }
    }

    /**
    * Register api
    *
    * @return \Illuminate\Http\Response
    */
    public function register(Request $request)
    {
        $validator = Validator::make($request->all(), [
            ‘name’ => ‘required’,
            ‘email’ => ‘required|email’,
            ‘password’ => ‘required’,
            ‘c_password’ => ‘required|same:password’,
        ]);

        if ($validator->fails()) {
            return response()->json([‘error’=>$validator->errors()], 401);
        }

        $input = $request->all();
        $input[‘password’] = Hash::make($input[‘password’]);
        $user = User::create($input);
        $user->sendApiEmailVerificationNotification();
        $success[‘message’] = ‘Please confirm yourself by clicking on verify user button sent to you on your email’;
        return response()->json([‘success’=>$success], $this-> successStatus);
    }

    /**
    * details api
    *
    * @return \Illuminate\Http\Response
    */
    public function details()
    {
        $user = Auth::user();
        return response()->json([‘success’ => $user], $this-> successStatus);
    }
}
Now all we need to do is add the routes to tie up with the methods in our controller as following , again make sure to add this in your api routes
Route::post(‘login’, ‘UsersApiController@login’);

Route::post(‘register’, ‘UsersApiController@register’);

Route::group([‘middleware’ => ‘auth:api’], function() {
    Route::post(‘details’, ‘UsersApiController@details’)->middleware(‘verified’);
}); // will work only when user has verified the email
Congratulations now you can recieve the email via Api registration , you can test the result in Postman by simply sending a POST Request to
yourUrl/api/register — to register and you should get an email and you can simply click on the link at the email that you have recieved you will get a response as “Email verified” and user is now verified.
Hope this article helps you in solving your API email verification in laravel . Please feel free to reach me out for any queries or doubt.

More love to expressive code, and less to those verbose lines

Laravel made it so easy to implement a multi-language website. You can implement it with Laravel localization and just some tricks. Also, there is plenty of Laravel translation packages which you can use in your project. In this post, I will explain how to implement multi-language functionality.
Creating a multi-language website requires two steps. Firstly, you need to detect user local language setting and change it bu user choice. Secondly, you need to translate messages and strings into user local language, in which we use Laravel localization.
In order to detect user language setting, we need to create a language middleware. this middleware checks for locale setting in the user session. If there was no locale setting, the middleware sets a default locale setting. Then, it sets system locale by the user session setting.
if (is_null(session('locale'))) {
    session(['locale'=> "en"]);
}
app()->setLocale(session('locale'));
Setting locale is enough for Laravel localization to work. After that, we need a simple function To change the system language. This function gets a locale string and sets the user locale session.
public function change_lang($lang) {
    if (in_array($lang,['en','tr','fa'])) {
        session(['locale'=> $lang]);
    }
    return back();
}
In order to make sure the given string is a locale string, we check the language string against an array of locales.
Any route to that function, like a drop down to select language will work perfectly and will show your website multi-language functionality for users. So they can easily choose their languages.
Every string that needed to be translated must be in Laravel lang directive or __ function. For example, you can manage all message strings with inside messages.
@lang('messages.successful_login')
In addition, you can find more useful information about localization like how to put variables inside translation strings in Laravel documentation.
Laravel Langman package is one of the useful packages for translation. In order to translate strings, every time you updated views with new strings, you just need to run Langman sync command:
php artisan langman:sync
Laravel Langman has a lot more commands that would help you in your Laravel project localization. Reading through its documentation will add a lot.
Although this method is easy and enough, I realized that for SEO purposes and to share localized links to your website, you better consider concatenating user locale in your projects routes. Then, you can check user locale from the query string and the rest is just as same as I explained in this post.
Keep in touch and share your ideas about Laravel localization and how you implement multi-language functionality in your web projects. What other methods and Laravel packages do you use in your multi-language projects?
Also, you can read my other post about Laravel authorization and user’s permission management in Laravel.
If you find this multi-language functionality method useful in Laravel and you may want to implement this on your Laravel projects, share your ideas with me. Follow me on Twitter, Let’s connect on LinkedIn and give me a visit to amiryousefi.com
Inmany web projects, we have different user roles interacting with the system. Each role has its own permission. Every feature of the system can be enabled or disabled for these roles. We can define users permissions in our codes and check if they are authorized to do the requested action or not. A better way, mostly in more flexible systems, is to create a role and authorization management system. I’ll explain how to implement a Laravel authorization system and define users permission based on their roles.
In this post, firstly we manage users in groups we called roles. Every role has different permissions. In order to avoid permissions conflict, we assume each user has only one role. Secondly, Laravel authorization implemented by middleware. This middleware checks for the user’s role permission and authorizes user requests.
In order to implement Laravel authorization, we will create roles and permissions table. To assign a role for users, we create a roles table. The migration for roles table is as simple as this:
Schema::create(‘roles’, function (Blueprint $table) {
    $table->increments(‘id’);
    $table->string(‘name’);
    $table->string(‘description’)->nullable();
    $table->timestamps();
});
We have an ID and name for roles. All users will be managed in these roles. There is also a description field, because you may need a short note on roles to describe each role for yourself.
After that, we add a foreign key, role_id, in the user table. Adding this field to the default user model helps us for Laravel authorization.
$table->unsignedInteger(‘role_id’)->index();
$table->foreign(‘role_id’)->references(‘id’)->on(‘roles’);
Now let’s talk about the permissions table. Every request leads to a method of a controller. So we store a list of all methods and their controller’s name in the permissions table. Later, we explain how we gather this list and how we check users authorization in Laravel by this permissions table.
Schema::create(‘permissions’, function (Blueprint $table) {
    $table->increments(‘id’);
    $table->string(‘name’)->nullable();
    $table->string(‘key’)->nullable();
    $table->string(‘controller’);
    $table->string(‘method’);
    $table->timestamps();
});
Finally, a relationship created between roles and permission.
Schema::create(‘permission_role’, function (Blueprint $table) {
    $table->unsignedInteger(‘permission_id’);
    $table->unsignedInteger(‘role_id’);$table->foreign(‘permission_id’)
        ->references(‘id’)
        ->on(‘permissions’)
        ->onDelete(‘cascade’);$table->foreign(‘role_id’)
        ->references(‘id’)
        ->on(‘roles’)
        ->onDelete(‘cascade’);$table->primary([‘permission_id’, ‘role_id’]);
});
We created a complete users->roles->permissions architecture. After that, an access list will be stored in these tables. So, we can easily implement Laravel authorization by checking requests against this list.
Read Laravel migration documentation for further information about creating tables.
The whole purpose of this post is about being dynamic. Especially, in systems with a different type of roles. We need to create a list of permissions in the system. Also, this list must be updated as the system developed. List of controllers and methods is a good representation of all permissions in the system. Every route is leading to a method of a controller. So, it’s a good idea to make a list of permissions using the routes list.
In order to do that, I used a Laravel database seeder. Firstly, let’s write a role seeder. It creates basic roles we need and stores them in the roles table. Running this artisan command will create RolesSeeder for you:
php artisan make:seeder RolesTableSeeder
Inside this RolesTableSeeder, we create our basic roles:
DB::table(‘roles’)->insert([
    [‘name’ => ‘admin’],
    [‘name’ => ‘operator’],
    [‘name’ => ‘customer’],
]);
You can add as many roles as you need. Also, you can create new roles from your website whenever you need a new one.
The second step is to create an authorization list for each role. we create another Laravel seeder in which populate permissions table:
php artisan make:seeder PermissionTableSeeder
Firstly, we get all routes list. Then, We check up with the database if the permission already stored. After that, if this permission is not in the table already, we insert new permissions in the permissions table. After all, we attach all permissions to the admin role.
$permission_ids = []; // an empty array of stored permission IDs
// iterate though all routes
foreach (Route::getRoutes()->getRoutes() as $key => $route) {
    // get route action
    $action = $route->getActionname(); // separating controller and method
    $_action = explode(‘@’, $action);

    $controller = $_action[0];
    $method = end($_action);

    // check if this permission is already exists
    $permission_check = Permission::where(
        [‘controller’ => $controller, ’method’ => $method]
    )->first();
    if (!$permission_check) {
        $permission = new Permission;
        $permission->controller = $controller;
        $permission->method = $method;
        $permission->save();

        // add stored permission id in array
        $permission_ids[] = $permission->id;
    }
} // find admin role.
$admin_role = Role::where(‘name’, ’admin’)->first(); // atache all permissions to admin role
$admin_role->permissions()->attach($permission_ids);
Every request in Laravel goes through middleware. Knowing that creating RolesAuth middleware will do Laravel authorization. You can create the middleware manually or by an artisan command:
php artisan make:middleware RolesAuth
Inside this middleware, we get all permissions for logged in user. Then, we check if the requested action is in the permissions list. If requested action can’t be found in permissions list, a 403 error response returns.
// get user role permissions
$role = Role::findOrFail(auth()->user()->role_id);
$permissions = $role->permissions; // get requested action
$actionName = class_basename($request->route()->getActionname()); // check if requested action is in permissions list
foreach ($permissions as $permission) {
    $_namespaces_chunks = explode(‘\’, $permission->controller);
    $controller = end($_namespaces_chunks);
    if ($actionName == $controller . ‘@’ . $permission->method) {
        // authorized request
        return $next($request);
    }
} // none authorized request
return response(‘Unauthorized Action’, 403);
Finally, you can register this middleware in Laravel and use it according to your requirements.
I started publishing my experience about Laravel development, here you can see my post about Laravel localization. Comment your questions about this post or any other Laravel development questions in this area.
Update 2020:
Now you can use my Laravel permission package build based this article. It just got better, cleaner, and easier to understand.
https://github.com/amiryousefi/laravel-permission