Although there are many articles about this topic, I decided to document this in a post for my future self and to share with all of you the approach I usually use to separate an application depending on specific roles.


Although there are many articles about this topic, I decided to document this in a post for my future self and to share with all of you the approach I usually use to separate an application depending on specific roles.

Any hacker knows the keys to the network are in Active Directory (AD). Once a hacker has access to one of your user accounts, it’s a race against you and your data security protections to see if you can stop them before they can start a data breach.
It’s important to know Active Directory backwards and forwards in order to protect your network from unauthorized access – and that includes understanding LDAP.
LDAP (Lightweight Directory Access Protocol) is an open and cross platform protocol used for directory services authentication.
LDAP provides the communication language that applications use to communicate with other directory services servers. Directory services store the users, passwords, and computer accounts, and share that information with other entities on the network.
Active Directory is a directory services implementation that provides all sorts of functionality like authentication, group and user management, policy administration and more.
Active Directory (AD) supports both Kerberos and LDAP – Microsoft AD is by far the most common directory services system in use today. AD provides Single-SignOn (SSO) and works well in the office and over VPN. AD and Kerberos are not cross platform, which is one of the reasons companies are implementing access management software to manage logins from many different devices and platforms in a single place. AD does support LDAP, which means it can still be part of your overall access management scheme.
Active Directory is just one example of a directory service that supports LDAP. There are other flavors, too: Red Hat Directory Service, OpenLDAP, Apache Directory Server, and more.
LDAP is a way of speaking to Active Directory.
LDAP is a protocol that many different directory services and access management solutions can understand.
The relationship between AD and LDAP is much like the relationship between Apache and HTTP:
Occasionally you’ll hear someone say, “We don’t have Active Directory, but we have LDAP.” What they probably mean is that they have another product, such as OpenLDAP, which is an LDAP server.
It’s kind of like someone saying “We have HTTP” when they really meant “We have an Apache web server.”
There are two options for LDAP authentication in LDAP v3 – simple and SASL (Simple Authentication and Security Layer).
Simple authentication allows for three possible authentication mechanisms:
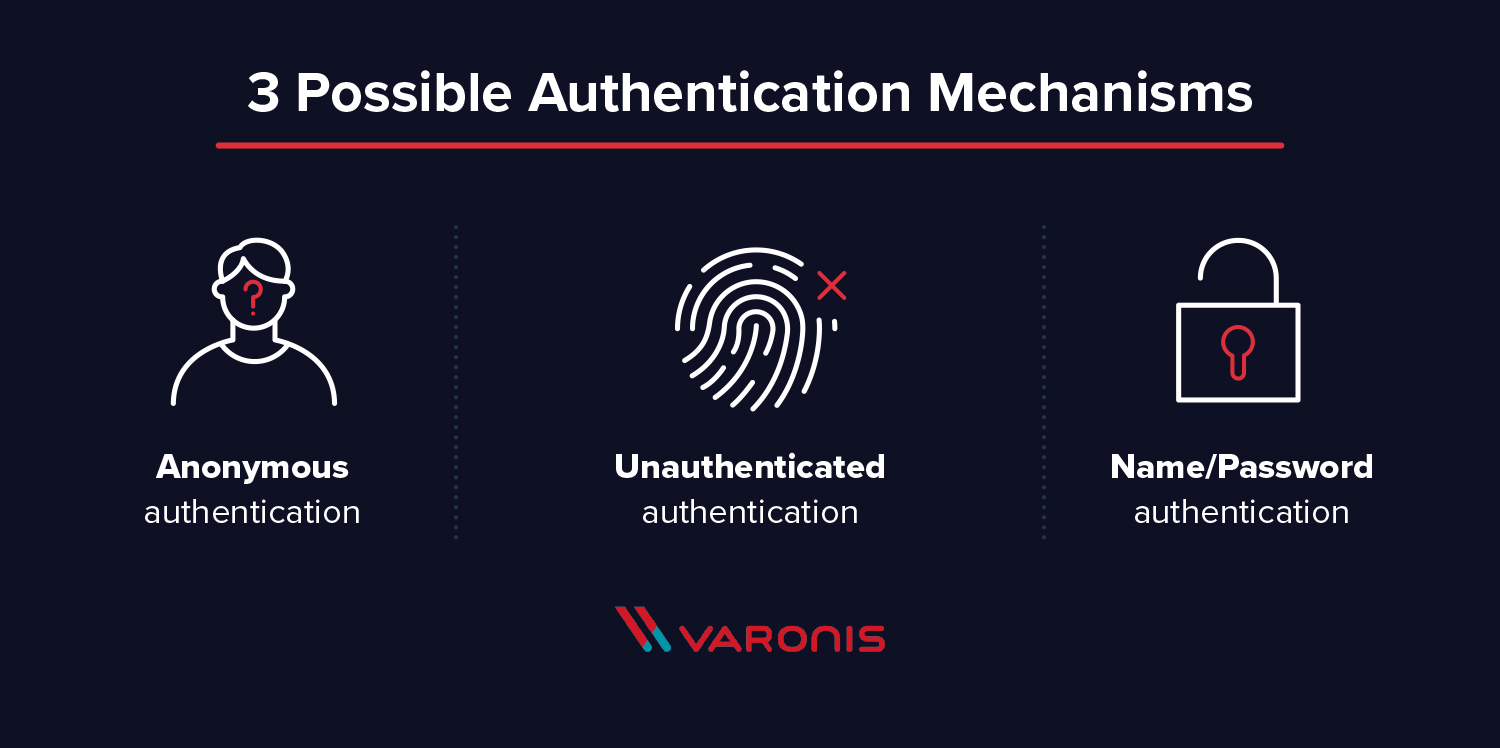
SASL authentication binds the LDAP server to another authentication mechanism, like Kerberos. The LDAP server uses the LDAP protocol to send an LDAP message to the other authorization service. That initiates a series of challenge response messages that result in either a successful authentication or a failure to authenticate.
It’s important to note that LDAP passes all of those messages in clear text by default, so anyone with a network sniffer can read the packets. You need to add TLS encryption or similar to keep your usernames and passwords safe.
An LDAP query is a command that asks a directory service for some information. For instance, if you’d like to see which groups a particular user is a part of, you’d submit a query that looks like this:
(&(objectClass=user)(sAMAccountName=yourUserName)

(memberof=CN=YourGroup,OU=Users,DC=YourDomain,DC=com))
Beautiful syntax, huh? Not quite as simple as typing a web address into your browser. Feels like LISP.
Luckily, in most cases, you won’t need to write LDAP queries. To maintain your sanity, you’ll perform all your directory services tasks through a point-and-click management interface like Varonis DatAdvantage or perhaps using a command line shell like PowerShell that abstracts away the details of the raw LDAP protocol.
TL;DR: LDAP is a protocol, and Active Directory is a server. LDAP authenticates Active Directory – it’s a set of guidelines to send and receive information (like usernames and passwords) to Active Directory. Want to learn more? Get a 1:1 AD demo and learn how Varonis helps protect your Active Directory environment.
I’ll be adding updates to my new blog here: https://blog.salrashid.me/
Tutorial on how to provision users and groups from a local LDAP server (OpenLDAP) into your G-suites domain. Any users and groups present in your local LDAP server will get created in G-suites. Once your users are present in your G-suites domain, you can authorize these users and groups access to Google Cloud Resources and other G-suites features.
This article is simply a tutorial on the simplified steps you would take for your on-prem directory server (ActiveDirectory, OpenLDAP). The Directory Sync utility overwrites any existing G-suites users and groups in favor of your local LDAP. As this is just a tutorial, only execute the ‘dry-run/simulate’ capabilities unless you are absolutely sure. You will need Domain Admin user privileges to your G-suites domain.
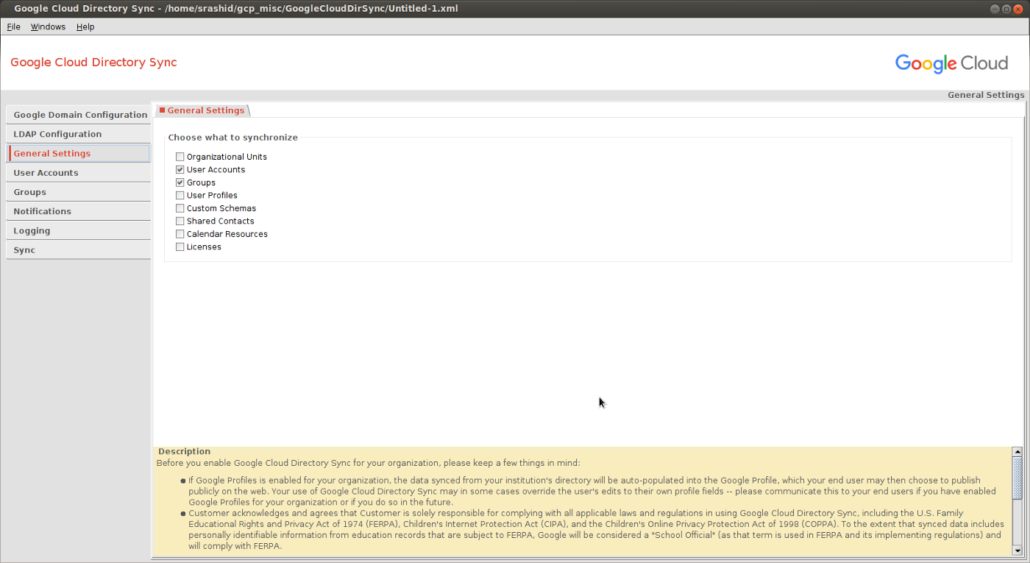
This sample will only sync the basic Users and Groups objects from your LDAP to G-suites.
Some references on the Directory Sync tool:
If you are a Google Cloud Platform user, consider migrating your organization after you have setup Directory Sync
This article is a copy of my github page.
This tutorial run a Docker container with a configurable OpenLDAP server that you can setup and load sample data reflecting your LDAP hierarchy. The the sample LDIF file is very basic and enables the domain dc=example, dc=com with users under ou=users and groups under ou=groups
You can edit the slapd.conf file and import.ldif file to map to your users and directory structure. You will need to initialize and load the LDIF files once the container starts up as shown below
** NOTE: I’ve made some specific modifications to the objectclass mappings for a users groups display name for simplicity **
The first step is to setup the local LDAP server. You will need to clone the gitrepo to acquire the sample Dockerfile and ldap configurations.
docker build -t myldap .
docker run -p 1389:389 -p 1636:636 myldap slapd -h "ldap://0.0.0.0:389 ldaps://0.0.0.0:636" -d 3 -f /ldap/slapd.conf
Install LDAP utilities on the host
Either: Install some LDAP utilities you will need on the docker host
apt-get install ldap-utils
Alternatively, you can install an LDAP UI like Apache Directory Studio.
Load the sample data
ldapadd -v -x -D "cn=admin,dc=example,dc=com" -w mypassword -H ldap://localhost:1389 -f import.ldif
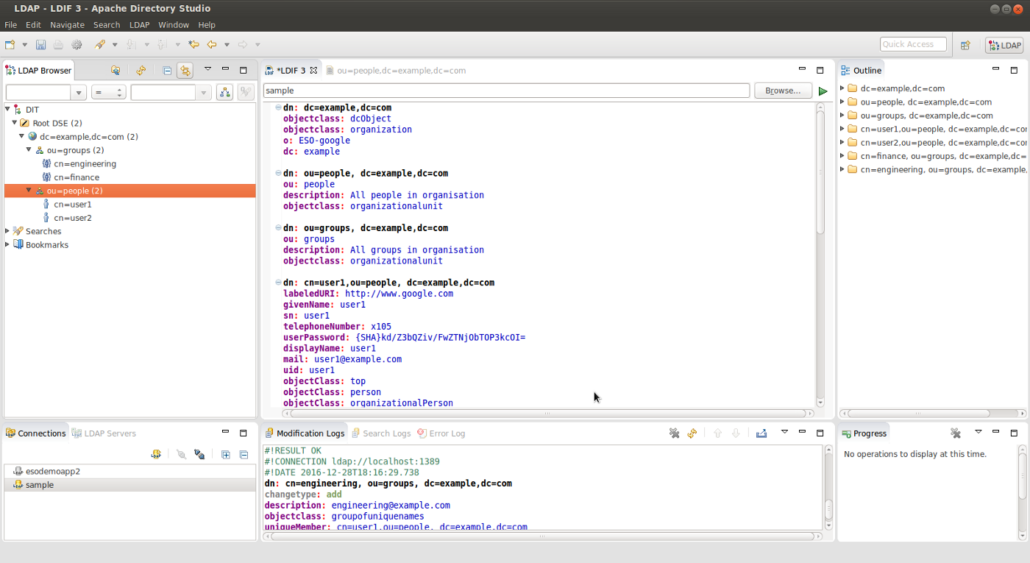
If you used Apache Directory Studio, you can load and execute the .ldif file directly (“LDAP →New LDIF FIle”) after you establish a connection:
Verify via query
ldapsearch -v -x -D "cn=admin,dc=example,dc=com" -w mypassword -b "ou=people,dc=example,dc=com" -H ldap://localhost:1389
If you use Directory Studio, you can browse the imported LDAP structure in the console directly.
Once the LDAP server is running, we need to run the Directory Sync utility.
Again only run the Directory Sync in dry-run mode!!
Download and Start the Directory Sync utility Download: https://support.google.com/a/answer/6120989 Launch:
$ GoogleCloudDirSync/config-manager
You need to be domain super user to syn and run this utility:
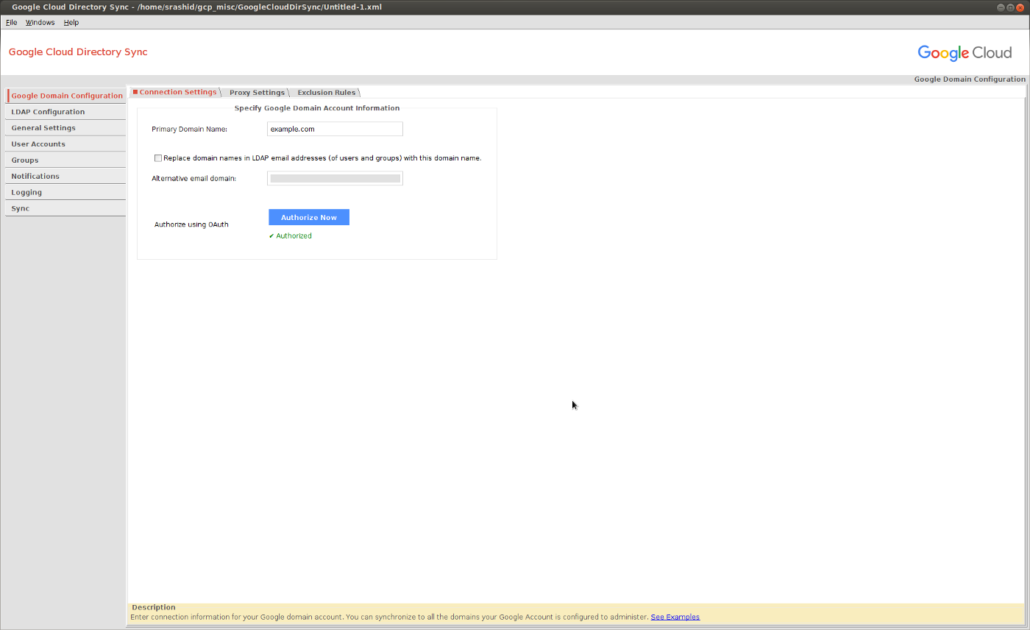
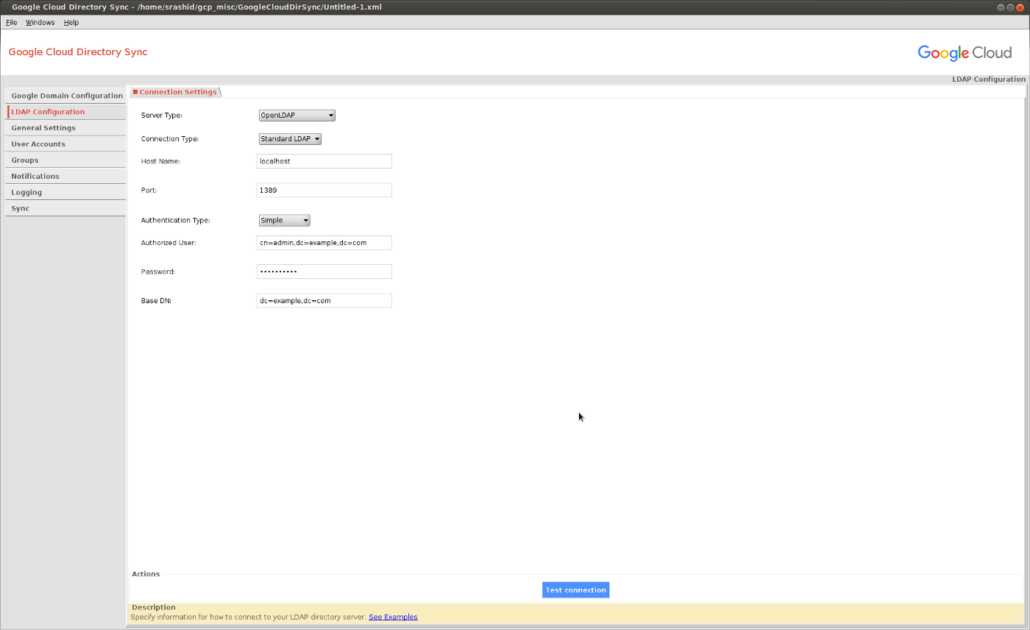
Connect as cn=admin,dc=example,dc=com. The default password is mypassword
If you are using ldaps://, you need to add in the certificate chain first:
cd GoogleCloudDirSync/jre
$ keytool -keystore lib/security/cacerts -storepass changeit -import -file path_to_your/ldap_crt.pem -alias mydc
$ keytool -keystore lib/security/cacerts -storepass changeit -import -file path_to_your/CA_crt.pem -alias myca
I’ve made some specific maps for LDAP attributes to G-suites attributes:
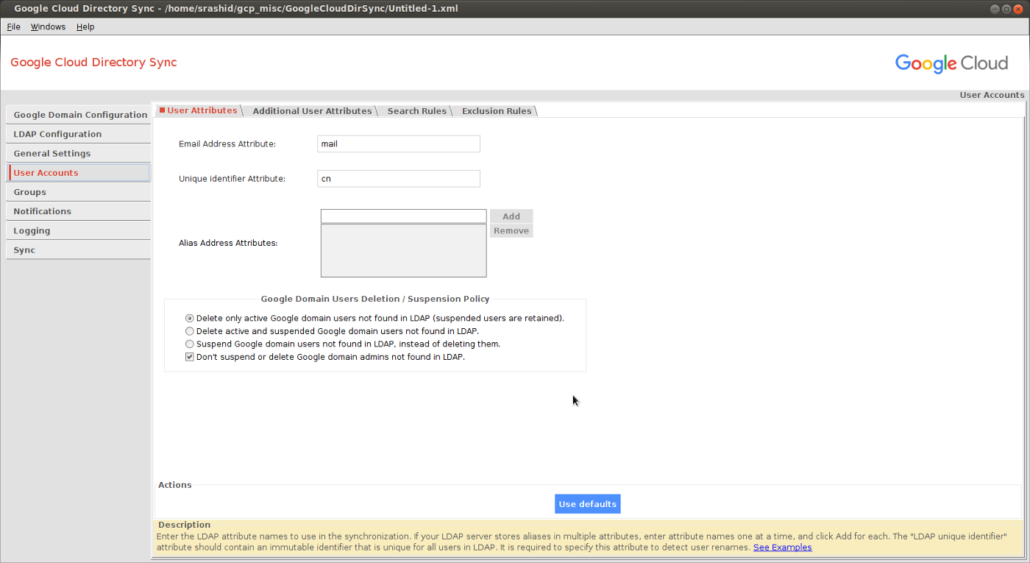
The users in LDAP are found under ou=People,dc=example,dc=com and the primary identifier is cn
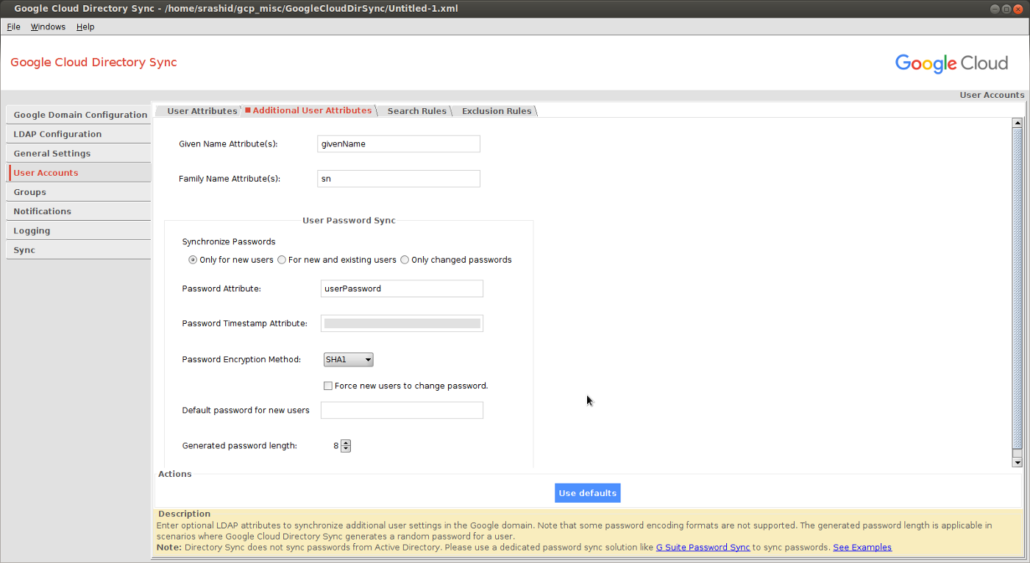
The SHA format for the password can be derived using sample utilities bundled with openldap:
slappasswd -h  {SHA} -s mypassword
{SHA}kd/Z3bQZiv/FwZTNjObTOP3kcOI=

I did not want to override the default openldap schema so I ended up using the description attribute of objectclass: groupofuniquenames as the attribute the utility will use to infer the Group Email Address:
Meaning the LDAP’s description field for a groupofuniquenames denotes the email address to provision in G-suites.
You can search for the groups by looking in the subtree for:
(&(objectClass=groupOfUniqueNames)(cn=*))
For example:
dn: cn=engineering, ou=groups, dc=example,dc=com
cn: engineering
objectclass: groupofuniquenames
description: engineering@example.com
uniqueMember: cn=user1,ou=people, dc=example,dc=com
uniqueMember: cn=user2,ou=people, dc=example,dc=com
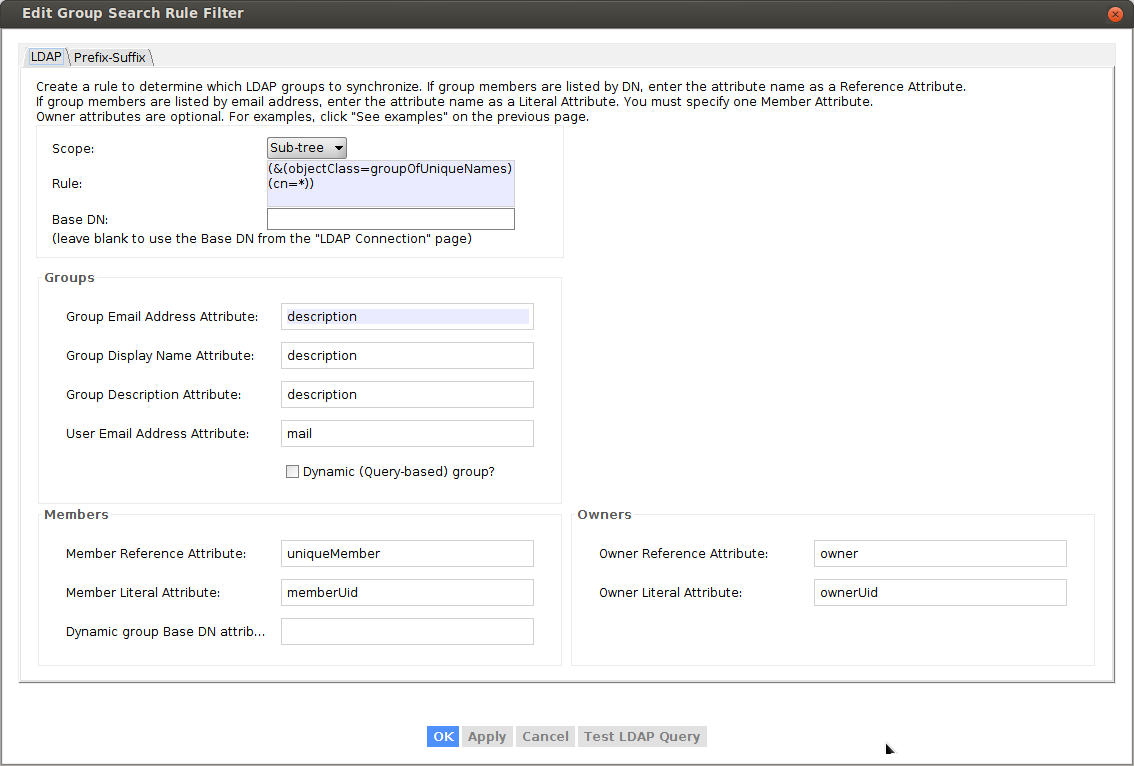
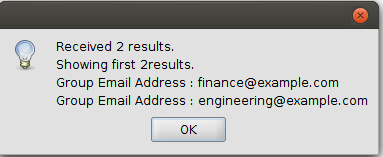
To verify, select “Test Query” button:
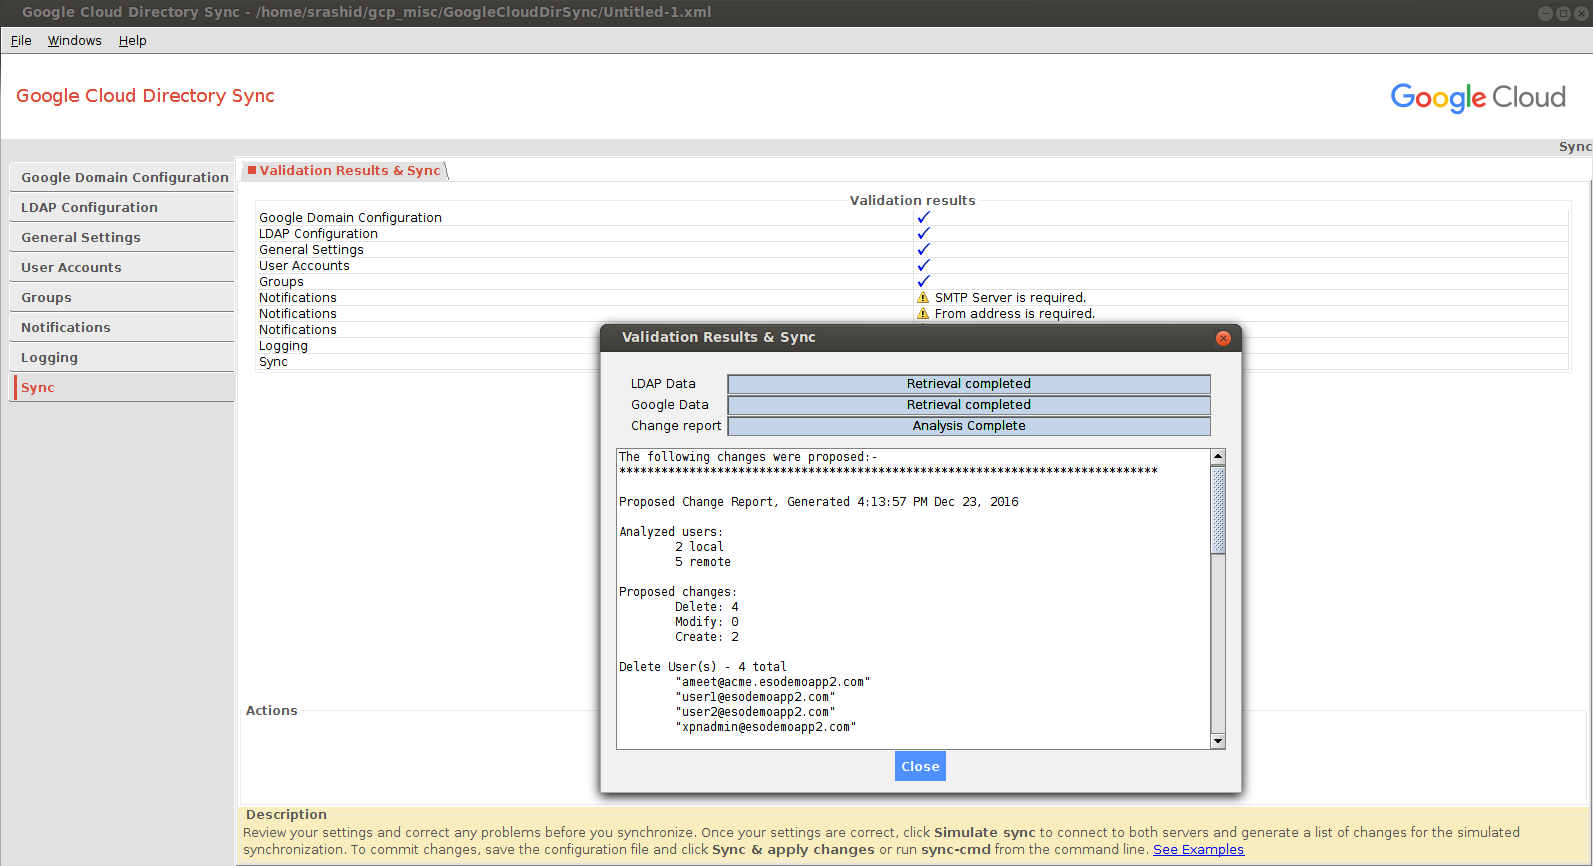
Now that you are all setup, click the ‘Simulate sync’ button to see what would happen.
REMEMBER TO SELECT “SIMULATE SYNC”
If had existing users already in my apps domain and I tried to import new ones, the reconciliation favored the local LDAP (meaning it would add local ldap and delete existing accounts~)
Only execute a full sync if you are absolutely sure this is what you want to do!!
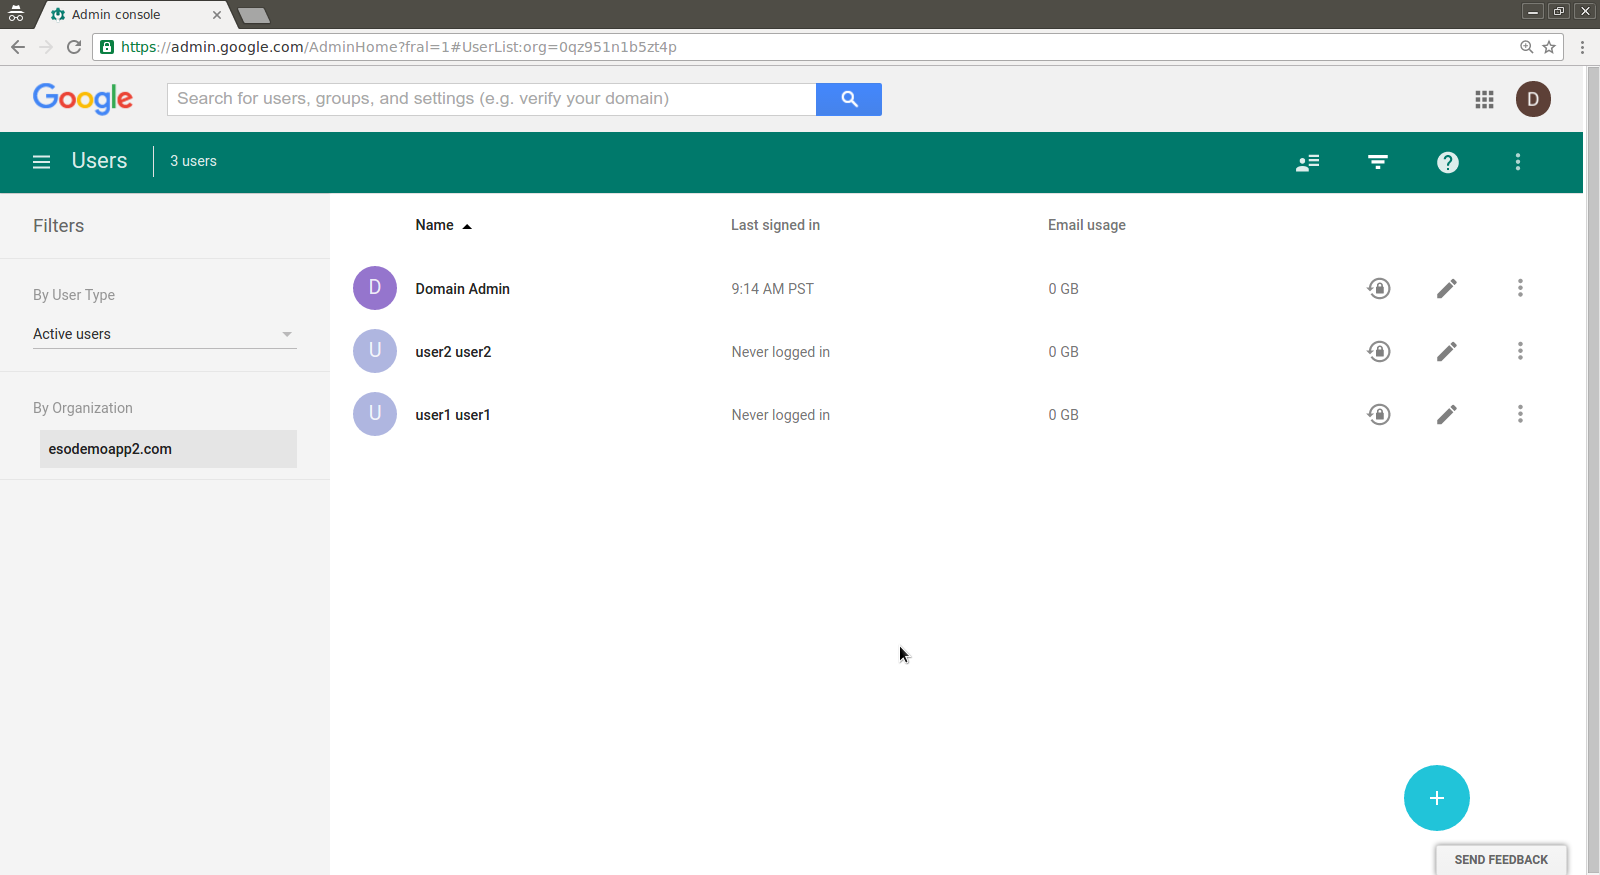
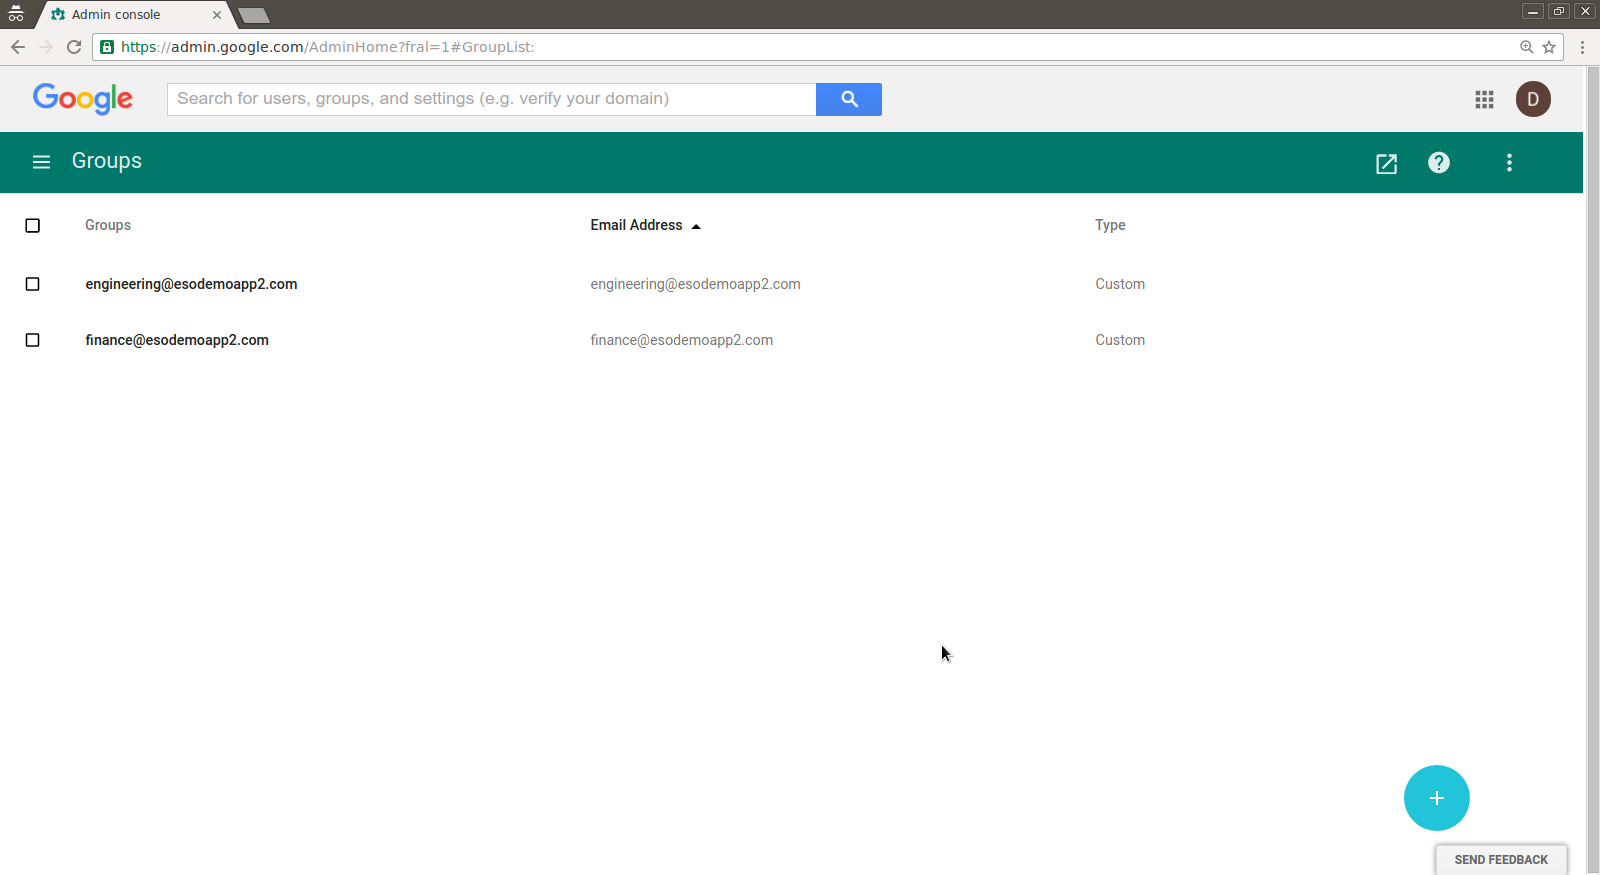
If you are confident on the sync setup, you can initiate the full synchronization. Once the users and groups are committed, you can see them in the Google Apps domain console.
Note, the setup does not sync or overwrite the domain admin users.
You can also backup/export your existing users list first to a .csv file prior to running the full sync.
The following changes were applied on the Google domain:-
*****************************************************************************Change Status Report, Generated 10:09:17 AM Dec 28, 2016
Successful user changes:
    Deleted:  0
    Modified: 0
    Created:  2Failures:
    Delete: 0
    Modify: 0
    Create: 0Created 2 new users
User: "user1@example.com"
    Local key "dXNlcjE"
    Given name "user1"
    Family name "user1"
    Set SHA-1 password hashUser: "user2@example.com"
    Local key "dXNlcjI"
    Given name "user2"
    Family name "user2"
    Set SHA-1 password hash
Successful group changes:
    Deleted:  0
    Modified: 2
    Created:  2Failures:
    Delete: 0
    Modify: 0
    Create: 0Successfully modified 2 groups
Group: "finance@example.com"
    Added user user1@example.comGroup: "engineering@example.com"
    Added user user1@example.com
    Added user user2@example.com
Created 2 new groups
Group: "engineering@example.com"
Group: "finance@example.com"The following changes were proposed:-
*****************************************************************************Proposed Change Report, Generated 10:09:16 AM Dec 28, 2016Analyzed users:
    2 local
    1 remoteProposed changes:
    Delete: 0
    Modify: 0
    Create: 2Create - 2 total
New user 1: "user1@example.com"
    Non-address primary key "dXNlcjE"
    Given name "user1"
    Family name "user1"
    SHA1 password
    0 aliasesNew user 2: "user2@example.com"
    Non-address primary key "dXNlcjI"
    Given name "user2"
    Family name "user2"
    SHA1 password
    0 aliasesAnalyzed groups:
    2 local
    0 remoteProposed changes:
    Delete: 0
    Modify: 2
    Create: 2
Create Group(s) - 2 total
    "engineering@example.com"
    "finance@example.com"
Modify (all proposed changes) - 2 total groups affected
Modify group 1: "engineering@example.com"
    Add address "user1@example.com"
    Add address "user2@example.com"Modify group 2: "finance@example.com"
    Add address "user1@example.com"
You can also script the provisioning and management of users and groups via the G-suites APIs such as Directory API
#!/usr/bin/pythonfrom apiclient.discovery import build
import httplib2
from oauth2client.service_account import ServiceAccountCredentials
from oauth2client.client import GoogleCredentials
import logging
import json
import sys
from apiclient import discovery
import oauth2client
from oauth2client import client
from oauth2client import toolsscope = 'https://www.googleapis.com/auth/admin.directory.user'
credentials = ServiceAccountCredentials.from_p12_keyfile('adminapi@fabled-ray-104117.iam.gserviceaccount.com',
                                                           'project1-5fc7d442817b.p12',
                                                           scopes=scope)
credentials = credentials.create_delegated('admin@example.com')
http = httplib2.Http()
http = credentials.authorize(http)
service = discovery.build('admin', 'directory_v1', http=http)
results = service.users().list(customer='C023zw2x7', domain='example.com').execute()
users = results.get('users', [])
print json.dumps(users, sort_keys=True, indent=4)
for u in users:
  print json.dumps(u['primaryEmail'], sort_keys=True, indent=4)
Testing is an important yet often overlooked aspect of building successful Laravel applications. This article will provide an introduction to testing applications written using the Laravel Framework.
For our purposes we’ll be writing feature tests that make HTTP requests to our application and then make assertions about the responses and the state of the application’s database after the request is complete. We will make minimal changes to the authentication scaffolding provided by Laravel and focus on testing the Password Reset feature.
Assuming you are familiar with setting up a new Laravel project, use your terminal and the Laravel installer to create a new project.
If you aren’t familiar with setting up a development environment for a new Laravel application I encourage you to check out the documentation on installation and the Vagrant box Homestead.
Create a new Laravel application in the directory password-reset-testing.
$ laravel new password-reset-testing
Once composer has finished installing everything, change your working directory to that of the new project.
$ cd password-reset-testing/
Next use Artisan to generate the authentication scaffolding for our application.
$ php artisan make:auth
Again using Artisan, run the database migrations to create the users and password_resets tables.
$ php artisan migrate
As a best practice, each of our application’s routes should have a name. By using route names and the route helper function instead of hard-coding routes, the URI of a route can be easily changed in the future.
Open up routes/web.php and change the contents to match below.
<?php

// Welcome Route
Route::get('/', function () {
    return view('welcome');
})->name('welcome');

// Authentication Routes
Route::get('login', 'Auth\LoginController@showLoginForm')
    ->name('login');

Route::post('login', 'Auth\LoginController@login')
    ->name('login.submit');

Route::post('logout', 'Auth\LoginController@logout')
    ->name('logout');

// Registration Routes
Route::get('register',
    'Auth\RegisterController@showRegistrationForm')
    ->name('register');

Route::post('register',
    'Auth\RegisterController@register')
    ->name('register.submit');

// Password Reset Routes
Route::get('password/reset',
    'Auth\ForgotPasswordController@showLinkRequestForm')
    ->name('password.request');

Route::post('password/email',
    'Auth\ForgotPasswordController@sendResetLinkEmail')
    ->name('password.email');

Route::get('password/reset/{token}',
    'Auth\ResetPasswordController@showResetForm')
    ->name('password.reset');

Route::post('password/reset',
    'Auth\ResetPasswordController@reset')
    ->name('password.reset.submit');

// Home Route
Route::get('/home', 'HomeController@index')
    ->name('home');
Note that we didn’t change any of the routes provided by the original Auth::routes() statement, we simply rewrote them to include names for every route.
Before we write our tests, let’s quickly edit the base test case. Open up the file at tests/TestCase.php and edit the contents to match below.
<?php

namespace Tests;

use Illuminate\Foundation\Testing\DatabaseTransactions;
use Notification;
use Illuminate\Foundation\Testing\TestCase as BaseTestCase;

abstract class TestCase extends BaseTestCase
{
    use CreatesApplication;
    use DatabaseTransactions;

    /**
     * Set up the test case.
     */
    protected function setUp()
    {
        parent::setUp();

        Notification::fake();
    }
}
First we import the Illuminate\Foundation\Testing\DatabaseTransactions trait and the Notification facade.
The statement use DatabaseTransactions at the top of the class tells Laravel to create a database transaction before each test and roll back the transaction after each test. This will keep our tests from affecting the state of our database; the database will be in the same starting state for each test.
We override the setUp method which is called before running each test. In this method we first call the parent setUp method then call fake on the Notification facade. This will fake all notifications sent out during any of our tests. Within each test we can then use another method on the Notification facade to assert a notification would have been sent to the correct destination.
Use artisan to generate a new feature test called PasswordResetTest.
$ php artisan make:test PasswordResetTest
Open the new file at tests/Feature/PasswordResetTest.php and edit the contents to match below.
<?php

namespace Tests\Feature;

use App\User;
use Hash;
use Illuminate\Auth\Notifications\ResetPassword;
use Illuminate\Foundation\Testing\WithFaker;
use Notification;
use Password;
use Tests\TestCase;

class PasswordResetTest extends TestCase
{
    use WithFaker;

    const ROUTE_PASSWORD_EMAIL = 'password.email';
    const ROUTE_PASSWORD_REQUEST = 'password.request';
    const ROUTE_PASSWORD_RESET = 'password.reset';
    const ROUTE_PASSWORD_RESET_SUBMIT = 'password.reset.submit';

    const USER_ORIGINAL_PASSWORD = 'secret';
}
Here we’ve added import statements for the model App\User, the facades Hash, Notification, and Password, and the notification Illuminate\Auth\Notifications\ResetPassword. We’ve also added an import statement for the trait Illuminate\Foundation\Testing\WithFaker which conveniently instantiates a Faker factory for us for use within our tests. We simply specify our class is using the WithFaker trait and each test case will have an instance of a Faker factory at $this->faker.
Within our class we replaced the example test case with a statement specifying we’re using the WithFaker trait, constants for each route name we’ll be using, and a constant for the password test users will have.
We will write tests for the following cases:
After each new test, feel free to run PHPUnit using your terminal.
$ ./vendor/bin/phpunit
Now it’s time to write our first test! Edit the PasswordResetTest class by adding the method below. By convention each test case method starts with test which is then recognized by PHPUnit.
/**
 * Testing showing the password reset request page.
 */
public function testShowPasswordResetRequestPage()
{
    $this
        ->get(route(self::ROUTE_PASSWORD_REQUEST))
        ->assertSuccessful()
        ->assertSee('Reset Password')
        ->assertSee('E-Mail Address')
        ->assertSee('Send Password Reset Link');
}
In this test case we use the method get to make a GET request to the specified URI. We generate the URI using the route helper method and the name of our route, which is stored in a constant. The assertSuccessful method asserts the response has a 200 level status code. Next we use the assertSee method to check for the presence of the text Reset Password, E-Mail Address, and Send Password Reset Link.
Our next few tests will be testing submitting the password reset request page with various inputs.
Add the next test shown below which tests submitting a password reset request with an invalid email address.
/**
 * Testing submitting the password reset request with an invalid
 * email address.
 */
public function testSubmitPasswordResetRequestInvalidEmail()
{
    $this
        ->followingRedirects()
        ->from(route(self::ROUTE_PASSWORD_REQUEST))
        ->post(route(self::ROUTE_PASSWORD_EMAIL), [
            'email' => str_random(),
        ])
        ->assertSuccessful()
        ->assertSee(__('validation.email', [
            'attribute' => 'email',
        ]));
}
When a request fails validation, Laravel will return a redirect to the location the request came from with validation error messages flashed to the session. To make assertions on the response the user will see, therefore, we need to follow redirects with the followingRedirects method. We also specify a location we’re making the request from using the from method.
Next we use the post method to issue a POST request to the password.email route (again using the route helper and a previously defined constant) with data specifying the email key as a random string (using the str_random helper method).
We assert the response is successful and check for the presence of a validation message. The __ helper method is used to format the validation message using localization files. validation.email specifies the file resources/lang/{locale}/validation.php and the email array key, where {locale} is the application’s configured locale. The :attribute parameter in the string The :attribute must be a valid email address. will be replaced by the string email as specified by the associative array passed as the second argument to the __ method.
Next we’ll be testing submitting the password reset request page with a valid email address that is not in use by any user of the application.
Add the test shown below.
/**
 * Testing submitting the password reset request with an email
 * address not in the database.
 */
public function testSubmitPasswordResetRequestEmailNotFound()
{
    $this
        ->followingRedirects()
        ->from(route(self::ROUTE_PASSWORD_REQUEST))
        ->post(route(self::ROUTE_PASSWORD_EMAIL), [
            'email' => $this->faker->unique()->safeEmail,
        ])
        ->assertSuccessful()
        ->assertSee(e(__('passwords.user')));
}
Again we follow redirects and set the location where our request should originate from, but this time we use Faker to generate an email address that is not in use by anyone in the world (as the domains are example.com, example.net, and example.org). We use the unique method to ensure the email address returned has not been previously returned by Faker.
We assert the response is successful and check for the presence of the validation error message specified by the user key in the associative array in the file resources/lang/{locale}/passwords.php. This time the validation message contains a reserved HTML character, ', so we must use the e helper method to replace the character with it’s corresponding character entity.
Finally it’s time to test successfully submitting the password reset request page with a valid email address present in our application’s database.
Add the test shown below.
/**
 * Testing submitting a password reset request.
 */
public function testSubmitPasswordResetRequest()
{
    $user = factory(User::class)->create();

    $this
        ->followingRedirects()
        ->from(route(self::ROUTE_PASSWORD_REQUEST))
        ->post(route(self::ROUTE_PASSWORD_EMAIL), [
            'email' => $user->email,
        ])
        ->assertSuccessful()
        ->assertSee(__('passwords.sent'));

    Notification::assertSentTo($user, ResetPassword::class);
}
In this test we use the factory helper method to create a new user in our database. Then we follow redirects for the response to our POST request to the password.email route. Our request specifies the created user’s email address in the email key of the payload. We assert the response is successful and check for the presence of the string We have e-mailed your password reset link!, specified with the argument passwords.sent passed to the __ helper method.
Using the Notification facade’s method assertSentTo we assert the ResetPassword notification was sent to the $user. We can pass the model stored in the variable $user directly into the assertSentTo method because our User model, by default, uses the Illuminate\Notifications\Notifiable trait. When routing emails for any model using the Notifiable trait, the email property on the model will be used by default.
Next, to test showing the password reset page, add the test shown below.
/**
 * Testing showing the reset password page.
 */
public function testShowPasswordResetPage()
{
    $user = factory(User::class)->create();

    $token = Password::broker()->createToken($user);

    $this
        ->get(route(self::ROUTE_PASSWORD_RESET, [
            'token' => $token,
        ]))
        ->assertSuccessful()
        ->assertSee('Reset Password')
        ->assertSee('E-Mail Address')
        ->assertSee('Password')
        ->assertSee('Confirm Password');
}
We again create a user using the factory helper method. Next we create a valid password reset token using the Password facade.
The value of $token is used to replace the token parameter in the password.reset route. We send a GET request to this route, assert the response is successful, and check for the presence of the text for page elements.
Next we’ll test submitting the password reset page, starting with using an invalid email address.
Continue our testing by adding the test shown below.
/**
 * Testing submitting the password reset page with an invalid
 * email address.
 */
public function testSubmitPasswordResetInvalidEmail()
{
    $user = factory(User::class)->create([
        'password' => bcrypt(self::USER_ORIGINAL_PASSWORD),
    ]);

    $token = Password::broker()->createToken($user);

    $password = str_random();

    $this
        ->followingRedirects()
        ->from(route(self::ROUTE_PASSWORD_RESET, [
            'token' => $token,
        ]))
        ->post(route(self::ROUTE_PASSWORD_RESET_SUBMIT), [
            'token' => $token,
            'email' => str_random(),
            'password' => $password,
            'password_confirmation' => $password,
        ])
        ->assertSuccessful()
        ->assertSee(__('validation.email', [
            'attribute' => 'email',
        ]));

    $user->refresh();

    $this->assertFalse(Hash::check($password, $user->password));

    $this->assertTrue(Hash::check(self::USER_ORIGINAL_PASSWORD,
        $user->password));
}
In this test we’re again using the factory helper method to create at test user but this time we explicitly set the user’s password. To do this we use the bcrypt helper method to hash the value of our constant.
We create another password reset token and generate a random string to use as the new password for our request’s payload. Again following redirects we POST to the password.reset.submit route with a request originating from the password.reset route. A random string is used for the email address in the request payload.
After asserting the response was successful and checking for the validation.email validation message we refresh the user model and use the check method on the Hash facade to assert the user’s password has not changed.
Next we’ll test submitting the password reset page with an email address not in use by our application’s database.
Add the test shown below.
/**
 * Testing submitting the password reset page with an email
 * address not in the database.
 */
public function testSubmitPasswordResetEmailNotFound()
{
    $user = factory(User::class)->create([
        'password' => bcrypt(self::USER_ORIGINAL_PASSWORD),
    ]);

    $token = Password::broker()->createToken($user);

    $password = str_random();

    $this
        ->followingRedirects()
        ->from(route(self::ROUTE_PASSWORD_RESET, [
            'token' => $token,
        ]))
        ->post(route(self::ROUTE_PASSWORD_RESET_SUBMIT), [
            'token' => $token,
            'email' => $this->faker->unique()->safeEmail,
            'password' => $password,
            'password_confirmation' => $password,
        ])
        ->assertSuccessful()
        ->assertSee(e(__('passwords.user')));

    $user->refresh();

    $this->assertFalse(Hash::check($password, $user->password));

    $this->assertTrue(Hash::check(self::USER_ORIGINAL_PASSWORD,
        $user->password));
}
Nothing new on this test. We create a user, password reset token, and new password. Then the follow redirects, POST to the password.reset.submit route from the password.reset route using the token, a random and unique safe email, and the new password. We assert the response is successful, check for the presence of the passwords.user translated string (after swapping any html character entities in the string), refresh the user, and assert the user’s password hasn’t changed.
The next test will be testing submitting the password reset page with a password that doesn’t match the password confirmation.
Add the test shown below.
/**
 * Testing submitting the password reset page with a password
 * that doesn't match the password confirmation.
 */
public function testSubmitPasswordResetPasswordMismatch()
{
    $user = factory(User::class)->create([
        'password' => bcrypt(self::USER_ORIGINAL_PASSWORD),
    ]);

    $token = Password::broker()->createToken($user);

    $password = str_random();
    $password_confirmation = str_random();

    $this
        ->followingRedirects()
        ->from(route(self::ROUTE_PASSWORD_RESET, [
            'token' => $token,
        ]))
        ->post(route(self::ROUTE_PASSWORD_RESET_SUBMIT), [
            'token' => $token,
            'email' => $user->email,
            'password' => $password,
            'password_confirmation' => $password_confirmation,
        ])
        ->assertSuccessful()
        ->assertSee(__('validation.confirmed', [
            'attribute' => 'password',
        ]));

    $user->refresh();

    $this->assertFalse(Hash::check($password, $user->password));

    $this->assertTrue(Hash::check(self::USER_ORIGINAL_PASSWORD,
        $user->password));
}
Again nothing new on this test except we’re checking for a different validation message.
Our last invalid submission case to test for submitting the password reset page is using a new password that’s too short.
Add the test shown below.
/**
 * Testing submitting the password reset page with a password
 * that is not long enough.
 */
public function testSubmitPasswordResetPasswordTooShort()
{
    $user = factory(User::class)->create([
        'password' => bcrypt(self::USER_ORIGINAL_PASSWORD),
    ]);

    $token = Password::broker()->createToken($user);

    $password = str_random(5);

    $this
        ->followingRedirects()
        ->from(route(self::ROUTE_PASSWORD_RESET, [
            'token' => $token,
        ]))
        ->post(route(self::ROUTE_PASSWORD_RESET_SUBMIT), [
            'token' => $token,
            'email' => $user->email,
            'password' => $password,
            'password_confirmation' => $password,
        ])
        ->assertSuccessful()
        ->assertSee(__('validation.min.string', [
            'attribute' => 'password',
            'min' => 6,
        ]));

    $user->refresh();

    $this->assertFalse(Hash::check($password, $user->password));

    $this->assertTrue(Hash::check(self::USER_ORIGINAL_PASSWORD,
        $user->password));
}
This time we pass an argument 5 to the str_random helper function to specify the length of the random returned string (as opposed to the default length of 16). Another difference in this test is we’re checking for the presence of a validation message, validation.min.string, with two parameters, attribute and min.
Notice how we can use dot notation to specify a translation string in a nested array. To learn more about these validation messages and translation strings, check out the file at resources/lang/{locale}/validation.php.
Finally, it’s time to test the happy path: submitting the password reset page with a valid email address belonging to a user with a valid password reset token and a password matching the confirmation password (that isn’t too short).
Add the final test shown below.
/**
 * Testing submitting the password reset page.
 */
public function testSubmitPasswordReset()
{
    $user = factory(User::class)->create([
        'password' => bcrypt(self::USER_ORIGINAL_PASSWORD),
    ]);

    $token = Password::broker()->createToken($user);

    $password = str_random();

    $this
        ->followingRedirects()
        ->from(route(self::ROUTE_PASSWORD_RESET, [
            'token' => $token,
        ]))
        ->post(route(self::ROUTE_PASSWORD_RESET_SUBMIT), [
            'token' => $token,
            'email' => $user->email,
            'password' => $password,
            'password_confirmation' => $password,
        ])
        ->assertSuccessful()
        ->assertSee(__('passwords.reset'));

    $user->refresh();

    $this->assertFalse(Hash::check(self::USER_ORIGINAL_PASSWORD,
        $user->password));

    $this->assertTrue(Hash::check($password, $user->password));
}
In this test we use the Hash facade to assert the user’s password has changed to the given password, thus successfully completing the password reset.
This concludes our testing for Laravel’s password resets. In ten short tests we were able to do things like create test users and valid password reset tokens, make HTTP requests to our application, assert the response contains desired content, and check if the user’s password has changed as a result of the request.
Laravel has provided ample testing capabilities and I strongly recommend reading the documentation for a deeper look at the possibilities.
You can view the source code for this project on GitHub.
Today we’ll be learning about working with geospatial data, or data relating to geographical locations, in Laravel 5.6. As an exercise for working with this kind of data we’ll be building a simple USA Neighborhood Finder application.
There are three main learning objectives for this article:
The flow of our application is as follows:
For the purposes of this article we won’t be tracking down the neighborhood boundaries of every neighborhood in the USA; instead we’ll be using three example data sets but set things up so more data sources can easily be added in the future.
You can take a look at the data sources using these links:
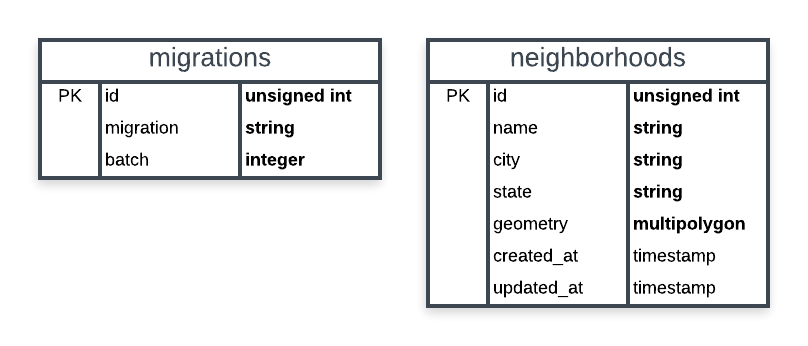
A basic schema of our application’s database is shown below. We only need two tables: Laravel’s table for migrations and a table for storing neighborhoods. Our spatial column will be named geometry and be of the multipolygon type. Think of a multipolygon as a collection of polygons. We’re using a multipolygon because a neighborhood may have more than one polygon to define its boundary. If a neighborhood uses a polygon to define its boundary we can always create multipolygon containing a single polygon (which we’ll be doing later).
In addition to the Laravel Framework, we’ll be using two more packages to build our application:
We will also be using Bootstrap 4 for basic styling.
For this article it’s assumed you’re comfortable using a development environment for Laravel (such as Homestead).
First, let’s create a new Laravel project using the terminal.
$ laravel new neighborhood-finder
Wait for the installation to finish and change directories to the root of the project.
$ cd neighborhood-finder/
Next let’s clean up some of the things Laravel comes with that we won’t be using for our application. This includes authentication controllers, the User model/migration/factory, and the password_resets table.
app/Http/Controllers/Auth directoryapp/User.phpdatabase/factories/UserFactory.phpdatabase/migrations/*_create_users_table.phpdatabase/migrations/*_create_password_resets_table.phpNow we’re ready to create the model and migration for a Neighborhood. Note how we’re creating the model in the App\Models namespace.
$ php artisan make:model Models\\Neighborhood --migration
For our application each Neighborhood will have an (auto-incrementing) id, a name, a city, a state(abbreviation), and a geometry representing the neighborhood’s boundary as a multipolygon.
Open up the generated database/migrations/*_create_neighborhoods_table.php migration and edit the up method as shown below.
/**
 * Run the migrations.
 *
 * @return void
 */
public function up()
{
    Schema::create('neighborhoods', function (Blueprint $table) {
        $table->increments('id');
        $table->string('name');
        $table->string('city');
        $table->string('state', 2);
        $table->multiPolygon('geometry');
        $table->timestamps();
    });
}
Now let’s install our first package using composer: grimzy/laravel-mysql-spatial. This package will allow us to easily work with spatial data types.
$ composer require "grimzy/laravel-mysql-spatial"
Let composer install the package dependencies and regenerate autoload files.
Our Neighborhood model will be using the SpatialTrait found in the grimzy/laravel-mysql-spatial package. The package looks for any attributes defined in the $spatialFields array on a model using this trait.
Edit app/Models/Neighborhood.php to match below. Notice how a spatial field is still eligible to be fillable through mass assignment.
<?php

namespace App\Models;

use Grimzy\LaravelMysqlSpatial\Eloquent\SpatialTrait;
use Illuminate\Database\Eloquent\Model;

class Neighborhood extends Model
{
    use SpatialTrait;

    /**
     * The attributes that are mass-assignable.
     *
     * @var array
     */
    protected $fillable = [
        'name',
        'geometry',
    ];

    /**
     * The attributes that are spatial fields.
     *
     * @var array
     */
    protected $spatialFields = [
        'geometry'
    ];
}
Many cities have data portals open to the public. To seed our database with neighborhoods including geospatial data for boundaries, our application will use Comma-separated values (CSV) files exported from three of these data portals.
Create a directory at database/seeds/flat-files for a place to store the flat files.
We want to ensure none of these flat files are checked into source control, so create a .gitignore file at database/seeds/flat-files/.gitignore containing the following:
*
!.gitignore
The * entry is a wildcard telling git to ignore all files in the directory. The !.gitignore entry excludes the .gitignore file from the wildcard so it is still checked into source control.
Download the following CSV files to each location specified below.
database/seeds/flat-files/chicago-illinois.csvdatabase/seeds/flat-files/baltimore-maryland.csvdatabase/seeds/flat-files/east-baton-rouge-parish-louisiana.csvLet’s take a quick peek at what this data looks like. Open up database/seeds/flat-files/chicago-illinois.csv and notice the file contains a header row specifying the columns. The two columns we want are PRI_NEIGH (primary neighborhood) and the_geom (the geometry data).
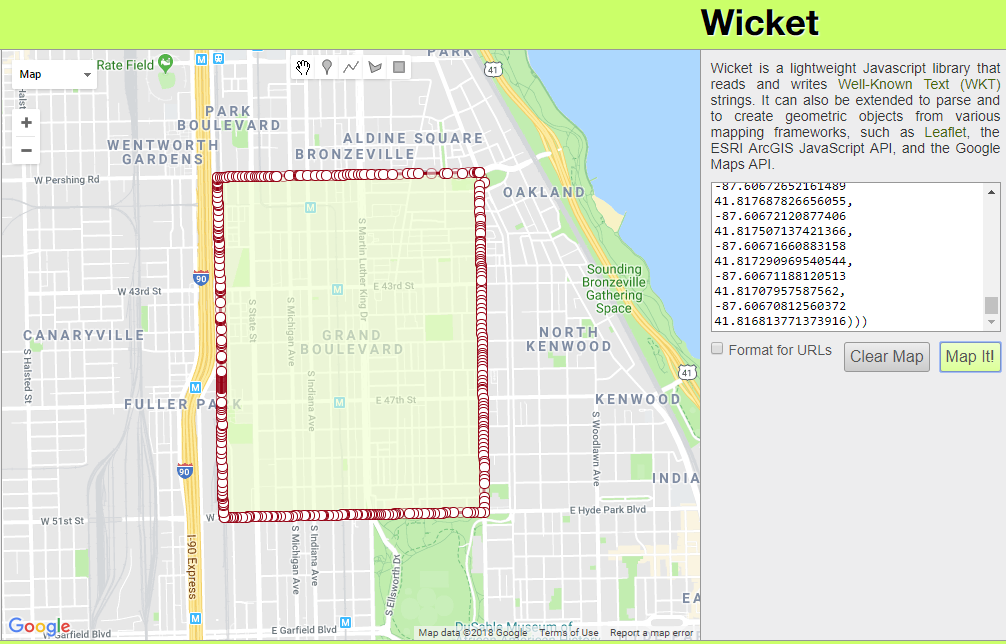
From the first row of data in the file, copy the MULTIPOLYGON(((...))) part. This is the WKT representation of the neighborhood’s boundary.
To visualize WKT data one of my favorite tools is Wicket by Arthur Endsley. Open up Wicket, paste the WKT data from your clipboard into the text box, and click “Map It!”. You’ll see the mapped multipolygon for Chicago’s neighborhood Grand Boulevard.
Now that we have our flat files and an understanding of what the data looks like let’s create some seeders.
For this exercise we’ll keep things simple with one seeder per file, each of which will extend a base class. The base class will hold logic for reading a CSV and creating a Neighborhood record. It will also contain an abstract method for transforming a geometry record into a Multipolygon. Each seeder extending the base class will implement this abstract method with logic specific to the file being processed. These seeders will also contain the run() method to be called by Laravel.
While this pattern works well for our purposes as we only have a few flat files to process, for a larger application with possibly hundreds of files I’d suggest a variation of this pattern and not defining one seeder per file.
First, let’s create our BaseNeighborhoodSeeder using artisan.
$ php artisan make:seeder BaseNeighborhoodSeeder
Update the created file at database/seeds/BaseNeighborhoodSeeder.php to match below.
<?php

use App\Models\Neighborhood;
use Grimzy\LaravelMysqlSpatial\Types\MultiPolygon;
use Illuminate\Database\Seeder;

abstract class BaseNeighborhoodSeeder extends Seeder
{
    /**
     * Mode for opening a file as read-only.
     */
    const FILE_MODE_READ = 'r';

    /**
     * Parses the given geometry value into a Multipolygon.
     *
     * @param mixed $geometry the geometry to parse
     * @return \Grimzy\LaravelMysqlSpatial\Types\MultiPolygon
     */
    protected abstract function parseGeometryToMultiPolygon($geometry): MultiPolygon;

    /**
     * Reads all records in a flat file, parses the geometry into a multipolygon,
     * and saves a Neighborhood in the database for each record.
     *
     * @param string $file_path path to the file to read data from
     * @param int $name_index the index of the column containing the neighborhood name
     * @param int $geometry_index the index of the column containing the neighborhood geometry
     * @param string $city the name of the neighborhoods' city
     * @param string $state the name of the neighborhoods' state
     * @param bool $skip_first_row if the first row of the file should be skipped (if there's a header row)
     * @param bool $use_title_case if the neighborhood names should be converted to Title Case
     * @throws \Throwable
     */
    protected function seedFromFlatFile(string $file_path,
                                        int $name_index,
                                        int $geometry_index,
                                        string $city,
                                        string $state,
                                        bool $skip_first_row,
                                        bool $use_title_case) {

        // throw an exception unless a file exists at the given location
        throw_unless(file_exists($file_path), new Exception("No file found at path '$file_path'"));

        try {
            // open the specified file at the given location
            $file = fopen($file_path, self::FILE_MODE_READ);

            // if the first row should be skipped, read the first row of the file
            if ($skip_first_row) {
                fgetcsv($file);
            }

            // while there's a row to be read in the file, read the next row
            while ($row = fgetcsv($file)) {
                // get the neighborhood name from the specified index
                $name = $row[$name_index];

                // if the name should be converted to Title Case, convert it
                if ($use_title_case) {
                    $name = title_case($name);
                }

                // parse the geometry at the specified index into a multipolygon
                $multipolygon = $this->parseGeometryToMultiPolygon($row[$geometry_index]);

                // make the new neighborhood model by filling the name, city, state, and geometry
                $neighborhood = new Neighborhood([
                    'name' => $name,
                    'city' => $city,
                    'state' => $state,
                    'geometry' => $multipolygon,
                ]);

                // throw an exception unless the neighborhood could be saved
                throw_unless($neighborhood->save(), new Exception("Failed to save neighborhood '$name'"));
            }
        } finally {
            // if the file has been opened, close it
            if (! empty($file)) {
                fclose($file);
            }
        }
    }
}
Here we’re defining an abstract class which cannot be instantiated; this class must be extended to be used. At the top of the class we have a constant for the file mode we’ll be using to open CSV files.
We define the abstract method parseGeometryToMulipolygon($geometry) and declare it returns a Multipolygon. This method must be implemented by any class extending BaseNeighborhoodSeeder and will contain the logic necessary for converting the geometry data in each CSV record to a Multipolygon. For our purposes this will always be parsing WKT but it could easily be parsing another format such as GeoJSON.
The seedFromFlatFile method contains parameters for the path to the file to read data from, the index of the neighborhood name column, the index of the neighborhood boundary geometry column, the name of the city for the neighborhoods, the name of the state for the neighborhoods, whether or not to skip the first row of the file (in case there is a header row), and whether or not the neighborhood name should be converted to Title Case before being saved.
In this method we first check if a file exists at $file_path using PHP’s file_exists function. If a file does not exist at the specified path we throw an exception.
Next, inside a try block, we open the file for reading using fopen with the file mode 'r'. If the $skip_first_row flag is true, we read the first row of the file using PHP’s function fgetcsv. Looping through each row, while there’s still a row left to read in the file, we use fgetcsv to parse the CSV row into an array of data.
Using the given $name_index we get the neighborhood name from the array and if $use_title_case is true we use Laravel’s helper method title_case to convert the string to Title Case. The neighborhood’s geometry is parsed into a MultiPolygon by passing the data of the geometry column into the parseGeometryToMultiPolygon method, which will be implemented by child classes.
Finally we create the new neighborhood record by passing an array of attributes to the Neighborhood model’s constructor. If the model could not be saved, an exception is thrown.
In the finally block we check if the $file variable has a value and if it does, we use fclose to close the file. Putting this logic inside the finally block ensures we close the file even if an exception is thrown.
With our base seeder class in place, we’re ready to create a seeder for each flat file. Start by creating ChicagoIllinoisNeighborhoodSeeder using artisan.
$ php artisan make:seeder ChicagoIllinoisNeighborhoodSeeder
Update the file database/seeds/ChicagoIllinoisDatabaseSeeder.php with the content below.
<?php

use Grimzy\LaravelMysqlSpatial\Types\MultiPolygon;

class ChicagoIllinoisNeighborhoodSeeder extends BaseNeighborhoodSeeder
{
    /**
     * Index of the name column.
     */
    const COLUMN_INDEX_NAME = 0;

    /**
     * Index of the geometry column.
     */
    const COLUMN_INDEX_GEOMETRY = 1;

    /**
     * Name of the neighborhoods' city.
     */
    const CITY = 'Chicago';

    /**
     * Name of the neighborhoods' state.
     */
    const STATE = 'IL';

    /**
     * Path of the seed file relative to the `database` directory.
     */
    const DATABASE_FILE_PATH = 'seeds/flat-files/chicago-illinois.csv';

    /**
     * If the file has a header row.
     */
    const HAS_HEADER_ROW = true;

    /**
     * If the neighborhood names should be converted to Title Case.
     */
    const USE_TITLE_CASE = false;

    /**
     * Run the database seeds.
     *
     * @throws \Throwable
     */
    public function run()
    {
        // resolve the path of the seed file
        $file_path = database_path(self::DATABASE_FILE_PATH);

        // seed the neighborhoods from the flat file
        $this->seedFromFlatFile($file_path,
            self::COLUMN_INDEX_NAME,
            self::COLUMN_INDEX_GEOMETRY,
            self::CITY,
            self::STATE,
            self::HAS_HEADER_ROW,
            self::USE_TITLE_CASE);
    }

    /**
     * Parses the geometry to a multipolygon from well-known text.
     *
     * @param mixed $geometry
     * @return \Grimzy\LaravelMysqlSpatial\Types\MultiPolygon
     */
    protected function parseGeometryToMultiPolygon($geometry): MultiPolygon
    {
        return MultiPolygon::fromWKT($geometry);
    }
}
At the top of the file we have constants for the column indexes of the name and geometry data as well as constants for the neighborhood city, the neighborhood state, the file path relative to the database directory, whether or not the file has a header row, and whether or not the neighborhood names should be converted to Title Case.
Next we have the run method which is called by Laravel when executing the seeder. In this method we first resolve the path of the flat file using Laravel’s helper method database_path. Then we call the parent class’s method seedFromFlatFile using the file path and our constants as arguments.
Finally, we implement the parseGeometryToMultiPolygon method by using the fromWKT static method of Grimzy\LaravelMysqlSpatial\Types\Multipolygon to instantiate a new MultiPolygon and return it. Remember this method will be called by the base class during the execution of the seedFromFlatFile method.
Continuing with our seeders, use artisan to create BaltimoreMarylandSeeder.
$ php artisan make:seeder BaltimoreMarylandSeeder
Edit the file database/seeds/BaltimoreMarylandSeeder.php to match the contents below.
<?php

use Grimzy\LaravelMysqlSpatial\Types\MultiPolygon;

class BaltimoreMarylandSeeder extends BaseNeighborhoodSeeder
{
    /**
     * Index of the name column.
     */
    const COLUMN_INDEX_NAME = 3;

    /**
     * Index of the geometry column.
     */
    const COLUMN_INDEX_GEOMETRY = 1;

    /**
     * Name of the neighborhoods' city.
     */
    const CITY = 'Baltimore';

    /**
     * Name of the neighborhoods' state.
     */
    const STATE = 'MD';

    /**
     * Path of the seed file relative to the `database` directory.
     */
    const DATABASE_FILE_PATH = 'seeds/flat-files/baltimore-maryland.csv';

    /**
     * If the file has a header row.
     */
    const HAS_HEADER_ROW = true;

    /**
     * If the neighborhood names should be converted to Title Case.
     */
    const USE_TITLE_CASE = false;

    /**
     * Run the database seeds.
     *
     * @throws \Throwable
     */
    public function run()
    {
        // resolve the path of the seed file
        $file_path = database_path(self::DATABASE_FILE_PATH);

        // seed the neighborhoods from the flat file
        $this->seedFromFlatFile($file_path,
            self::COLUMN_INDEX_NAME,
            self::COLUMN_INDEX_GEOMETRY,
            self::CITY,
            self::STATE,
            self::HAS_HEADER_ROW,
            self::USE_TITLE_CASE);
    }

    /**
     * Parses the geometry to a multipolygon from well-known text.
     *
     * @param mixed $geometry
     * @return \Grimzy\LaravelMysqlSpatial\Types\MultiPolygon
     */
    protected function parseGeometryToMultiPolygon($geometry): MultiPolygon
    {
        return MultiPolygon::fromWKT($geometry);
    }
}
Notice how simple it was to implement a new flat file seeder because we abstracted away the logic into our base class.
Again using artisan, create our last seeder EastBatonRougeParishSeeder.
$ php artisan make:seeder EastBatonRougeParishSeeder
Open up the file database/seeds/EastBatonRougeParishSeeder.php and edit the contents to match below.
<?php

use Grimzy\LaravelMysqlSpatial\Types\MultiPolygon;
use Grimzy\LaravelMysqlSpatial\Types\Polygon;

class EastBatonRougeParishSeeder extends BaseNeighborhoodSeeder
{
    /**
     * Index of the name column.
     */
    const COLUMN_INDEX_NAME = 2;

    /**
     * Index of the geometry column.
     */
    const COLUMN_INDEX_GEOMETRY = 1;

    /**
     * Name of the neighborhoods' city.
     */
    const CITY = 'Baton Rouge';

    /**
     * Name of the neighborhoods' state.
     */
    const STATE = 'LA';

    /**
     * Path of the seed file relative to the `database` directory.
     */
    const DATABASE_FILE_PATH = 'seeds/flat-files/east-baton-rouge-parish-louisiana.csv';

    /**
     * If the file has a header row.
     */
    const HAS_HEADER_ROW = true;

    /**
     * If the neighborhood names should be converted to Title Case.
     */
    const USE_TITLE_CASE = true;

    /**
     * Run the database seeds.
     *
     * @throws \Throwable
     */
    public function run()
    {
        // resolve the path of the seed file
        $file_path = database_path(self::DATABASE_FILE_PATH);

        // seed the neighborhoods from the flat file
        $this->seedFromFlatFile($file_path,
            self::COLUMN_INDEX_NAME,
            self::COLUMN_INDEX_GEOMETRY,
            self::CITY,
            self::STATE,
            self::HAS_HEADER_ROW,
            self::USE_TITLE_CASE);
    }

    /**
     * Parses the geometry to a multipolygon from well-known text.
     *
     * @param mixed $geometry
     * @return \Grimzy\LaravelMysqlSpatial\Types\MultiPolygon
     */
    protected function parseGeometryToMultiPolygon($geometry): MultiPolygon
    {
        // parse the well-known text into a polygon
        $polygon = Polygon::fromWKT($geometry);

        // return a multipolygon containing the polygon
        return new MultiPolygon([$polygon]);
    }
}
This time the implementation of the parseGeometryToMultiPolygon method is different. If you check the east-baton-rouge-parish-louisiana.csv file you’ll notice the WKT contains polygons instead of multipolygons, but the method calls for a MultiPolygon to be returned. Therefore we first parse the Polygon from WKT and then create and return a new MutliPolygon using an array containing the Polygon passed to the constructor.
Next we need to edit database/seeds/DatabaseSeeder.php to call each of our seeders. Update the file to match the contents below.
<?php

use Illuminate\Database\Seeder;

class DatabaseSeeder extends Seeder
{
    /**
     * Seed the application's database.
     *
     * @return void
     */
    public function run()
    {
        $this->call([
            ChicagoIllinoisNeighborhoodSeeder::class,
            BaltimoreMarylandSeeder::class,
            EastBatonRougeParishSeeder::class,
        ]);
    }
}
Let’s quickly regenerate our autoload files using composer.
$ composer dump-autoload
Finally, let’s migrate and seed our database using an artisan command. This will create our neighborhoods table as well as seed all the neighborhoods from our flat files.
$ php artisan migrate --seed
Use composer to require the toin0u/geocoder-laravel package we’ll be using to geocode addresses.
$ composer require "toin0u/geocoder-laravel"
While composer is running, this is a great time to get a Google API key for our project. We’ll be using Google’s Geocoding API.
APIs & Services dashboard, click ENABLE APIS AND SERVICES.Geocoding API, clicking on the result, and then clicking the button labeled ENABLE.APIs & Services go to Credentials.Create and select API Key.Now we’re going to add the necessary configuration for the geocoding package we just installed.
Edit the .env environment file at the root of our project, adding the key GOOGLE_MAPS_API_KEY and pasting in the value of your API key.
GOOGLE_MAPS_API_KEY=***************************************
For posterity’s sake let’s also add an entry in .env.example for the same key. Remember, don’t add your API key here; this file is only a template and is checked into source control.
GOOGLE_MAPS_API_KEY=
Now let’s define our routes by editing routes/web.php, deleting the existing welcome route, and replacing it with the routes below.
Route::get('/', 'HomeController@show')->name('home.show');
Route::post('/', 'HomeController@submit')->name('home.submit');
The first route, named home.show, is for displaying the home page. The second route, named home.submit, will handle the submission of addresses and return a response containing the result of the search.
Next, create a HomeController using artisan.
$ php artisan make:controller HomeController
Edit app/Http/Controllers/HomeController.php to match the contents below.
<?php

namespace App\Http\Controllers;

use App\Models\Neighborhood;
use Grimzy\LaravelMysqlSpatial\Types\Point;
use Illuminate\Http\Request;

class HomeController extends Controller
{
    /**
     * The session key for storing the success message.
     */
    const SESSION_KEY_SUCCESS = 'success';

    /**
     * The session key for storing the error message.
     */
    const SESSION_KEY_ERROR = 'error';

    /**
     * The result message for an address that could not be geocoded.
     */
    const RESULT_BAD_ADDRESS = 'Failed to find a location for that address!';

    /**
     * The result message for an address that does not fall in any exiting Neighborhood's geometry.
     */
    const RESULT_NO_RESULTS = 'No results for that address!';

    /**
     * The result message prefix for a found Neighborhood.
     */
    const RESULT_NEIGHBORHOOD_PREFIX = 'That address is in ';

    /**
     * The route name for showing the home page.
     */
    const ROUTE_NAME_SHOW_HOME = 'home.show';

    /**
     * Shows the home page.
     *
     * @return \Illuminate\View\View
     */
    public function show()
    {
        return view('home');
    }

    /**
     * Handles submission of an address and returns a redirect to the home page with success or error message.
     *
     * @param \Illuminate\Http\Request $request
     * @return \Illuminate\Http\RedirectResponse
     */
    public function submit(Request $request)
    {
        // validate the request
        $this->validate($request, [
            'address' => 'required',
        ]);

        // get the given address from the request
        $address = $request->input('address');

        // make the geocoder
        $geocoder = app('geocoder');

        // geocode the address and get the first result
        $result = $geocoder->geocode($address)->get()->first();

        // if a result couldn't be found, redirect to the home page with a result message flashed to the session
        if (! $result) {
            return redirect(route(self::ROUTE_NAME_SHOW_HOME))->with(self::SESSION_KEY_ERROR, self::RESULT_BAD_ADDRESS);
        }

        // get the coordinates of the geocoding result
        $coordinates = $result->getCoordinates();

        // get the latitude of the coordinates
        $lat = $coordinates->getLatitude();

        // get the longitude of the coordinates
        $lng = $coordinates->getLongitude();

        // create a new point using the coordinates
        $point = new Point($lat, $lng);

        // get the first Neighborhood that has geometry containing the point
        $neighborhood = Neighborhood::contains('geometry', $point)->first();

        // if a Neighborhood couldn't be found, redirect to the home page with a result message flashed to the session
        if (! $neighborhood) {
            return redirect(route(self::ROUTE_NAME_SHOW_HOME))->with(self::SESSION_KEY_ERROR, self::RESULT_NO_RESULTS);
        }

        // format the result message for the found Neighborhood
        $message = $this->formatNeighborhoodResult($neighborhood);

        // redirect to the home page with the result message flashed to the session
        return redirect(route(self::ROUTE_NAME_SHOW_HOME))->with(self::SESSION_KEY_SUCCESS, $message);
    }

    /**
     * Format the result message for a found neighborhood.
     *
     * @param \App\Models\Neighborhood $neighborhood
     * @return string
     */
    private function formatNeighborhoodResult(Neighborhood $neighborhood) {
        return self::RESULT_NEIGHBORHOOD_PREFIX . $neighborhood->name . ', ' . $neighborhood->city . ', ' . $neighborhood->state . '.';
    }
}
In this file we first define constants for the session key storing success messages, the session key storing error messages, the text for result messages, and the home.show route name.
In the show method we simply return the view named home using the Laravel helper method view.
The submit method accepts an argument of type Illuminate\Http\Request called $request. Laravel will automatically inject this variable containing the current request data.
First we validate the request by specifying a rule for address making the field required. The validated address is then retrieved using the input method on the $request variable. We use Laravel’s app helper method which uses the service container to resolve an instance of the geocoder. Using method chaining we geocode the given address and get the first result. If a result couldn’t be found for the given address we redirect the user to the home page with an error message flashed to the session.
Next we get the longitude and latitude coordinates from the result and create a new Grimzy\LaravelMysqlSpatial\Types\Point instance by passing the coordinates into the constructor.
The eloquent query scope contains provided by the grimzy/laravel-mysql-spaital package is then used to scope the query by records with a geometry containing the point. We use the first method to get the first result. This will generate a query along the lines of:
SELECT * FROM `neighborhoods` WHERE ST_Contains(`geometry`, ST_GeomFromText('POINT(0 0)')) LIMIT 1
In this case 'POINT(0 0)' is the WKT representation of our longitude and latitude (which won’t actually be 0, 0 unless our user lives in the middle of the ocean).
Notice that we are using MySQL to calculate if the the geometry contains the point. This is much faster than if we had chunked through all the records and had done the calculation in PHP.
Finally, if a resulting neighborhood containing the point couldn’t be found we return a redirect to the home page with an error message flashed to the session. Otherwise, we format the neighborhood name, city, and state into a success result message (using the formatNeighborhoodResult method) and return a redirect to the home page with the message flashed to the session.
Rename the blade template at resources/views/welcome.blade.php to resources/views/home.blade.php and open the file.
Under the <!-- Styles --> comment, add a link to Bootstrap’s style sheet.
<link rel="stylesheet" href="https://maxcdn.bootstrapcdn.com/bootstrap/4.0.0-alpha.6/css/bootstrap.min.css" integrity="sha384-rwoIResjU2yc3z8GV/NPeZWAv56rSmLldC3R/AZzGRnGxQQKnKkoFVhFQhNUwEyJ" crossorigin="anonymous">
Next, in the .title class definition, change the font size to something smaller.
.title {
    font-size: 64px;
}
Just before the closing </body> tag, add script tags for Bootstrap’s dependencies jQuery, Popper.js, and Bootstrap’s minified JavaScript file.
<script src="https://code.jquery.com/jquery-3.1.1.slim.min.js" integrity="sha384-A7FZj7v+d/sdmMqp/nOQwliLvUsJfDHW+k9Omg/a/EheAdgtzNs3hpfag6Ed950n" crossorigin="anonymous"></script>
<script src="https://cdnjs.cloudflare.com/ajax/libs/tether/1.4.0/js/tether.min.js" integrity="sha384-DztdAPBWPRXSA/3eYEEUWrWCy7G5KFbe8fFjk5JAIxUYHKkDx6Qin1DkWx51bBrb" crossorigin="anonymous"></script>
<script src="https://maxcdn.bootstrapcdn.com/bootstrap/4.0.0-alpha.6/js/bootstrap.min.js" integrity="sha384-vBWWzlZJ8ea9aCX4pEW3rVHjgjt7zpkNpZk+02D9phzyeVkE+jo0ieGizqPLForn" crossorigin="anonymous"></script>
Because our application has no authentication, remove the entire @if (Route::has(‘login’)) directive including the contents and closing directive.
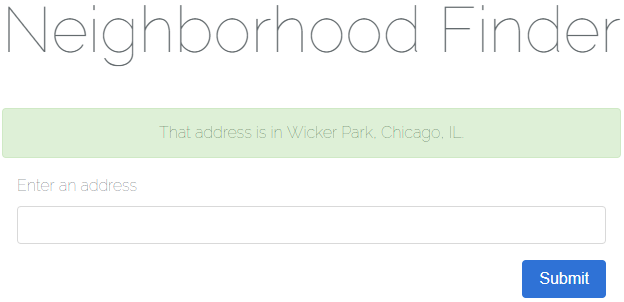
Finally, edit the contents of the <div class="content"> div to match below.
<div class="content">
    <div class="title m-b-md">
        Neighborhood Finder
    </div>
    @if (session('success'))
        <div class="alert alert-success">
            {{ session('success') }}
        </div>
    @elseif (session('error'))
        <div class="alert alert-danger">
            {{ session('error') }}
        </div>
    @endif
    <div class="col-12 text-left">
        <form class="form-horizontal" method="POST" action="{{ route('home.submit') }}">
            @csrf
            <div class="form-group{{ $errors->has('address') ? ' has-error' : '' }}">
                <label for="address" class="control-label">Enter an address</label>

                <input id="address" name="address" type="text" class="form-control" required autofocus>

                @if ($errors->has('address'))
                    <span class="help-block">
                        <strong>{{ $errors->first('address') }}</strong>
                    </span>
                @endif
            </div>
            <div class="form-group text-right">
                <button type="submit" class="btn btn-primary">
                    Submit
                </button>
            </div>
        </form>
    </div>
</div>
Here we use the blade directive @if to check if there’s a message in the success key of the current session. If there is one, we display an alert to the user containing the message. If there isn’t one, we use the blade directive @elseif to check if there’s a message in the error key of the current session, again displaying it to the user if it exists.
Next we define a form with an action specifying our submission route using the route helper method. The @crsf blade directive is used to generate a Cross-Site Request Forgery field and token. If the $errors message bag contains an entry for address we add the has-error class to the form group div and display the error in a help block.
That’s it! Open the project in your browser and try out some different addresses! The address will be geocoded and a neighborhood will be returned if any neighborhoods in the database have a boundary containing the address’s coordinates. If no address coordinates or neighborhood could be found, an error message stating such will be returned.
Try some of these addresses:
1558 N Damen Ave, Chicago, IL 606221001 E Fayette St, Baltimore, MD 21202201 Community College Dr, Baton Rouge, LA 70806123 Fake St, NowhereYour Address
For additional data sources I encourage you to check out this Forbes article as well as Open Data Inception.
You can view the source code for this project on GitHub.
If you don’t already know, WPA-2 is not a good Wi-fi standard. Basically it can be breached through the flawed four way handshake. But now it gets even worse, and where ESET Research have published a white paper defining KrØØk (CVE-2019–15126), and which is based on the previously discovered KRACK vulnerability. Within this the researchers manage to force a device to use a “All Zeros” key, and thus decrypt all the packets sent from the device:
The research has shown that two of the most popular wifi chipset manufacters — Broadcom and Crypress — are vulnerabily to thus, which could mean that millions (or even billions) or devices are exposed to the vulnerability. These chipers are used in wifi routers and access points, and affects both home-based wifi (WPA-2 Personal) and enterprise networks (WPA-2 Enterprise).
It’s a well-know secret, but the WPA-2 handshaking method used in your home Wi-fi system is flawed. The authentication method used is defined as WPA2-Personal, and that we need to migrate to something which is more secure. While your corporate wi-fi network (and which uses WPA3-Enterprise) is fairly bullet proof, the 4-way handshake method used on WPA2-Personal networks can be cracked with a single capture of a packet [details]:
And so, on 16 October 2017, the weakness of the four-way handshake was further highlighted with KRACK (Key Reinstallation Attacks) vulnerability [paper]:
US-CERT has become aware of several key management vulnerabilities in the 4-way handshake of the Wi-Fi Protected Access II (WPA2) security protocol. The impact of exploiting these vulnerabilities includes decryption, packet replay, TCP connection hijacking, HTTP content injection, and others. Note that as protocol-level issues, most or all correct implementations of the standard will be affected. The CERT/CC and the reporting researcher KU Leuven, will be publicly disclosing these vulnerabilities on 16 October 2017.
Within the four-way handshake, in the third step, the protocol allows for the key to be sent many times. On resending, the nonce is reused, and which compromises the handshaking, and cracks the crypto.
And so the Simultaneous Authentication of Equals(SAE, and also typically known as Dragonfly) method has been introduced in WPA-3 Personal and which replaces with 4-way handshake with a zero-knowledge proof method (see theory later on in the article). Unfortunately the same team that defined the KRACK vulnerability has found new weaknesses in its setup [here].
Within their research, the research team found that they could recover the password used for the network, and thus steal sensitive information from the communications. These attacks were:
The full details of the vulnerabilities are defined here:
While all of these relate to WPA-3 Personal, the research team also found a bug in the EAP-PWD protocol, and where an intruder could impersonate a user on a network, without knowing their password. This bug affects WPA-3 Enterprise, as it focuses on RADIUS integration. Details have not been released at the current time on this.
It has been known for a while that the core of Wi-fi — WPA-2 (IEEE 802.11i) — is weak in its implementation of security. While its cryptography is sound — using AES encryption — its main weakness focuses on the flawed 4-way handshake.
Within this, the client and access point pass a hashed value of the SSID and the password, and this can be seen by an intruder. Its saving grace is that the hashing method used — PBKDF2 — is a relatively slow method, and when it was initially rolled-out it would have been relatively expensive to crack it. Unfortunately, these days, cloud crackers can now run at high speeds, and even PBKDF2 can be cracked within reasonable time limits and for a minimal cost.
The great worry, though, is that once it is cracked, it is cracked for the whole network. With 16-GPU clusters available to rent within AWS for less than $10 per hour, the opportunity exists for the core of wi-fi to fundamentally fail within the next few years.
And so, the Wi-Fi Alliance has addressed this fundamental problem with the release of WPA-3, and where the 4-way handshake is replaced by a zero-knowledge proof method named Simultaneous Authentication of Equals (SAE). Its roots derive from mesh networks and of the Dragonfly protocol, and have since been defined in IEEE 802.11s.
The focus for SAE is to properly authenticate a device onto a network and using a password and MAC addresses to authenticate. An intruder should not be able to connect to a network unless they known password that the access point uses. Also, an intruder should not be able to guess either the password or the long-term authentication element of the password. In WPA-2 an intruder can listen to the 4-way handshake and can then brute force the password from hashed value created (see the section below for details).
With SAE — and which is based on a zero-knowledge proof known as dragonfly — we use the Diffie-Hellman key exchange method but adds an authentication element. With this we create a shared key with elliptic curve methods (NIST curves), and then use a pre-shared key and MAC addresses. When the client connects to the access point, they perform an SAE exchange. If successful, they will each create a cryptographically strong key, of which the session key will be derived from. If one session key is cracked it will only affect one key, and not all of the key used, as with WPA-2.
Basically a client and access point goes into phases of commit and then confirm. Once we have a commitment, the client and access point can then go into the confirm states each time there is a session key to be generated. The method uses forward secrecy, where an intruder could crack a single key, but not all of the other keys.
The core security comes from the power of discrete logarithms and where it is difficult to find the value of x, even though we have Y, G and p:
Y = Gˣ mod q
and where q is a prime number. We make q a prime number as it allows us to perform maths functions, while constraining the value between 0 and q-1 [finite fields].
In the commit phase, Alice (the client) generates two random values (a,A), and then computes a scalar value (a+A). The value that Alice will pass is the PE (Password Equivalent — such as hashed value of the password that Bob and Alice know) raised to the power of -A. As the values will get large, the operations are done with (mod q) and where q is a large prime number.
Bob does the same, and then they exchange values. In the end they will have the same shared commit key (PEªᵇ). They will only have the same shared value, if they have both used the same password. This password is thus used to validate Bob and Alice, and they will only have the shared shared commit value if they both have the same password. The intruder cannot determine either the original password or the final shared value.
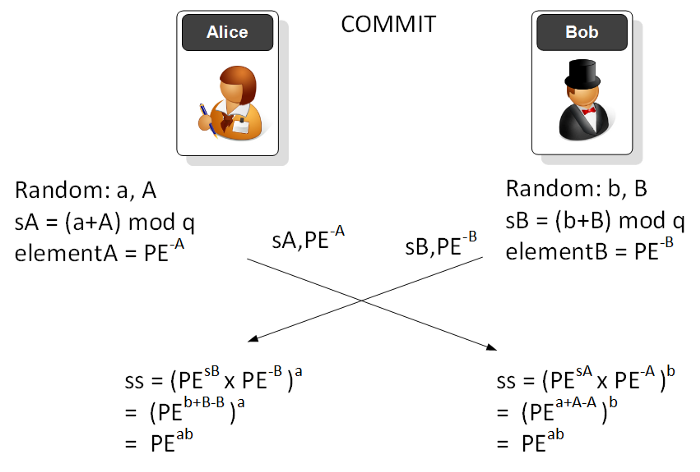
To perform the -A power, we perform an inverse mod q function (and which uses the extended euclidean algorithm) [inverse mod function]:
elementA = inverse_of(pow(PE,A),q)
elementB = inverse_of(pow(PE,B),q)
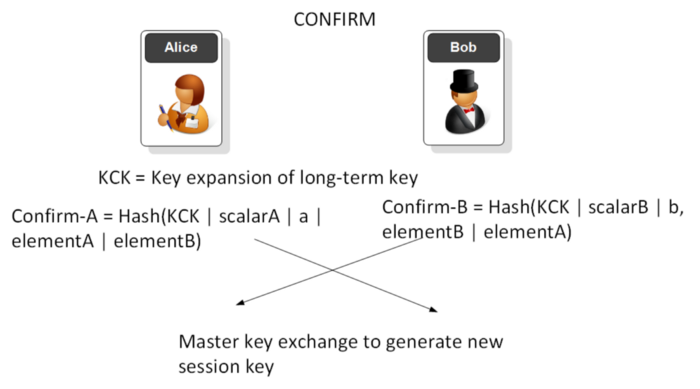
In the confirm phase we then use the long-term key to generate a unique session key. An attacker cannot determine the password used or the long-term master key (PMK). The cracking of one session key will also not reveal the rest of the keys which have been used (forward security). This is not the case for WPA-2.
Here is a simple implementation of the Dragonfly method [here]:
import hashlib
import randomdef extended_euclidean_algorithm(a, b):
    """
    Returns a three-tuple (gcd, x, y) such that
    a * x + b * y == gcd, where gcd is the greatest
    common divisor of a and b.This function implements the extended Euclidean
    algorithm and runs in O(log b) in the worst case.
    """
    s, old_s = 0, 1
    t, old_t = 1, 0
    r, old_r = b, awhile r != 0:
        quotient = old_r // r
        old_r, r = r, old_r - quotient * r
        old_s, s = s, old_s - quotient * s
        old_t, t = t, old_t - quotient * treturn old_r, old_s, old_tdef inverse_of(n, p):
    """
    Returns the multiplicative inverse of
    n modulo p.This function returns an integer m such that
    (n * m) % p == 1.
    """
    gcd, x, y = extended_euclidean_algorithm(n, p)
    assert (n * x + p * y) % p == gcdif gcd != 1:
        # Either n is 0, or p is not a prime number.
        raise ValueError(
            '{} has no multiplicative inverse '
            'modulo {}'.format(n, p))
    else:
        return x % pq=131
a=random.randint(1,1000)
b=random.randint(1,1000)
A=random.randint(1,1000)
B=random.randint(1,1000)sA= a + A
sB = b + Btext="hello"
PE = int(hashlib.md5(text).hexdigest()[:8], 16)elementA = inverse_of(pow(PE,A),q)
elementB = inverse_of(pow(PE,B),q)PEsA = pow(PE,sA,q)
PEsB = pow(PE,sB,q)print "Element A:",elementA
print "Element B:",print elementBss1 = pow(PEsA * elementA,b,q)
ss2 = pow(PEsB * elementB,a,q)print "Alice share:",ss1
print "Bob share:",ss2
A sample run is [here]:
Password: hello
Alice generates two random values
a: 419
A: 467Bob generates two random values
b: 858
B: 608Alice calculates elementA
Element A: 347Bob calculates elementA
Element B: 227They exchange values and calculate a secret shareAlice share: 151
Bob share: 151
You can see I have taken a hash of the password, and then converted it into an integer, so that I can use operate on it with logs:
text="hello"
PE = int(hashlib.md5(text).hexdigest()[:8], 16)
The operation of performing a power (PEˣ and mod q) is achieved with a single (and fast) operation with Python:
PEsB = pow(PE,x,q)
The WPA2-Personal protocol has a fundamental weakness, and it looks like there could be problems with WPA3-Personal. Hopefully these will get fixed, but WPA2-Personal will be retired forever. For some reason, when systems are created, the requirement to get things to the market often trumps the requirement for security testing.
Prof Bill Buchanan OBEAug 30, 2018 · 5 min read
Which program has never reached Version 1.2, but is used as a core of security on the Internet? OpenSSL.
OpenSSL has caused so many problems in the industry including the most severe with Heartbleed. The problem with it is that it has been cobbled together and maintained on a shoe-string budget. Google, though, have been driving cryptography standards, and especially for the adoption of HTTPs.
And so Google have released Tink which is a multi-language, cross-platform cryptographic library. With OpenSSL we have complex bindings and which were often focused on specific systems, such as for DLLs in Windows systems. Tink is open-source and focuses on creating simple APIs and which should make the infrastructure more portable.
To overcome the problems caused by OpenSSL, Amazon too created their own stack: s2n (signal to noise), with a core focus on improving TLS (Transport Layer Security) and using a lighter weight approach. This follows Google’s release of BoringSSL and OpenBSD’s LibreSSL (and which were forks from OpenSSL). Each have defined smaller and more stripped down versions that implement the basic functionality of SSL/TLS. Overall s2n uses only 6,000 lines of code, but, of course, this is likely to increase with new versions, as it is only a basic implementation.
s2n is open source and hosted in GitHub allowing others to view and review the code, along with it being difficult to actually delete a project which is hosted there. Along with this, GitHub allows for a forking of the project, to support new features which the core version does not want to support.
What is interesting too, is that Amazon have generally taken security seriously, and has respond well to bugs found by the community. This includes working with researchers and academics on new addressing bugs.
Problems, too, have been discovered in the random generator for the key generation (one for public and one for the private key), and s2n uses two separate random number generators, which many would struggle to see the advantage of this, but perhaps time will tell.

For Tink — based on BoringSSL and now at Version 1.2.0 — the adoption has been good and is already integrated into AdMob, Google Pay, Google Assistant, and Firebase. It also integrates AEAD (Authenticated encryption AE and authenticated encryption with associated data) methods and which integrates encryption keys, a hash function, and a message authentication code (MAC). Google, too, have analysed many cryptography weaknesses and have created code which addresses many of these problems.
The minimal standards for AEAD include [RFC5116]:
A basic cryptography operation is to use symmetric key encryption, and where Bob and Alice use the same key to encrypt and also to decrypt. Either Bob creates the key, and then passes it securely to Alice, or they use a key exchange method to generate a shared key:

Tink aims to simplify encryption processing and use the best methods possible for encryption. In the following we encrypt a string (“napier”) with a key of “qwerty123”:
package com.helloworld;import com.google.crypto.tink.aead.AeadConfig;
import java.security.GeneralSecurityException;import com.google.crypto.tink.Aead;
import com.google.crypto.tink.KeysetHandle;
import com.google.crypto.tink.aead.AeadFactory;
import com.google.crypto.tink.aead.AeadKeyTemplates;public final class HelloWorld {
  public static void main(String[] args) throws Exception {AeadConfig.register();try {KeysetHandle keysetHandle = KeysetHandle.generateNew(AeadKeyTemplates.AES128_GCM);Aead aead = AeadFactory.getPrimitive(keysetHandle);String plaintext="napier";String aad="qwerty123";System.out.println("Text:"+plaintext);
    byte[] ciphertext = aead.encrypt(plaintext.getBytes(), aad.getBytes());
    System.out.println("Cipher:"+ciphertext.toString());byte[] decrypted = aead.decrypt(ciphertext, aad.getBytes());
    String s = new String(decrypted);
    System.out.println("Text:"+s);} catch (GeneralSecurityException e) {
      System.out.println(e);
      System.exit(1);
    }}
}
A sample run proves the process:
Text:  hello123
Password: qwerty
Type:  1
Enc type: 128-bit AES GCMCipher: AQbLoE0ino8ofgrvuSSLOKTaYjdPc/ovwWznuMeYfjP+TO1fc6cn7DE=Cipher: 4151624C6F4530696E6F386F666772767553534C4F4B5461596A6450632F6F7677577A6E754D6559666A502B544F31666336636E3744453DDecrypted: hello123
In this case we use 128-bit AES with GCM (Galois/counter mode). Our AEAD object is created with:
KeysetHandle keysetHandle = KeysetHandle.generateNew(AeadKeyTemplates.AES128_GCM);Aead aead = AeadFactory.getPrimitive(keysetHandle);
and then the encrypt() and decrypt() methods are used to create the cipher stream and then decipher it.
A demo of these methods is here.
Google aims to focus the industry on strong encryption methods using AEAD and with integrated authentication: AES-EAX (encrypt-then-authenticate-then-translate), AES-GCM, AES-CTR-HMAC (Counter reset), KMS Envelope. For streaming encryption these methods are converted into: AES-GCM-HKDF-STREAMING, and AES-CTR-HMAC-STREAMING .
This AeadKeyTemplates object has the following properties:
Here is an example of creating a stream cipher from AES:Which Encryption Process Encrypts on Either Side?Making stream ciphers from AES: CFB Modemedium.com
Google is changing the world of encryption for the better, and forcing developers to use a good standard (AEAD), and where there is embedded authentication of the cryptography used.
Here is an example of using MAC tags with Tink:Proving Messages and That Bob Is Still Sending Them: MAC With Google TinkGoogle Tink is an open source repository for the integration of cryptography methods. It uses best practice in order to…medium.com
and for digital signing:Proving Bob is “Bob”: Using Digital Signatures With Google TinkGoogle Tink is an open source repository for the integration of cryptography methods. It uses best practice in order to…medium.com
WRITTEN BY
Follow

Recently, I worked on a task of adding a time zone feature to the TOAST UI Calendar, the JavaScript calendar library managed by my team. I pretty well knew that the time zone support in JavaScript is quite poor, but hoped that abstracting existing data objects would easily resolve many problems.
However, my hope was false, and I found it really hard to handle time zone in JavaScript as I progressed more. Implementing time zone features beyond simple formatting of time and calculating time data with complex operations (e.g. calendar) was a truly daunting task. For this reason, I had a valuable and thrilling experience of solving a problem leading to cause more problems.
The purpose of this article is to discuss the issues and solutions related to the implementation of time zone features using JavaScript. As I was writing this rather lengthy article, I suddenly realized that the root of my problem lied in my poor understanding of the time zone domain. In this light, I will first discuss the definition and standards related to time zone in detail, and then talk about JavaScript.
A time zone is a region that follows a uniform local time which is legally stated by the country. It’s common for many countries to have its unique time zone, and some large countries, such as the USA or Canada, even have multiple time zones. Interestingly, even though China is large enough to have multi time zones, she uses only one time zone. This sometimes results in such an awkward situation where the sun rises around 10:00 AM in the western part of China
The Korean local time is normally GMT +09:00. GMT is an abbreviation for Greenwich Mean Time, which is the clock time at the Royal Observatory in Greenwich, U.K. located at longitude 0. The GMT system began spreading in Feb. 5, 1925 and became the world time standard until Jan. 1, 1972.
Many consider GMT and UTC the same thing, and the two are used interchangeably in many cases, but they are actually different. UTC was established in 1972 to compensate for the slowing problem of the Earth’s rotation. This time system is based on International Atomic Time, which uses the cesium atomic frequency to set the time standard. In other words, UTC is the more accurate replacement system of GMT. Although the actual time difference between the two is tiny, UTC is whatsoever the more accurate choice for software developers.
When the system was still in development, anglophones wanted to name the system CUT (Coordinated Universal Time) and francophones wanted to name it TUC (Temps Universal Coordonn). However, none of the either side won the fight, so they came to an agreement of using UTC instead, as it contained all the essential letters (C, T, and U).
+09:00 in UTC+09:00 means the local time is 9 hours ahead than the UTC standard time. This means that it’s 09:00 PM in Korea when it’s 12:00 PM in a UTC region. The difference of time between UTC standard time and the local time is called “offset”, which is expressed in this way: +09:00, -03:00, etc.
It’s common that countries name their time zone using their own unique names. For example, the time zone of Korea is called KST (Korea Standard Time), and has a certain offset value which is expressed as KST = UTC+09:00. However, the +09:00 offset is also used by not only Korea but also Japan, Indonesia, and many others, which means the relation between offsets and time zone names are not 1:1 but 1:N. The list of countries in the +09:00 offset can be found in UTC+09:00.
Some offsets are not strictly on hourly basis. For example, North Korea uses +08:30 as their standard time while Australia uses +08:45 or +09:30 depending on the region.
The entire list of UTC offsets and their names can be found in List of UTC Time offsets.
As I mentioned earlier, we use the names of time zones (KST, JST) interchangeably with offset without distinguishing them. But it’s not right to treat the time and offset of a certain region the same for the following reasons:
Although this term might be unfamiliar to some countries, a lot of countries in the world adopted summer time. “Summer time” is a term mostly used in the U.K. and other European countries. Internationally, it is normally called Daylight Saving Time (DST). It means advancing clocks to one hour ahead of standard time during summer time.
For example, California in the USA uses PST (Pacific Standard Time) during winter time and use PDT (Pacific Daylight Time, UTC-07:00) during summer time. The regions that uses the two time zones are collectively called Pacific Time (PT), and this name is adopted by many regions of the USA and Canada.
Then the next question is exactly when the summer begins and ends. In fact, the start and end dates of DST are all different, varying country by country. For example, in the U.S.A and Canada, DST used to be from the first Sunday of April at 02:00 AM to the last Sunday of October at 12:00 AM until 2006, but since 2007, DST has begun on the second Sunday of March at 02:00 AM till the first Sunday of November at 02:00 AM. In Europe, summer time is uniformly applied across the countries, while DST is applied progressively to each time zone in the states.
As I briefly mentioned earlier, each country has its own right to determine which time zone to use, which means its time zone can be changed due to any political and/or economic reasons. For example, in the states, the period of DST was changed in 2007 because President George Bush signed the energy policy in 2005. Egypt and Russia used to use DST, but they ceased to use it since 2011.
In some cases, a country can change not only its DST but also its standard time. For example, Samoa used to use the UTC-10:00 offset, but later changed to the UTC+14:00 offset to reduce the losses in trading caused by the time difference between Samoa and Australia & New Zealand. This decision caused the country to miss the whole day of Dec. 30, 2011 and it made to newspapers all over the world.
Netherlands used to use +0:19:32.13 offset, which is unnecessarily accurate since 1909, but changed it to +00:20 offset in 1937, and then changed again to +01:00 offset in 1940, sticking to it so far.
To summarize, a time zone can have one or more offsets. Which offset a country will use as its standard time at a certain moment can vary due to political and/or economic reasons.
This is not a big issue in everyday life, but it is when trying to systematize it based on rules. Let’s imagine that you want to set a standard time for your smartphone using an offset. If you live in a DST-applied region, your smartphone time should be adjusted whenever DST starts and ends. In this case, you would need a concept that brings standard time and DST together into one time zone (e.g. Pacific Time).
But this cannot be implemented with just a couple of simple rules. For example, as the states changed the dates DST starts and ends in 2007, May 31, 2006 should use PDT (-07:00) as the standard time while Mar 31, 2007 should use PST (-08:00) as the standard time. This means that to refer to a specific time zone, you must know all historical data of the standard time zones or the point in time when DST rules were changed.
You can’t simply say, “New York’s time zone is PST (-08:00).” You must be more specific by saying, for instance, “New York’s current time zone is PST.” However, we need a more accurate expression for the sake of the system implementation. Forget the word “time zone”. You need to say, “New York is currently using PST as its standard time”.
Then what should we use other than offset to designate the time zone of a specific region? The answer is the name of the region. To be more specific, you should group regions where the changes in DST or standard time zone has been uniformly applied into one time zone and refer to it as appropriate. You might be able to use names like PT (Pacific Time), but such term only combines the current standard time and its DST, not necessarily all the historical changes. Furthermore, since PT is currently used only in the USA and Canada, you need more well established standards from trusted organizations in order to use software universally.
To tell you the truth, time zones are more of a database rather than a collection of rules because they must contain all relevant historical changes. There are several standard database designed to handle the time zone issues, and the most frequently used one is IANA Time Zone Database. Usually called tz database (or tzdata), IANA Timezone Database contains the historical data of local standard time around the globe and DST changes. This database is organized to contain all historical data currently verifiable to ensure the accuracy of time since the Unix time (1970.01/01 00:00:00). Although it also has data before 1970, the accuracy is not guaranteed.
The naming convention follows the Area/Location rule. Area usually refers to the name of a continent or an ocean (Asia, America, Pacific) while Location the name of major cities such as Seoul and New York rather than the name of countries (This is because the lifespan of a country is far shorter than that of a city). For example, the time zone of Korea is Asia/Seoul and that of Japan is Asia/Tokyo. Although the two countries share the same UTC+09:00, both countries have different histories regarding time zone. That is why the two countries are handled using separate time zones.
IANA Time Zone Database is managed by numerous communities of developers and historians. Newly found historical facts and governmental policies are updated right away to the database, making it the most reliable source. Furthermore, many UNIX-based OSs, including Linux and macOS, and popular programming languages, including Java and PHP, internally use this database.
Note that Windows is not in the above support list. It’s because Windows uses its own database called Microsoft Time Zone Database. However, this database does not accurately reflect historical changes and managed only by Microsoft. Therefore, it is less accurate and reliable than IANA.
As I briefly mentioned earlier, the time zone feature of JavaScript is quite poor. Since it follows the time zone of the region by default (to be more specific, the time zone selected at the time of the OS installation), there is no way to change it to a new time zone. Also, its specifications for database standard are not even clear, which you will notice if you take a close look at the specification for ES2015. Only a couple of vague declarations are stated regarding local time zone and DST availability. For instance, DST is defined as follows: ECMAScript 2015 — Daylight Saving Time Adjustment
An implementation dependent algorithm using best available information on time zones to determine the local daylight saving time adjustment DaylightSavingTA(t), measured in milliseconds. An implementation of ECMAScript is expected to make its best effort to determine the local daylight saving time adjustment.
It looks like it is simply saying, “Hey, guys, give it a try and do your best to make it work.” This leaves a compatibility problem across browser vendors as well. You might think “That’s sloppy!”, but then you will notice another line right below:
NOTE : It is recommended that implementations use the time zone information of the IANA Time Zone Database http://www.iana.org/time-zones/.
Yes. The ECMA specifications toss the ball to you with this simple recommendation for IANA Time Zone Database, and JavaScript has no specific standard database prepared for you. As a result, different browsers use their own time zone operations for time zone calculation, and they are often not compatible with one another. ECMA specifications later added an option to use IANA time zone in ECMA-402 Intl.DateTimeFormat for international API. However, this option is still far less reliable than that for other programming languages.
We will assume a simple scenario in which time zone must be considered. Let’s say we’re going to develop a simple calendar app that will handle time information. When a user enters date and time in the field on the register page in the client environment, the data is transferred to the server and stored in the DB. Then the client receives the registered schedule data from the server to displays it on screen.
There is something to consider here though. What if some of the clients accessing the server are in different time zones? A schedule registered for Mar 11, 2017 11:30 AM in Seoul must be displayed as Mar 10, 2017 09:30 PM when the schedule is looked up in New York. For the server to support clients from various time zones, the schedule stored in the server must have absolute values that are not affected by time zones. Each server has a different way to store absolute values, and that is out of the scope of this article since it is all different depending on the server or database environment. However for this to work, the date and time transferred from the client to the server must be values based on the same offset (usually UTC) or values that also include the time zone data of the client environment.
It’s a common practice that this kind of data is transferred in the form of Unix time based on UTC or ISO-8601 containing the offset information. In the example above, if 11:30 AM on Mar 11, 2017 in Seoul is to be converted into Unix time, it will be an integer type of which value is 1489199400. Under ISO-8601, it will be a string type of which value is 2017–03–11T11:30:00+09:00.
If you’re working with this using JavaScript in a browser environment, you must convert the entered value as described above and then convert it back to fit the user’s time zone. The both of these two tasks have to be considered. In the sense of programming language, the former is called “parsing” and the latter “formatting”. Now let’s find out how these are handled in JavaScript.
Even when you’re working with JavaScript in a server environment using Node.js, you might have to parse the data retrieved from the client depending on the case. However since servers normally have their time zone synced to the database and the task of formatting is usually left to clients, you have fewer factors to consider than in a browser environment. In this article, my explanation will be based on the browser environment.
In JavaScript, tasks involving date or time are handled using a Date object. It is a native object defined in ECMAScript, like Array or Function. which is mostly implemented in native code such as C++. Its API is well described in MDN Documents. It is greatly influenced by Java’s java.util.Date class. As a result, it inherits some undesirable traits, such as the characteristics of mutable data and month beginning with 0.
JavaScript’s Date object internally manages time data using absolute values, such as Unix time. However, constructors and methods such as parse() function, getHour(), setHour(), etc. are affected by the client’s local time zone (the time zone of the OS running the browser, to be exact). Therefore, if you create a Date object directly using user input data, the data will directly reflect the client’s local time zone.
As I mentioned earlier, JavaScript does not provide any arbitrary way to change time zone. Therefore, I will assume a situation here where the time zone setting of the browser can be directly used.
Let’s go back to the first example. Assume that a user entered 11:30 AM, Mar 11, 2017 in a device which follows the time zone of Seoul. This data is stored in 5 integers of 2017, 2, 11, 11, and 30 — each representing the year, month, day, hour, and minute, respectively. (Since the month begins with 0, the value must be 3–1=2.) With a constructor, you can easily create a Date object using the numeric values.
const d1 = new Date(2017, 2, 11, 11, 30);
d1.toString(); // Sat Mar 11 2017 11:30:00 GMT+0900 (KST)
If you look at the value returned by d1.toString(), then you will know that the created object’s absolute value is 11:30 AM, Mar 11, 2017 based on the offset +09:00 (KST).
You can also use the constructor together with string data. If you use a string value to the Date object, it internally calls Date.parse() and calculate the proper value. This function supports the RFC2888 specifications and the ISO-8601 specifications. However, as described in the MDN’s Date.parse() Document, the return value of this method varies from browser to browser, and the format of the string type can affect the prediction of exact value. Thus, it is recommended not to use this method.
For example, a string like 2015–10–12 12:00:00 returns NaN on Safari and Internet Explorer while the same string returns the local time zone on Chrome and Firefox. In some cases, it returns the value based on the UTC standard.
Let’s now assume that you are going to receive data from the server. If the data is of the numerical Unix time value, you can simply use the constructor to create a Date object. Although I skipped the explanation earlier, when a Date constructor receives a single value as the only parameter, it is recognized as a Unix time value in millisecond. (Caution: JavaScript handles Unix time in milliseconds. This means that the second value must be multiplied by 1,000.) If you see the example below, the resultant value is the same as that of the previous example.
const d1 = new Date(1489199400000);
d1.toString(); // Sat Mar 11 2017 11:30:00 GMT+0900 (KST)
Then what if a string type such as ISO-8601 is used instead of the Unix time? As I explained in the previous paragraph, the Date.parse() method is unreliable and better not be used. However since ECMAScript 5 or later versions specify the support of ISO-8601, you can use strings in the format specified by ISO-8601 for the Date constructor on Internet Explorer 9.0 or higher that supports ECMAScript 5 if carefully used.
If you’re using a browser of not the latest version, make sure to keep the Z letter at the end. Without it, your old browser sometimes interprets it based on your local time instead of UTC. Below is an example of running it on Internet Explorer 10.
const d1 = new Date('2017-03-11T11:30:00');
const d2 = new Date('2017-03-11T11:30:00Z');
d1.toString(); // "Sat Mar 11 11:30:00 UTC+0900 2017"
d2.toString(); // "Sat Mar 11 20:30:00 UTC+0900 2017"
According to the specifications, the resultant values of both cases should be the same. However, as you can see, the resultant values are different as d1.toString() and d2.toString(). On the latest browser, these two values will be the same. To prevent this kind of version problem, you should always add Z at the end of a string if there is no time zone data.
Now use the Date object created earlier, and you can freely add or subtract time based on local time zones. But don’t forget to convert your data back to the previous format at the end of the processing before transferring it back to the server.
If it’s Unix time, you can simply use the getTime() method to perform this. (Note the use of millisecond.)
const d1 = new Date(2017, 2, 11, 11, 30);
d1.getTime(); // 1489199400000
What about strings of the ISO-8601 format? As explained earlier, Internet Explorer 9.0 or higher that supports ECMAScript 5 or higher supports the ISO-8601 format. You can create strings of the ISO-8601 format using the toISOString() or toJSON() method. (toJSON() can be used for recursive calls with JSON.stringify() or others.) The two methods yield the same results, except for the case in which it handles invalid data.
const d1 = new Date(2017, 2, 11, 11, 30);
d1.toISOString(); // "2017-03-11T02:30:00.000Z"
d1.toJSON();      // "2017-03-11T02:30:00.000Z"

const d2 = new Date('Hello');
d2.toISOString(); // Error: Invalid Date
d2.toJSON();      // null
You can also use the toGMTString() or toUTCString() method to create strings in UTC. As they return a string that satisfies the RFC-1123 standard, you can leverage this as needed.
Date objects include toString(), toLocaleString(), and their extension methods. However, since these are mainly used to return a string based on local time zone, and they return varying values depending on your browser and OS used, they are not really useful.
You can see now that JavaScript provides a bit of support for time zone. What if you want to change the local time zone setting within your application without following the time zone setting of your OS? Or what if you need to display a variety of time zones at the same time in a single application? Like I said several times, JavaScript does not allow manual change of local time zone. The only solution to this is adding or removing the value of the offset from the date provided that you already know the value of the time zone’s offset. Don’t get frustrated yet though. Let’s see if there is any solution to circumvent this.
Let’s continue with the earlier example, assuming that the browser’s time zone is set to Seoul. The user enters 11:30 AM, Mar 11, 2017 based on the Seoul time and wants to see it in New York’s local time. The server transfers the Unix time data in milliseconds and notifies that New York’s offset value is -05:00. Then you can convert the data if you only know the offset of the local time zone.
In this scenario, you can use the getTimeZoneOffset() method. This method is the only API in JavaScript that can be used to get the local time zone information. It returns the offset value of the current time zone in minutes.
const seoul = new Date(1489199400000);
seoul.getTimeZoneOffset(); // -540
The return value of -540 means that the time zone is 540 minutes ahead of the target. Be warned that the minus sign in front of the value is opposite to Seoul’s plus sign (+09:00). I don’t know why, but this is how it is displayed. If we calculate the offset of New York using this method, we will get 60 * 5 = 300. Convert the difference of 840 into milliseconds and create a new Date object. Then you can use that object’s getXX methods to convert the value into a format of your choice. Let’s create a simple formatter function to compare the results.
function formatDate(date) {
  return date.getFullYear() + '/' +
    (date.getMonth() + 1) + '/' +
    date.getDate() + ' ' +
    date.getHours() + ':' +
    date.getMinutes();
}

const seoul = new Date(1489199400000);
const ny = new Date(1489199400000 - (840 * 60 * 1000));

formatDate(seoul);  // 2017/3/11 11:30
formatDate(ny);     // 2017/3/10 21:30
formatDate() shows the correct date and time according to the time zone difference between Seoul and New York. It looks like we found a simple solution. Then can we convert it to the local time zone if we know the region’s offset? Unfortunately, the answer is “No.” Remember what I said earlier? That time zone data is a kind of database containing the history of all offset changes? To get the correct time zone value, you must know the value of the offset at the time of the date (not of the current date).
If you keep working with the example above a little more, you will soon face with a problem. The user wants to check the time in New York local time and then change the date from 10th to 15th. If you use the setDate() method of Date object, you can change the date while leaving other values unchanged.
ny.setDate(15);
formatDate(ny);   // 2017/3/15 21:30
It looks simple enough, but there is a hidden trap here. What would you do if you have to transfer this data back to the server? Since the data has been changed, you can’t use methods such as getTime() or getISOString(). Therefore, you must revert the conversion before sending it back to the server.
const time = ny.getTime() + (840 * 60 * 1000); // 1489631400000
Some of you may wonder why I added using the converted data when I have to convert it back anyway before returning. It looks like I can just process it without conversion and temporarily create a converted Date object only when I’m formatting. However, it is not what it seems. If you change the date of a
Dateobject based on Seoul time from 11th to 15th, 4 days are added (24 * 4 * 60 * 60 * 1000). However, in New York local time, as the date has been changed from 10th to 15th, resultantly 5 days have been added (24* 5 * 60 * 60 * 1000). This means that you must calculate dates based on the local offset to get the precise result.
The problem doesn’t stop here. There is another problem waiting where you won’t get wanted value by simply adding or subtracting offsets. Since Mar 12 is the starting date of DST in New York’s local time, the offset of Mar 15, 2017 should be -04:00 not -05:00. So when you revert the conversion, you should add 780 minutes, which is 60 minutes less than before.
const time = ny.getTime() + (780 * 60 * 1000); // 1489627800000
On the contrary, if the user’s local time zone is New York and wants to know the time in Seoul, DST is applied unnecessarily, causing another problem.
Simply put, you can’t use the obtained offset alone to perform the precise operations based on the time zone of your choice. If you recollect what we have discussed in the earlier part of this document, you would easily know that there is still a hole in this conversion if you know the summer time rules. To get the exact value, you need a database that contains the entire history of offset changes, such as IANA timezone Database.
To solve this problem, one must store the entire time zone database and whenever date or time data is retrieved from the Date object, find the date and the corresponding offset, and then convert the value using the process above. In theory, this is possible. But in reality, this takes too much effort and testing the converted data’s integrity will also be tough. But don’t get disappointed yet. Until now, we discussed some problems of JavaScript and how to solve them. Now we’re ready to use a well built library.
Moment is a well established JavaScript library that is almost the standard for processing date. Providing a variety of date and formatting APIs, it is recognized by so many users recently as stable and reliable. And there is Moment Timezone, an extension module, that solves all the problems discussed above. This extension module contains the data of IANA Time Zone Database to accurately calculate offsets, and provides a variety of APIs that can be used to change and format time zone.
In this article, I won’t discuss how to use library or the structure of library in details. I will just show you how simple it is to solve the problems I’ve discussed earlier. If anyone is interested, see Moment Timezone’s Document.
Let’s solve the problem shown in the picture by using Moment Timezone.
const seoul = moment(1489199400000).tz('Asia/Seoul');
const ny = moment(1489199400000).tz('America/New_York');

seoul.format(); // 2017-03-11T11:30:00+09:00
ny.format();    // 2017-03-10T21:30:00-05:00

seoul.date(15).format();  // 2017-03-15T11:30:00+09:00
ny.date(15).format();     // 2017-03-15T21:30:00-04:00
If you see the result, the offset of seoul stays the same while the offset of ny has been changed from -05:00 to -04:00. And if you use the format() function, you can get a string in the ISO-8601 format that accurately applied the offset. You will see how simple it is compared to what I explained earlier.
So far, we’ve discussed the time zone APIs supported by JavaScript and their issues. If you don’t need to manually change your local time zone, you can implement the necessary features even with basic APIs provided that you’re using Internet Explorer 9 or higher. However, if you need to manually change the local time zone, things get very complicated. In a region where there is no summer time and time zone policy hardly changes, you can partially implement it using getTimezoneOffset() to convert the data. But if you want full time zone support, do not implement it from scratch. Rather use a library like Moment Timezone.
I tried to implement time zone myself, but I failed, which is not so surprising. The conclusion here after multiple failures is that it is better to “use a library.” When I first began writing this article, I didn’t know what conclusion I was going to write about, but here we go. As a conclusion, I would say that it’s not a recommended approach to blindly use external libraries without knowing what features they support in JavaScript and what kind of issues they have. As always, it’s important to choose the right tool for your own situation. I hope this article helped you in determining the right decision of your own.
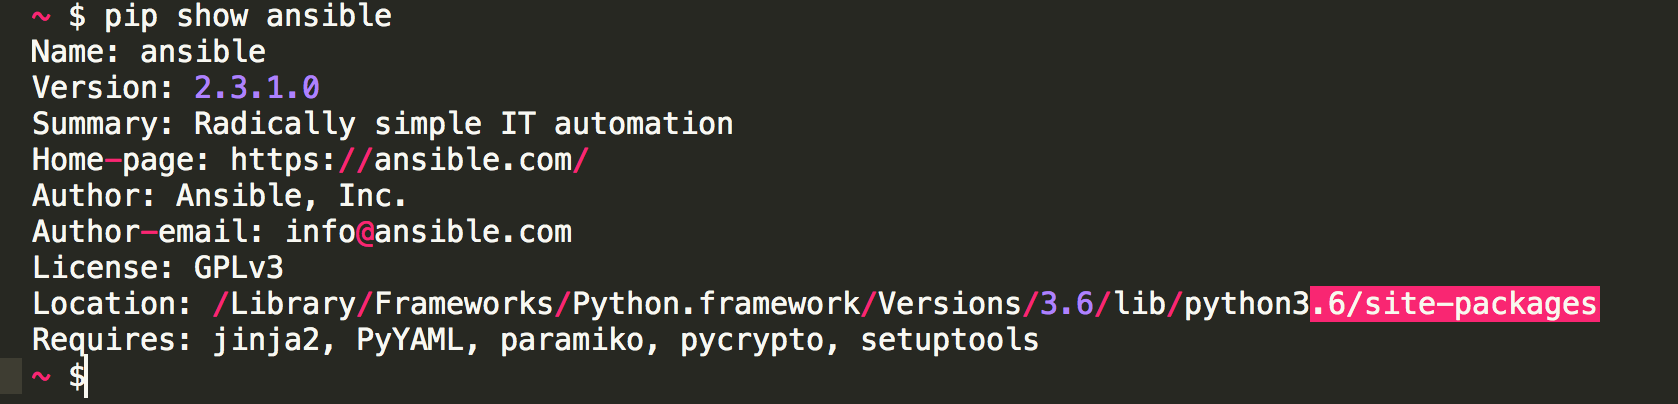
I have been cooking this blog topic idea for a long time. I did a lot of searching, reading and trying while working on different projects. But even today after publishing it I don’t think I’m 100% satisfied with the provided solution how to manage python project dependencies efficiently.
Software released in bundled packages this way it’s easier to manage installed programs.
The package manager is a collection of libraries that are packaged together, which makes it easier to download entire package rather than each library.
Almost every library in the package has a dependency managed by the dependency manager.
Dependency management helps manage all the libraries required to make an application work. It’s incredibly beneficial when you’re dealing with complex projects and in a multi-environment. Dependency management also helps to keep track, update libraries faster and easier, as well as solve the problem then one package will depend on another package.
Every programming language has its flavor of dependency manager.
To summarize all above :
Today the most used Python package manager is pip, used to install and manage python software packages, found in the Python Package Index. Pip helps us, python developers, effortlessly “manually” control installation and lifecycle of publicly available Python packages from their online repositories.
Pip also can upgrade, show, uninstall project dependencies, etc.
To install the package, you can just run pip install <somepackage> that will build an extra Python library in your home directory.
Running pip freeze,can help to check installed packages and packages versions listed in case-insensitive sorted order.
After building your application, you will need to perform some set of actions(steps) to make application dependencies available in the different environments.
Actions will be similar to the one below:
$ python3 -m venv /path/to/new/virtual/env$pip install <package> command$pip freeze > requirements.txt. Keep in mind that in this case, requirements.txt file will list all packages that have been installed in virtual environment, regardless of where they came fromWhen if you’re going to share the project with the rest of the world you will need to install dependencies by running $pip install -r requirements.txt
To find more information about individual packages from the requiements.txt you can use $pip show <packagename>. But how informative the output is?
Personally, I think above setup is not easy to maintain, for the variety of reasons:
requirements.txt the result executing a fresh $ pip install -r requirements.txt will result in different packages being installed every time then new, different versions of sub-dependencies will be released.Pip doesn’t have dependency resolution.pip freeze command. )There are many examples of projects with multiple requirements.txt files. Developers having different versions of requirements.txt file for example for different environments (e.g., test or local ) or files for different users (e.g., machines vs. people).
Multiple requirements.txt is a good solution for managing project dependencies? I disagree…managing manually various requirements.txt files not a good solution, and it will be not easy if they grow more than even ~50lines.
I recently tried pipreqsutility, which generates requirements.txt file based on project imports. It’s simple to use.
To generate a requirements.txt file you can run pipreqs /your_project/path

I thought of combining it with pipdeptree another cool and “handy” command line utility which will help to display the installed python packages in the form of a dependency tree.
After executing pipdeptree command in your terminal window in the virtualenv directory of the project, all the installed python packages of a dependency tree will be displayed:
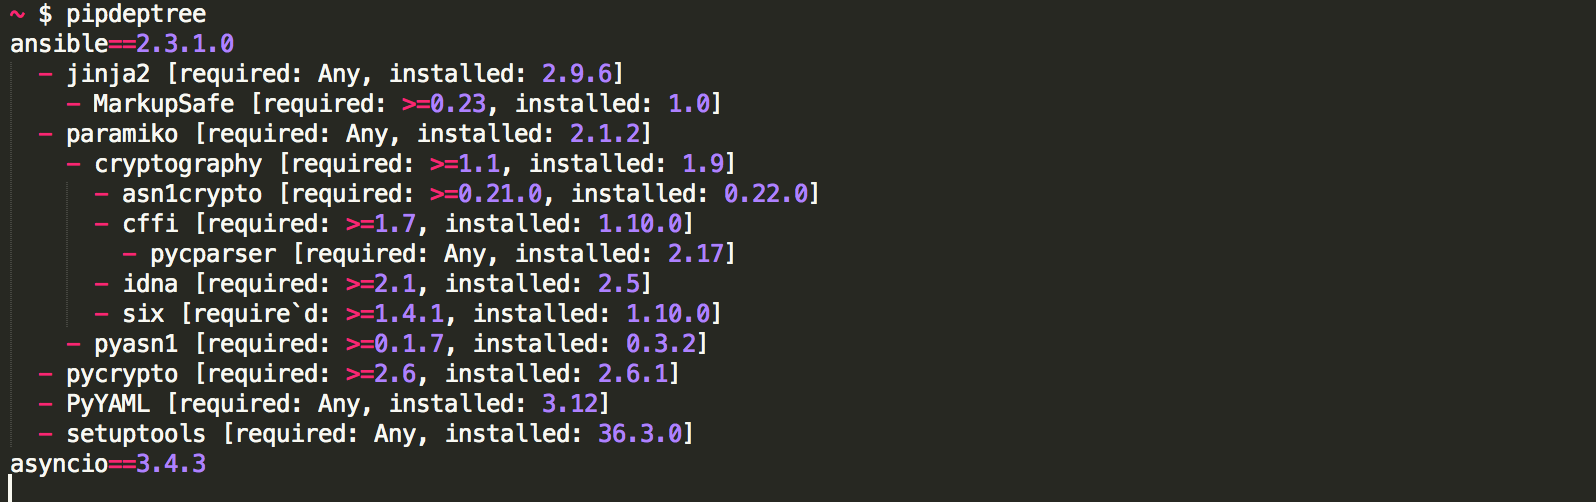
pipdeptree commandCool bonus thatpipdeptree will warns you when you have multiple dependencies where versions don’t exactly match.
I found it’s handy in some cases, like:
clean commandpipdeptree to verify project dependenciesThere are some downsides too,Pipreq will not include the plugins required for specific projects, and you will end up adding plugins information manually in a requirement.txt. It’s not yet a very mature utility.
Option 3: have you tried pip-compile?
pip-compilemodule provides two commands: pip-compile and pip-sync.
pip-compile command will generate requirements.inor requirements.txt of top-level summary of the packages and all (underlying dependencies) pinned. And you can store .in and .txt files in version control.How useful, right?
This means that we can get the same versions whenever we run pip install, no matter what the new version is.
-generate-hashes flag helps to generate-hashes. In this case pip-compile consults the PyPI index for each top level package required, looking up the package versions available.
To update all packages, periodically re-run pip-compile --upgrade.
To update a specific package to the latest or a particular version use the --upgrade-package or -P flag.
pip-sync command used to update your virtual environment to reflect exactly what’s in there. Command will install/upgrade/uninstall everything necessary to match the requirements.txt contents.
To know what dependencies your project hasT is very useful to find out after the fact what packages were installed and what dependencies your project has.
Organizations usually assume most risks come from public-facing web applications. That has changed. With dozens of small components in every application, threats can come from anywhere in the codebase.
Currently using pip freeze will only show the final package list of dependencies.
I would recommend using pipdeptreemodule which helps to find possible dependency conflicts and displaying an actual dependency in the project.
pipdeptree --reverse leaf package installed first
Another good advice is start building applications using Docker. Every tool we run in Docker is one less tool we have to install locally, so get up-and-running phase will be much faster. But that is a different topic.
Happy Packaging .
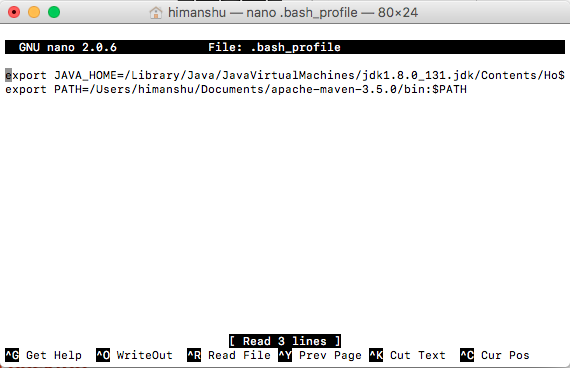
An environment variable in a named object containing data which can be used by multiple applications or processes. Basically, it is just a variable with a name and an associated value. It can be used to determine anything like location of executable files, libraries, current working directory, default shell, or local system settings.
For those new to mac can get overwhelmed with how to set up and manage these environment variables. This guide provides easy ways to do so.
Displaying current Environment Variables
This is very easy. Just open the Terminal and run the command printenv as shown below.
HIMANSHUs-MacBook-Pro:~ himanshu$ printenvJAVA_HOME=/Library/Java/JavaVirtualMachines/jdk1.8.0_131.jdk/Contents/Home
TERM_PROGRAM=Apple_Terminal
SHELL=/bin/bash
...
This will list all the environment variables currently set.
However, for displaying the value of any specific environment variable run the echo $[variable name] on the terminal, as shown below.
HIMANSHUs-MacBook-Pro:~ himanshu$ echo $JAVA_HOME/Library/Java/JavaVirtualMachines/jdk1.8.0_131.jdk/Contents/Home
Setting temporary environment variable using terminal
If the environment variable you wish to set is to be used once or twice, you would like to set a temporary variable for it, avoiding unwanted variables staying in the system. You can do this simply by opening the terminal and running export command followed by the variable name and its value.
HIMANSHUs-MacBook-Pro:~ himanshu$ export JAVA_HOME=/Library/Java/JavaVirtualMachines/jdk1.8.0_131.jdk/Contents/Home
The above example sets the variable $JAVA_HOME to the specified value. However, if your requirement is to append a value to an existing environment variable, then assign the value as
export [existing_variable_name]=[new_value]:$[existing_variable_name]
the ‘:’ here append the value to the existing value. See example below.
HIMANSHUs-MacBook-Pro:~ himanshu$ export PATH=/Users/himanshu/Documents/apache-maven-3.5.0/bin:$PATH
Setting permanent environment variable using terminal
Since Mac uses bash shell, so the environment variables can be added to the .bash_profile directory, for the current user. The path to this file can be found using the command
HIMANSHUs-MacBook-Pro:~ himanshu$ ~/.bash_profile
Get started by opening this file using a text editor. I’m using nano — a terminal based text editor, you may use any text editor you like — to open the file and edit it.
HIMANSHUs-MacBook-Pro:~ himanshu$ nano .bash_profile
This will open the .bash_profile file in the terminal.
Note: If there is no file named .bash_profile, then this above nano command will create a new file named .bash_profile .
Now move to the end of the file, go to the next line. Now add the desired environment variables using export command as we did before.
Press ctrl+X to exit the editor. Press ‘Y’ for saving the buffer, and you will return back to the terminal screen.
We are done now!
You may again run echo $[variable_name] to see the value of your just saved environment variable.
UPDATE: Don’t forget to close and reopen the terminal before using your newly set environment variable. Reopening the terminal loads the updated .bash_profile file.